


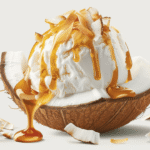
Homemade Vanilla Ice Cream
4
servings30
minutes40
minutes300
kcal1
hour10
minutesCreamy homemade vanilla ice cream using simple everyday ingredients.
Keep the screen of your device on
Ingredients
4 cups 4 heavy cream
4 cups 4 whole milk
2 cups 2 granulated sugar
2 tablespoons 2 vanilla extract
0.25 teaspoon 0.25 salt
Directions
- Combine heavy cream, whole milk, and granulated sugar in a large mixing bowl and whisk until the sugar is completely dissolved.
- Add vanilla extract and salt to the mixture and whisk again to make sure everything is well incorporated.
- Cover the bowl with plastic wrap and refrigerate for at least 2 hours, or until the mixture is thoroughly chilled.
- Pour the chilled mixture into an ice cream maker and churn according to the manufacturer's instructions for about 30 minutes.
- Transfer the churned ice cream to an airtight container and freeze for at least 2 hours for a firmer texture before serving.
- Serve the ice cream in bowls or cones and enjoy immediately, or store in the freezer for up to two weeks.
Nutrition Facts
- Total number of serves: 16
- Calories: 300kcal
- Cholesterol: 85mg
- Sodium: 60mg
- Potassium: 130mg
- Sugar: 25g
- Protein: 3g
- Calcium: 100mg
- Iron: 0mg
- Thiamin: 0mg
- Riboflavin: 0.2mg
- Niacin: 0.1mg
- Folate: 5mg
- Biotin: 0mg
- Phosphorus: 90mg
- Iodine: 18mg
- Magnesium: 10mg
- Zinc: 0.4mg
- Selenium: 1.4mg
- Copper: 0.04mg
- Manganese: 0.01mg
- Chromium: 0mg
- Molybdenum: 0mg
- Chloride: 76mg
Did you make this recipe?
Tag @https://www.instagram.com/ice_cream_haven/ on Instagram and hashtag it with #IceCreamIceCreamHavens
Like this recipe?
Follow @https://www.pinterest.com/Ice_Cream_Haven/ on Pinterest
Join our Facebook Group!
Follow https://www.facebook.com/icecreamhavens/ on Facebook
Why Homemade Vanilla Ice Cream Is the Ultimate Summer Treat
Fresh dairy and pure vanilla create a clean, rich flavor that’s hard to match with store pints. Whole milk and heavy cream bring higher fat, which keeps the mix silky and reduces icy crystals.
A warmed-and-chilled base often churns faster and sets up thicker. Expect roughly 20–30 minutes with freezer-bowl machines and 20–40 minutes with rock-salt churners. After churning, a two-hour freeze gives the classic scoopable texture for cones and sundaes.
The five-ingredient base is delightfully simple. Controlling sweetness and vanilla strength at home lets you tailor every batch. Skip eggs to keep prep easy—proper chilling still yields a lush, creamy result.
- Versatile foundation: sundaes, floats, pie à la mode, and sandwiches.
- Make-ahead advantage: churn large batches before a busy day and serve chilled when guests arrive.
- Easy upgrades: use vanilla bean paste for speckles and deeper aroma.
Beginners can follow a clear, stepwise method and enjoy an impressive, crowd-pleasing result at home. For a full walk-through tuned to larger batches, see our homemade ice cream guide.
Equipment You’ll Need for a 4-Quart Ice Cream Maker
Choose gear that fits your kitchen and how often you plan to churn. The right setup makes the process predictable and keeps texture smooth. Below is a quick comparison and a list of helpful tools for a successful batch at home.
Rock-salt churners vs. freezer-bowl machines
Rock-salt bucket churners use a metal canister surrounded by layers of ice and salt to freeze the mix as it turns. Expect to load roughly eight pounds of ice and about three cups of salt around the canister. These units typically churn for about 20-40 minutes.
Freezer-bowl machines require an insulated bowl frozen at least 12 hours ahead. Once the bowl is fully chilled, most models take about 20-30 minutes of churn time for a well-chilled base.
Helpful tools and parts
- Core parts: canister (holds the base), dasher (stirs and aerates), and motor (turns the dasher).
- Prep gear: large mixing bowl and whisk to dissolve sugar and avoid grit before freezing.
- Finish tools: a long-handled spatula for folding in mix-ins and freezer-safe tubs or a 9×5 loaf pan for storage.
Plan your time on the day you churn. Freezer-bowl makers demand advance freezing, while rock-salt units need fresh ice and salt at hand. Both approaches work well; pick the style that suits your space and how many batches you make in a season.
Simple Ingredients for Creamy, Homemade 4 qt Ice Cream Recipe

Gathering the right dairy and sweetener sets the stage for silky texture. Use fresh, high-quality items and measure carefully to avoid graininess in the final product.
The five core ingredients are whole milk, heavy cream, sugar, vanilla extract, and a pinch of salt. Each plays a clear role: milk and cream provide fat and body, sugar adds sweetness and helps control the freeze point, extract delivers flavor, and salt sharpens taste.
The quick 4-quart shopping list
- 3 cups granulated sugar
- 3 cups whole milk
- 6 cups heavy whipping cream
- 1 tablespoon vanilla extract
Optional: about 2 tablespoons lemon juice brightens the base without a lemony note.
Ice and rock salt setup
For bucket churners, plan roughly 8 lbs of ice and 3 cups rock salt to keep steady chilling. The salt lowers the bath’s freezing point so the mixture freezes evenly during churn.
“Measure with standard cups and stir until sugar dissolves to avoid grit.”
Tip: Use pure vanilla extract or vanilla bean paste for deeper aroma. Chill the mixture thoroughly before churning for best texture and faster processing.
4 qt Ice Cream Recipe Step-by-Step: From Ice Cream Mixture to Perfect Scoop

Start by setting up your machine so the chill work is handled before you pour in the base. This saves time and keeps the final texture smooth. Decide whether you’ll use a freezer bowl or a traditional bucket with ice and salt.
Prep and Chill
For freezer-bowl models, freeze the bowl at least 12 hours ahead. For rock-salt churners, layer about 2 inches of ice and add roughly 1/2 cup rock salt around the canister. Top up ice as it melts to keep a steady cold bath.
Make the Base
You can gently warm cream, milk, sugar, vanilla, and salt until the sugar dissolves, then chill the mixture for 2+ hours. Or whisk cold ingredients until the sugar dissolves if you prefer not to heat dairy.
Churn Time and Texture
Pour the chilled mixture into the canister, insert the dasher, and lock the lid per the manufacturer’s directions. Churn about 20–40 minutes. It’s ready when the motor slows, the mix pulls from the sides, and it resembles soft-serve.
Finish and Firm
Transfer the fresh churn to cold containers and rest in the freezer for 1–2 hours for scoopable texture. Plan backward from serving so the churn and short set fit your day.
Avoid over-churning — once thickened, move the batch quickly to containers to protect the texture.
4 qt Ice Cream Recipe

This concise shopping-and-timing guide helps you move from pantry to scoopable dessert with minimal fuss.
Quick Glance: Ingredients, Minutes, Yield, and Nutrition Notes
At-a-glance ingredients and measure
- 3 cups granulated sugar
- 3 cups whole milk
- 6 cups heavy cream
- 1 tablespoon vanilla extract
- Optional: 2 tablespoons lemon juice
Timing, yield, and quick tips
Active churn time: 20–40 minutes. Passive chill and set time: plan 2+ hours for chilling the base and 1–2 hours after churning for a firm scoop.
Yield: roughly 8–12 servings. Nutritional example per serving is dense—about 639 kcal with high fat and carbs—values vary by brand and portion size.
Tip: Pre-measure sugar and dairy into a large bowl, keep the canister cold until you pour, and serve in chilled bowls to slow melting outdoors.
The chilled mixture will thicken to soft-serve in the machine, then become scoopable after a short set in the freezer. Accurate measuring with cups and spoons helps you repeat the same creamy texture every time.
Mix-Ins and Toppings to Customize Your Homemade Ice Cream
Small, well-timed additions give each scoop a fresh pop of color and crunch. Add mix-ins right after churning while the texture is still soft so pieces distribute evenly and don’t sink.
Fruity favorites
Bright options like strawberry compote, blueberry sauce, or diced cherries add a lively contrast to a vanilla ice base. Ribbon fruit swirls in as you fill containers to create pretty layers and avoid soggy chunks.
Chocolate and nut add-ins
For a chocolate-forward touch, fold in mini chocolate chips, crumbled chocolate chip cookies, or small brownie pieces. Toasted nuts—walnuts, pecans, or sliced almonds—bring crunch and aroma; fold gently to keep air in the cream.
Classic finishes
Keep a small stash of hot fudge, salted caramel, sprinkles, and lightly sweetened whipped cream for quick sundaes. A light pinch of flaky salt on chocolate toppings makes flavors pop without making the dessert salty.
- Portion guide: fold in about 2 to 2½ cups total mix-ins per full batch to avoid overloading the base.
- Tip: keep pieces small and dry to prevent icy pockets or sogginess.
- Speed: work quickly so the base stays cold before containers return to the freezer.
“Fold mix-ins in while the churn is soft to get even distribution and the best texture.”
Serving Ideas: Scoops, Sundaes, and Summer Pairings
A warm slice of pie and a cold scoop form one of summer’s simplest pleasures. Pairings that balance heat and chill make each bite memorable.
Perfect matches: Serve a generous scoop with warm apple pie or peach cobbler so the cold cream melts into flaky crust and fruit. Try grilled peaches topped with a single scoop for an easy, restaurant-style finish.
Shortcake and cobblers
Strawberry shortcake or berry crisps work well when the vanilla softens tart fruit. The mix of textures—soft cake, crisp topping, and silky cream—keeps each bite interesting.
Cookie sandwiches and party ideas
Assemble sandwiches using chocolate chip or M&M cookies. Press a scoop between cookies, wrap individually, and freeze until set for simple party treats. For more party inspiration, see our party food ideas.
- Pre-chill bowls or cones on a hot day to slow melting.
- For pie à la mode, use one generous scoop per slice or two small scoops for sharing.
- Set up a sundae bar with sauces, nuts, and fruit so guests can build their own desserts.
“Drizzle salted caramel over warm desserts first, then add the scoop so it holds shape longer.”
Storage, Scaling, and Pro Tips for Homemade Ice Cream
Move the churned mixture into cold, airtight containers right away to protect texture and flavor. Press a sheet of plastic wrap or foil directly onto the surface to limit ice crystals, then seal the lid.
Best containers include freezer-safe tubs or a lined loaf pan wrapped tightly with plastic and foil. Store batches up to one month in the freezer and label with date and flavor.
Scale Up or Down
Keep the cream-to-milk-to-sugar ratios consistent when adjusting cups for larger or smaller batches. Watch the churn and judge doneness by thickness and when the machine slows — not only by minutes on a clock.
- When scaling, keep proportions the same for texture to hold.
- Record minutes and adjustments in a recipe notebook for repeatable results at home.
- Pre-chill containers to save transfer time on serving day.
Troubleshooting Texture & Salt
For bucket makers, layer about 2 inches of ice and add 1/2 cup rock salt, topping up as it melts. Avoid table salt; it can cause bitter notes. Use rock or kosher salt instead.
- If the mixture turns icy, confirm sugar fully dissolved and that the base was well chilled.
- If too firm after hours in the freezer, let the container sit a few minutes at room temp before scooping.
“Press plastic wrap directly on the surface to reduce air and keep scoops creamy.”
Conclusion
A few focused steps and a cold canister are all you need to make a consistent, crowd-ready batch at home.
4 qt Ice Cream Recipe, Use the balanced five-ingredient base, dissolve the sugar fully, chill the mixture, then churn about 20–40 minutes in your ice cream maker for best texture.
Both rock-salt buckets and freezer-bowl models work well when prepped: have ice and salt or a frozen bowl ready, and measure cups of milk and cream carefully to scale up or down.
Keep a short checklist—ingredients measured, bowl frozen or ice/salt staged, container chilled—and fold in fruit, chocolate, or nuts right after churning.
Store in airtight tubs with the surface covered and let scoops rest a few minutes if too firm. Try this homemade ice cream now so you’re set to make another batch before the weekend.
FAQ
How long does it take to make homemade vanilla ice cream with an ice cream maker?
What ingredients do I need for a creamy, homemade vanilla batch?
Do I have to heat the base to make the ice cream or can I mix it cold?
Which type of machine is best: rock-salt churner or freezer-bowl maker?
How do I add chocolate chips, nuts, or fruit without making the texture icy?
Can I make this without heavy cream or with lower-fat milk?
What storage containers work best for leftover ice cream?
How do I prevent my ice cream from becoming icy or grainy?
Can I make vegan or dairy-free versions in a standard ice cream maker?
How should I scale recipes for a 4-quart batch or adjust churning time?
Is it better to use pure vanilla extract or vanilla bean for flavor?
What is the role of salt in the base and in a rock-salt setup?
Can I prepare the ice cream base the day before churning?


