


dash my pint ice cream maker healthy recipes
4
servings30
minutes40
minutes300
kcal1
hour10
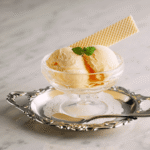
minutesSimple vanilla ice cream using everyday ingredients.
Keep the screen of your device on
Ingredients
2 cups 2 heavy cream
1 cup 1 whole milk
0.75 cup 0.75 granulated sugar
1 tablespoon 1 pure vanilla extract
1 pinch 1 salt
Directions
- In a medium mixing bowl, combine the heavy cream, whole milk, and granulated sugar, stirring until the sugar is completely dissolved.
- Add the pure vanilla extract and a pinch of salt to the cream mixture, stirring well to ensure even distribution.
- Cover the mixture and chill in the refrigerator for at least 1 hour to ensure it's very cold before churning.
- Assemble and pre-chill your Dash My Pint ice cream maker according to the manufacturer's instructions.
- Pour the chilled mixture into the ice cream maker and churn for about 20-25 minutes, or until thick and creamy.
- When the ice cream reaches the desired consistency, serve immediately for soft-serve texture or transfer to an airtight container for firmer ice cream.
- Store the ice cream in the freezer for at least 2 hours for a firmer texture, allowing it to thaw for 5 minutes before scooping.
Recipe Video
Nutrition Facts
- Total number of serves: 4
- Calories: 200kcal
- Cholesterol: 50mg
- Sodium: 30mg
- Potassium: 100mg
- Sugar: 22g
- Protein: 2g
- Calcium: 80mg
- Iron: 0mg
- Thiamin: 0mg
- Riboflavin: 0mg
- Niacin: 0mg
- Folate: 0mg
- Biotin: 0mg
- Phosphorus: 80mg
- Iodine: 0mg
- Magnesium: 0mg
- Zinc: 0mg
- Selenium: 0mg
- Copper: 0mg
- Manganese: 0mg
- Chromium: 0mg
- Molybdenum: 0mg
- Chloride: 0mg
Did you make this recipe?
Tag @https://www.instagram.com/ice_cream_haven/ on Instagram and hashtag it with #IceCreamIceCreamHavens
Like this recipe?
Follow @https://www.pinterest.com/Ice_Cream_Haven/ on Pinterest
Join our Facebook Group!
Follow https://www.facebook.com/icecreamhavens/ on Facebook
Introduction: Discover the Joy of Homemade Ice Cream
Unlock the simple pleasure of crafting your own frozen delights at home. Homemade ice cream lets you explore unique flavors and high-quality ingredients, tailoring each pint to your tastes and dietary needs. With a compact, pint-sized machine like the Dash My Pint, you can make single-serving treats that feel indulgent without the waste of a full batch.
Why Homemade Ice Cream Inspires Creativity
Making desserts from scratch sparks culinary creativity and gives you control over every element — from the ice cream base and fat content to sweeteners and mix-ins. Use fresh fruits, whole-milk or plant-based milk, and modest amounts of sugar to shape the texture and flavor you prefer.
Try blending ripe strawberries into an oat-milk base for a bright, dairy-free scoop, or fold in dark chocolate chunks for an extra-rich bite. Small tweaks — like swapping heavy cream for oat milk or using a lower-sugar syrup — let you create vegan or keto-friendly versions without sacrificing creaminess.
Benefits of a Pint-Sized Machine for Personalized Treats

The pint-sized design offers practical advantages for everyday use. It produces single servings so every treat is fresh, and you can experiment without committing to a large batch. With a properly pre-chilled bowl, expect most recipes to reach soft-serve consistency within about 20–30 minutes of churn time (total time depends on ingredients and starting temperature).
Here are some quick advantages:
Personalization: Adjust portion sizes and test new flavors without waste.
Quick results: Typical churn minutes fall in the 20–30 minute range, meaning you can be scooping in under an hour.
Healthier options: Use fresh fruit, lower-fat cream bases, or plant milks for lighter yet satisfying results.
Try a simple 3-ingredient starter: 1 ripe banana + 1/2 cup oat milk + 1 tsp vanilla (blend, chill briefly, then churn). It’s a great example of how easy it is to make a dairy-free, lower-sugar cup that still has creamy texture and real flavor.
By choosing high-quality ingredients and following a few basic techniques — pre-freezing the bowl, measuring mixtures, and timing your churn — you’ll get consistent, delicious results. Try the beginner recipe above, then experiment with your favorite mix-ins and flavor swaps.
Tips for Getting the Best Results with Your dash my pint ice cream maker healthy recipes
Achieving consistently creamy ice cream and frozen treats starts with a few reliable techniques. Whether you’re new to the Dash My Pint or you’ve made dozens of batches, these practical tips will help you improve texture, speed up troubleshooting, and get repeatable results.
Essential Cooling Techniques and Timing
Always pre-freeze the cooling bowl in your freezer for at least 24 hours (some users prefer 36 hours for maximum chill). A fully frozen bowl gives the cold surface needed for efficient churning and better cream formation.
Timing matters: start the churn within about 20 minutes of removing the bowl from the freezer so the bowl stays cold long enough to reach soft-serve consistency. Typical churn minutes for many bases fall in the 20–30 minute range, but exact times depend on your mixture’s temperature and fat content.
Quick-start checklist: Pre-freeze bowl 24+ hours | Use ≤1 cup per batch | Churn ~20–30 minutes | Transfer to container and firm in the freezer if needed.
Managing Mixture Capacity for Perfect Texture
Keep your mixture volume to about 1 cup for best performance — overfilling can slow the paddle and produce uneven consistency. If your recipe makes more than a cup, split it into two smaller batches to avoid stressing the motor or ending up with a soupy center.
If a batch finishes too soft, move it to a freezer-safe container and allow it to firm for 1–3 hours (times vary by base). For overly hard results, let the container sit at room temperature for 5–10 minutes before scooping to restore scoopable creaminess.
Troubleshooting examples
Watery or icy texture: the bowl wasn’t cold enough, the mixture was too warm, or there was excess liquid in the base — next time chill the base and extend pre-freeze hours.
Too hard or gritty: too much sugar or freezing the finished cup for many hours — reduce freezer time for serving or lower sugar slightly in the base.
Ingredient and ratio tips

Fat and sugar impact creaminess: higher-fat cream bases and moderate sugar improve mouthfeel, while plant milks (oat, almond) produce lighter textures — adjust ratios and expect slight differences in churn minutes and final texture.
Mix-ins timing: add chocolate chips, nuts, or fruit in the final minute or two of churning so pieces distribute evenly without sinking or clumping. If using frozen fruit, thaw slightly and drain excess liquid to avoid icy chunks.
Notes on parts and handling
Use the lid and paddle as instructed — ensure they’re seated correctly before starting. If your machine has a removable paddle, check for secure attachment to avoid noisy or inefficient churning.
Want a printable quick-reference? Download our troubleshooting PDF with recommended churn minutes for common bases and a simple capacity chart to keep by your freezer.
Dash my pint ice cream maker healthy recipes: A Listicle of Inspiring Ideas
Transform your dessert game with these wholesome, single-serving recipe ideas. Whether you want something fruity, creamy, or a little indulgent, the recipes below are optimized for small batches so you can test flavors without waste and get a perfect cup every time.
Peaches & Cream (Single-Serve Recipe Card)
Ingredients: 1 cup ripe peaches (pureed), 1/2 cup milk or oat milk, 2 tbsp light cream or 1 tbsp heavy cream (optional), 1 tsp sweetener (honey or maple).
Quick method: Blend peaches with milk and sweetener, chill mixture briefly, pour up to 1 cup into your pre-frozen bowl and churn ~20–25 minutes. Finish with sliced peaches.
Notes: Use oat milk for a dairy-free cream base; expect slightly lighter texture.
Oat-Milk Vanilla (Dairy-Free Favorite)
Ingredients: 1 cup oat milk, 1 tbsp neutral oil (or 2 tbsp coconut cream), 1 tsp vanilla extract, 1–2 tsp sweetener.
Quick method: Whisk, chill, and churn 20–30 minutes. Serves 1 pint-sized cup.
Notes: Oat milk gives a smooth mouthfeel; adding a small amount of fat (oil or coconut cream) improves creaminess and reduces churn minutes.
Mexican Chocolate (Bold Flavor)
Ingredients: 1/2 cup milk, 1/2 cup cream or oat milk + 1 tbsp cocoa powder, 1–2 tsp sugar, pinch cinnamon, 1 tbsp dark chocolate chips.
Quick method: Combine base, chill, and churn 20–30 minutes. Stir in chocolate chips in the final 1–2 minutes of churning.
Notes: For richer texture, use some heavy cream; for lighter, use oat milk. Adjust sugar to taste.
3-Ingredient Quick Starter (Beginner Friendly)
Ingredients: 1 ripe banana, 1/2 cup oat milk, 1 tsp vanilla.
Quick method: Blend banana and oat milk until smooth, chill briefly, then churn ~20 minutes for a creamy, naturally sweet cup. Great as a vegan, lower-sugar option.
Helpful tips for these recipes
– Keep each recipe’s final volume to about 1 cup for best performance in the pint machine; split larger batches into two.
– Add mix-ins (chocolate chips, nuts, fruit pieces) in the last minute or two to avoid clumping.
– If a base finishes too soft, transfer to a freezer-safe container and firm for 1–3 hours; avoid over-freezing to keep scoopable texture.
Want more recipes and printable recipe cards? Save or print this list and check the full recipe book for detailed ingredient ratios and nutritional notes — plus variants for keto, vegan, and low-sugar bases.
Exploring Delicious and Nutrient-Rich Ice Cream Varieties

Dive into a world of nutrient-packed frozen treats that prove indulgence and nutrition can coexist. With fresh ingredients and the right techniques, you can create fruit-forward scoops, creamy classics, and inventive variations that suit seasonal produce and dietary preferences.
Fruit-Based Recipes: Peaches, Strawberries, and More
Fresh fruits are the stars of these lighter recipes. Try a strawberry blend by pureeing ripe berries into your ice cream base for a bright, tangy flavor, or use peaches for a silky summer cup. Fruit adds natural sweetness and vitamins, which lets you reduce added sugar.
Quick fruit tip: Keep the final mixture to about 1 cup (puree + liquid) so the pint machine churns efficiently. If using frozen fruit, thaw slightly and drain any excess liquid to prevent icy texture — chill the base before pouring into the bowl for faster, creamier results.
Creamy Innovations: Oat Milk, Cannoli, and Vanilla Variations
For dairy-free options, oat milk is a standout — it produces a smooth mouthfeel that works well as a cream base. Try an oat-milk vanilla for a modern twist on a classic: add 1 tsp vanilla and a small amount of fat (1 tbsp coconut cream or neutral oil) to improve body and reduce churn minutes.
If you want an indulgent spin, try a cannoli-inspired cup: blend ricotta (smooth, well-drained) with a touch of sweetener, fold in mini chocolate chips, and add a pinch of cinnamon for that signature flavor. Note: blend ricotta thoroughly to avoid graininess in the final texture.
“The key to a perfect dessert is balancing flavor and texture. With the right ingredients, you can create treats that are both nutritious and delicious.”
Enhancing Your Experience with Creative Mix-Ins and Toppings

Mix-ins lift a simple base into something memorable. Add nuts or seeds for crunch, dark chocolate chunks for richness, or fresh fruit pieces for bursts of brightness. For best distribution, add mix-ins during the final 1–3 churn minutes so they’re evenly folded in without sinking.
Incorporating Natural Flavors and Nutritious Additions
Nuts and seeds boost texture and nutrition; dark chocolate adds antioxidants and deep flavor. Use natural extracts like vanilla or mint to layer flavor without extra sugar. Seasonal additions — pumpkin puree and cinnamon in fall, citrus zest or berries in summer — make your cups timely and interesting.
Practical tips for mix-ins:
– Chop mix-ins into small, even pieces to prevent clumping or sinking.
– Add frozen fruit slightly thawed and drained to avoid icy chunks.
– For very hard add-ins (candied nuts, large chocolate chunks), consider folding them in after churning rather than during to protect the paddle and ensure even texture.
Encourage experimentation: pair creamy oat-milk bases with citrus or berry swirls, or pair a rich cream base with dark chocolate chips for an indulgent but nutrient-aware treat. Share your favorite mix-in combos to inspire the community and try variations that match your dietary goals.
Understanding Ingredients, Texture, and Nutritional Balance

Crafting frozen desserts that are both delicious and nutrient-aware comes down to choosing the right ingredients and mastering a few simple techniques. This section covers how ingredient choices affect flavor, texture, and nutrition so you can build a base that meets your taste and wellness goals.
Key Nutritional Insights for Health-Conscious Desserts
Making ice cream at home gives you full control over the quality and quantity of ingredients. Fresh fruits like strawberries or peaches provide natural sweetness and vitamins, which helps reduce added sugar. Choosing low-fat dairy or plant-based milk (oat milk, almond milk) lowers calories and saturated fat, while moderate amounts of dark chocolate add flavor and antioxidants when used thoughtfully.
Ingredient benefits at a glance:
Fresh fruits: Natural sugars, vitamins, and fiber — use seasonal produce for the best flavor.
Low-fat dairy / plant milk: Lighter calories and less saturated fat; oat milk gives a smooth mouthfeel as an alternative to heavy cream.
Dark chocolate: Adds deep flavor and richness; use in moderation for an antioxidant boost.
3-Ingredient example (nutrient-aware)
Frozen Banana Vanilla — 1 ripe frozen banana + 1/2 cup oat milk + 1 tsp vanilla. Blend until smooth, chill briefly, then churn ~20–25 minutes for a creamy, naturally sweet cup. Estimated macros will depend on milk choice; using oat milk keeps fat low compared with a heavy cream base.
Tips on Achieving a Consistently Creamy Texture
Texture is a defining factor of great ice cream. Start by pre-freezing your bowl in the freezer for at least 24 hours so the surface is thoroughly chilled — this helps the ice cream base freeze evenly during churning. Avoid overfilling the bowl; aim for about 1 cup of mixture so the paddle can turn freely and build proper aeration.
Practical how-tos:
Ingredient ratios: Increasing the fat or adding a small amount of liquid sugar can improve creaminess; lower-fat and plant bases may need a tiny boost of fat (1 tbsp coconut cream or neutral oil) to match the mouthfeel of a cream base.
Timing: Start churning within 20 minutes of removing the bowl from the freezer. Typical churn minutes for many bases are 20–30 minutes, but that varies by base temperature and composition.
Mix-ins: Add chocolate chips or chopped nuts in the final 1–2 minutes of churning so they distribute evenly without clumping.
Notes on liquids and bases
Thinner, more liquid bases (higher water content) can produce icier textures; increasing solids (milk powder or a small amount of cream) improves body. For a richer ice cream base, replace part of the milk with heavy cream or add 1–2 tablespoons of powdered milk to the mixture to boost solids without excess volume.
Experiment with swaps and record results: try the same recipe with oat milk vs. heavy cream and note differences in churn minutes, texture, and flavor. That log will help you dial in the exact consistency you prefer for future batches.
Conclusion
Making your own frozen desserts with the Dash My Pint is both rewarding and practical. With a little planning — the right ingredients, a pre-frozen bowl, and measured portions — you can produce single-serve ice cream cups that balance flavor, texture, and nutrition. Experimenting with different bases and mix-ins opens up endless creative options that fit busy lifestyles.
Quick takeaway: Pre-freeze the bowl, keep mixtures to about 1 cup per batch, and expect most recipes to finish in roughly 20–30 minutes of churn time so you can be enjoying a scoop in under an hour.
Whether you prefer fruit-forward cups or a richer cream base, the convenience of the pint-sized format makes it easy to tailor each batch to your dietary needs and taste — from oat-milk vanilla to chocolate-studded indulgences.
For more inspiration and tested proportions, check the recipe book linked earlier — it includes swap ideas for vegan or keto ice cream recipes and printable recipe cards to keep by your freezer.
FAQ
Why should I make homemade frozen treats?
Homemade ice cream lets you control ingredients and sweetness, avoid additives, and customize flavors like vanilla, chocolate, or fruit blends to suit your preferences.
What makes a pint-sized machine ideal for making desserts?
A pint-sized ice cream maker is perfect for single servings or testing new ideas without waste — it’s quick, space-saving, and lets you create small batches on-demand.
How can I achieve the best texture in my frozen creations?
Use a fully frozen bowl, measure your mixture (about 1 cup), chill the base before churning, and start the churn within ~20 minutes of removing the bowl from the freezer for the creamiest results.
What are some healthy ingredient swaps I can try?
Swap heavy cream for oat milk or low-fat dairy, reduce sugar or use natural sweeteners like honey, and add fresh fruit or protein-rich mix-ins to boost nutrition.
Can I make dairy-free or vegan options with this machine?
Yes — oat milk, almond milk, or coconut milk all work as substitutes. Note that plant milks may produce a slightly lighter texture; adding a tablespoon of coconut cream or a small amount of powdered milk can improve creaminess if desired.
What are some creative mix-ins and toppings to enhance my dessert?
Try chopped nuts, dark chocolate chips, fresh fruit chunks, or a swirl of nut butter. Add mix-ins in the final 1–3 minutes of churning to ensure even distribution and protect the paddle.
How do I ensure my frozen treats are nutritionally balanced?
Focus on whole, natural ingredients, limit added sugar, and include fiber or protein-rich additions (nuts, seeds, or Greek yogurt) to make treats more satisfying and balanced.
Want quick access to favorite recipes and a printable quick-reference guide for churn minutes and capacity? Download the recipe PDF or visit the recipe book for detailed ice cream recipe notes, ingredient swaps, and community favorites.


