


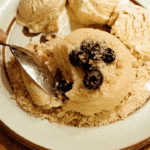
Vegan Banana Ice Cream
4
servings30
minutes40
minutes300
kcal1
hour10
minutesCreamy, dairy-free banana ice cream using simple ingredients.
Keep the screen of your device on
Ingredients
4 pieces 4 ripe bananas
1 cup 1 coconut milk
0.25 cup 0.25 maple syrup
1 teaspoon 1 vanilla extract
1/8 teaspoon 1/8 salt
Directions
- Peel the ripe bananas and slice them into thin rounds about half an inch thick for even freezing.
- Place the banana slices in a single layer on a baking sheet lined with parchment paper and freeze them for at least two hours or until solid.
- Once frozen, add the banana slices to a blender or food processor along with coconut milk, maple syrup, vanilla extract, and salt.
- Blend the mixture on high speed until smooth and creamy, stopping to scrape down the sides as needed.
- Transfer the blended mixture into an ice cream maker and churn for about 20 minutes or until it reaches a soft serve consistency.
- For a firmer texture, transfer the churned ice cream into an airtight container and freeze for an additional two hours.
- Before serving, let the ice cream sit at room temperature for a few minutes to slightly soften and make scooping easier.
Recipe Video
Nutrition Facts
- Total number of serves: 4
- Calories: 200kcal
- Cholesterol: 0mg
- Sodium: 50mg
- Potassium: 450mg
- Sugar: 18g
- Protein: 2g
- Calcium: 10mg
- Iron: 1mg
- Thiamin: 0mg
- Riboflavin: 0mg
- Niacin: 1mg
- Folate: 1mg
- Biotin: 0mg
- Phosphorus: 20mg
- Iodine: 0mg
- Magnesium: 30mg
- Zinc: 0mg
- Selenium: 0mg
- Copper: 0mg
- Manganese: 0mg
- Chromium: 0mg
- Molybdenum: 0mg
- Chloride: 0mg
Did you make this recipe?
Tag @https://www.instagram.com/ice_cream_haven/ on Instagram and hashtag it with #IceCreamIceCreamHavens
Like this recipe?
Follow @https://www.pinterest.com/Ice_Cream_Haven/ on Pinterest
Join our Facebook Group!
Follow https://www.facebook.com/icecreamhavens/ on Facebook
What makes this banana ice cream creamy, refreshing, and easy today
A food processor’s large blade and roomier bowl make for a fluffier frozen dessert fast. Ripe fruit carries natural pectin and strong sweetness, so the mix gains a rich mouthfeel with very little added fat.
Briefly thawing and slicing frozen pieces protects the blades and speeds processing. This step helps the machine cut evenly and reach a smooth texture.
The processor whips air into the mixture, limiting large crystals and producing soft-serve right away. A blender often needs more liquid, which can thin the batch and change the final texture.
- Natural structure: ripe bananas give body like dairy without extra sugar.
- Quick prep: slice, pulse, and spoon or freeze briefly for firmer scoops.
- Small add-ins: a splash of oat or whole milk and a pinch of salt lift flavor.
“Simple steps and one main ingredient deliver a real, refreshing dessert with minimal cleanup.”
| Tool | Speed | Result |
|---|---|---|
| Food processor | Fast | Light, airy texture; less added liquid |
| Blender | Variable | May need more liquid; can be thinner |
| Freezer finish | Optional | Firm scoops after short chill |
Banana ice cream recipe: ingredients and equipment at a glance

A tidy station with measured ingredients speeds you from frozen slices to spoon-ready dessert.
For a dairy-free soft-serve, you need 6 very ripe, peeled and frozen bananas (frozen bananas), 1 teaspoon vanilla extract, and 1/4 teaspoon sea salt. Add a splash of milk or water if the blades need help.
For extra creaminess, stir in 1/4 cup oat, almond, or whole milk or a little heavy cream. Optional boosters: 2 teaspoons vanilla, 1 teaspoon lemon juice, and 1/4 teaspoon kosher salt.
- Core produce: heavily speckled, ripe bananas give natural sweetness and body.
- Flavor boosters: vanilla extract, a pinch of salt, and optional lemon juice brighten the base.
- Optional liquids: a small cup of milk, plant milk, or water helps the motor without thinning too much.
- Equipment: a sturdy food processor with a wide bowl is preferred; a blender works in a pinch.
- Extras: airtight container for brief firm-up, knife and cutting board, and a rubber spatula to scrape the bowl.
- Mix-ins: peanut butter, chocolate chips, chopped chocolate, cinnamon, or cocoa.
| Component | Amount | Use |
|---|---|---|
| Frozen bananas | 6 peeled pieces | Base for dairy-free soft-serve |
| Milk / heavy cream | 1/4 cup (optional) | For extra creaminess |
| Vanilla & salt | 1–2 tsp vanilla, 1/4 tsp salt | Enhance flavor |
| Traditional custard | 2 cups heavy cream, 1 cup milk, 5 yolks, 2/3 cup sugar | Churned ice cream method |
| Tools | Food processor, spatula, container | Efficient blending and storage |
Prep tip:Pre-slice frozen pieces after a short thaw, set up the processor, and measure vanilla, salt, and any add-ins so the process stays smooth.
Step-by-step: from ripe bananas to scoopable ice cream
Start by freezing peeled fruit flat so each piece chills evenly and blends without clumping. Freeze for at least 8 hours, ideally overnight, to set a stable base of frozen bananas.
When ready, let the pieces sit 15 minutes at room temperature. Slice into uniform 1/2‑inch rounds to protect the food processor and speed blending.
Load the bowl and process in bursts. In about 3–5 minutes the mixture will turn pale, billowy, and soft-serve smooth. Pause to scrape the sides as needed.
- If the motor stalls: wait a minute, then add a small cup splash of milk or plant milk so the blades catch.
- Season: stir in a touch of vanilla and a pinch of salt to boost flavor.
- For scoopable texture: spread the whipped mixture into an airtight container and freeze 30–120 minutes.
If you leave the container longer than 2 hours, the dairy-free batch can form an icy block. If using a blender, expect to add more liquid, which may thin the result compared with a processor.
“Serve immediately for soft-serve texture, or chill briefly for neat scoops — total active minutes stay low and results stay smooth.”
Banana ice cream recipe Pro tips for perfect texture and flavor every time

Master a few small moves and you’ll avoid gritty or icy results.
Prioritize very ripe, heavily speckled fruit for the best natural sweetness and smooth body. If the processor stalls, let the bowl rest a minute or add a small bit of liquid—oat, almond, whole milk, or even water—so the blades can grab without over-thinning.
Choose your tool with intent: a food processor needs less liquid and yields a lighter, silkier whip. Use a high-powered blender only when necessary and expect to adjust the liquid.
- Season lightly: a pinch of salt raises perceived sweetness; a dash of vanilla adds warmth; a few drops of lemon juice brighten the fruit note.
- Timing matters: 3–5 minutes of steady processing builds volume without overheating. For firmer scoops, chill for a few hours.
- Dairy options: a splash of heavy cream or milk boosts body for a richer final scoop, while dairy-free batches are best served the same day to avoid iciness.
“Tiny adjustments — slice size, scrape frequency, or a measured splash — change mouthfeel more than big additions.”
| Problem | Quick fix | Result |
|---|---|---|
| Stalled motor | Add a tablespoon of milk or wait 60 seconds | Blades re-engage; smooth processing |
| Grainy texture | Process 1–2 more minutes; scrape sides | Light, custardy volume |
| Too firm after freezing | Stir in a splash of alcohol or let soften 5–10 minutes | Scoopable, less icy |
Banana ice cream recipe Flavor variations and mix-ins to try

Try bold swirls and crunchy add-ins to lift the simple frozen base into a standout flavor experience.
Stir smooth add-ins—peanut butter, almond butter, Nutella, or honey—into the bowl during the final minute of processing for ribboned swirls that keep the base silky. For chocolate-forward mixes, blend cocoa powder into the mixture, then finish with chocolate chips for two layers of texture.
Fold chunky elements like chocolate chips, chopped chocolate, or toasted nuts in with a spatula once the base is fully smooth. This preserves crunch in each bite and avoids melting the chips into the mix.
- Balance: a splash of milk or a touch of heavy cream makes a scoop-ready base without masking banana flavor.
- Season: a dash of vanilla extract and a pinch of salt improves aroma and reduces the need for extra sugar.
- Churned tips: add chopped dark chocolate or nuts in the last 5 minutes of the maker’s cycle for even distribution.
“Taste before folding in chunky add-ins so you can fine-tune salt and vanilla for perfect balance.”
Build simple recipes like a “Chunky Monkey” with peanut butter and chocolate, or keep it classic with a cocoa-vanilla blend. Serve right away for soft-serve or chill briefly for firmer scoops that still show off the mix-ins.
Storage, serving, and nutrition-friendly notes
Plan storage and serving now to keep each scoop as fresh and smooth as possible.
For the dairy-free base, serve the batch the same day for best texture. You can spread it into a sealed container and freeze 30–120 minutes to make scoops firmer without turning overly hard.
Peeled fruit stores well in the freezer for up to 3 months. This keeps ripe, spotty produce ready—similar to how overripe fruit improves banana bread flavor.
If you made a churned custard, transfer it to a tight container for longer storage. A splash of rum or vodka reduces hardness and keeps scoops scoopable between servings.
Nutrition notes: Fruit-only versions are lower in fat and calories; a custard-style half-cup can approach 455 kcal because of heavy cream and yolks. Portion by the half-cup to manage intake and pair with fresh berries for balance.
Let a very firm tub sit a few minutes at room time before scooping. Label the container with the date so you track freshness and serving quality.
- Enjoy dairy-free soft-serve within hours for best texture.
- Avoid long freezer time—no added sugar or stabilizers means more iciness.
- Choose add-ins to match nutrition goals: nuts add fat; spices add flavor without sugar.
| Type | Store method | Typical shelf time |
|---|---|---|
| Dairy-free soft-serve | Airtight container, short freeze | Same day; up to a few hours best |
| Peeled frozen fruit | Wrapped or bagged in freezer | Up to 3 months |
| Churned custard | Sealed tub; optional splash alcohol | Weeks to months |
Time, tools, and troubleshooting at present
Plan for mostly passive time. Freeze peeled fruit at least 8 hours, then thaw 15 minutes before you work. Active minutes total only about 3–5 minutes in the bowl to reach a pale, silky mixture.
Choose the right tool. A food processor with a wide bowl and sharp blade gives the lightest whip and needs less added liquid. If you use a blender, work in small batches and expect to add a splash of milk or water.
- Budget time: most work is hands-off—freeze and optional set for 30–120 minutes for firm scoops.
- Prep: slice frozen bananas into even rounds so the processor won’t stall or strain.
- If it stalls: pause, let the motor cool, or add up to a 1/4 cup of liquid to re-engage the blades.
- Finish: when the mix looks pale and silky, stop. Over-processing warms the batch and harms texture.
- Storage tip: spread into a lidded container and container freeze for 30–120 minutes for scoopable results; dairy-free batches are best same-day.
“Short active minutes and the right machine make consistent, scoopable results every time.”
Conclusion
Wrap up: choose the quick, fruit-forward path or the richer churned custard and follow your timing and texture cues.
Banana ice cream recipe, Keep it food-first: use very ripe fruit, a dash of vanilla extract, and a pinch of salt. A sharp processor, a sturdy spatula, and a lidded container get repeatable results.
Personalize the bowl with peanut butter ribbons, chocolate flecks, or cinnamon. Fold chips in at the end to keep crunch and measure by the cup so portions stay consistent.
Storage tip: serve the dairy-free soft version the same day for best texture; the custard-style batch stores longer and may benefit from a splash of alcohol to stay scoopable.
Try one method tonight, note the favorite ingredients, and refine your next ice cream or cream recipe for an even better finish from the bowl.
FAQ
What ingredients do I need for this creamy banana-based frozen treat?
How do I get smooth, scoopable texture without an ice-cream machine?
Can I make this using only frozen fruit with no added dairy?
How long should I freeze the blended mixture for firm scoops?
What mix-ins or flavor variations work best?
How can I prevent ice crystals and grainy texture?
Is this dessert suitable for meal prep or freezing for several weeks?
Can I swap ingredients for dietary needs like keto or low-sugar?
What equipment gives the best results: blender, food processor, or hand mixer?
Any tips for balancing sweetness and flavor?


