


Homemade Raspberry Syrup
4
servings30
minutes40
minutes300
kcal1
hour10
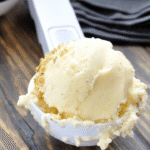
minutesEasy homemade vanilla ice cream with a fresh raspberry syrup.
Keep the screen of your device on
Ingredients
2 cups 2 heavy cream
1 cup 1 whole milk
3/4 cup 3/4 granulated sugar
1 tablespoon 1 vanilla extract
1 pinch 1 salt
1 cup 1 fresh raspberries
1/4 cup 1/4 water
1/4 cup 1/4 granulated sugar
Directions
- In a large bowl, whisk together heavy cream, whole milk, 3/4 cup granulated sugar, vanilla extract, and a pinch of salt until sugar is dissolved.
- Cover the mixture and refrigerate for at least 2 hours, or until completely chilled, for the best churning results.
- Pour the chilled mixture into the ice cream maker and churn according to manufacturer's instructions, usually about 20 minutes.
- During the churning process, combine fresh raspberries, 1/4 cup water, and 1/4 cup sugar in a saucepan over medium heat.
- Stir raspberry mixture until the sugar dissolves and the raspberries break down, about 5-7 minutes. Allow to cool.
- Once the ice cream is churned, transfer it to a lidded container, layering with raspberry syrup for swirls.
- Freeze the ice cream for at least 4 hours or until firm before serving. This helps improve its texture.
- For best storage, keep ice cream in an airtight container in the freezer, and consume within two weeks.
Recipe Video
Nutrition Facts
- Total number of serves: 8
- Calories: 250kcal
- Cholesterol: 65mg
- Sodium: 40mg
- Potassium: 120mg
- Sugar: 20g
- Protein: 3g
- Calcium: 8mg
- Iron: 2mg
- Thiamin: 2mg
- Riboflavin: 8mg
- Niacin: 2mg
- Folate: 2mg
- Biotin: 0mg
- Phosphorus: 10mg
- Iodine: 0mg
- Magnesium: 3mg
- Zinc: 5mg
- Selenium: 0mg
- Copper: 0mg
- Manganese: 4mg
- Chromium: 0mg
- Molybdenum: 0mg
- Chloride: 2mg
Did you make this recipe?
Tag @https://www.instagram.com/ice_cream_haven/ on Instagram and hashtag it with #IceCreamIceCreamHavens
Like this recipe?
Follow @https://www.pinterest.com/Ice_Cream_Haven/ on Pinterest
Join our Facebook Group!
Follow https://www.facebook.com/icecreamhavens/ on Facebook
The Magic of Homemade Raspberry Syrup
Discover the delightful world of homemade raspberry syrup, a simple yet versatile ingredient that can elevate your culinary creations. This syrup is not just a sweetener; it’s a flavor enhancer that brings a burst of berry flavor to any dish or drink.
Why Make Your Own Raspberry Syrup?
Making your own raspberry syrup at home allows you to control the ingredients and avoid artificial flavors, preservatives, and excessive sweeteners found in commercial versions. By using real raspberries, you get a vibrant color and intense flavor that’s hard to match with store-bought syrups.
What Makes This Recipe Special
This particular syrup recipe stands out for its simplicity, requiring just a few basic ingredients that most people already have in their kitchens. The process is straightforward, making it accessible to anyone looking to add a touch of homemade magic to their recipes. Plus, it’s a great way to use raspberries that might be slightly past their prime, reducing food waste.
The versatility of this syrup is a key selling point – it works equally well in beverages, breakfast items, and desserts. Whether you’re making raspberry flavored cocktails, topping pancakes, or adding a drizzle to flourless chocolate cake, this syrup is sure to impress.
Homemade Raspberry Syrup Recipe Ingredients You’ll Need

The beauty of homemade raspberry syrup lies in its simplicity, requiring only a few basic ingredients. This simplicity makes it accessible to anyone looking to create a delicious and flavorful syrup.
Basic Ingredients List
To make this syrup, you’ll need just two main ingredients: raspberries and sugar. The recipe calls for ½ cup of fresh or frozen raspberries and a significant amount of granulated sugar to balance the tartness of the berries. Water is also used to create the perfect consistency.
Fresh vs. Frozen Raspberries
You can use either fresh or frozen raspberries for this recipe. Fresh raspberries are ideal because they are sweeter and have a more vibrant flavor. However, frozen raspberries work just as well, especially when fresh ones are out of season. The key is to choose berries that are not past their prime. Whether you use fresh or frozen, make sure they’re of good quality to get the best flavor out of your syrup. One cup of water is typically used in conjunction with the raspberries and sugar.
Homemade Raspberry Syrup Recipe Equipment Required

Preparing homemade raspberry syrup requires a few essential tools. To ensure a smooth and efficient process, it’s crucial to have the right equipment.
Essential Tools
The most critical tool for making raspberry syrup is a fine mesh strainer. This tool is necessary for removing seeds and achieving a smooth texture. You’ll also need a saucepan for cooking the syrup and a container or jar for storing it. A non-reactive saucepan is recommended to prevent the acidic raspberries from reacting with the metal.
Optional But Helpful Items
While not strictly necessary, a few additional tools can make the process easier. A spatula can be helpful for stirring the mixture and pressing it through the fine mesh strainer. Having these tools on hand can enhance your syrup-making experience and result in a higher-quality final product.
Homemade Raspberry Syrup Recipe

Making homemade raspberry syrup is a straightforward process that requires just a few simple ingredients. To start, you’ll need to prepare your ingredients properly.
Preparing Your Ingredients
Begin by gathering your sugar, water, and fresh or frozen raspberries. Ensure your raspberries are ready to use by rinsing them if necessary.
Cooking the Syrup
Place the sugar and water in a medium saucepan over medium heat. Cook for 1 minute, stirring, until the sugar dissolves. Then, add raspberries and cook until they break down, about 5 to 6 minutes, turning the heat to low when it starts to boil.
Straining and Finishing
Once the raspberries are fully broken down, strain the syrup into a jar using a fine mesh sieve or strainer. Use a spatula to force it through until all the seeds are strained out. Allow the syrup to cool; it will thicken more as it cools.
No-Cook Raspberry Syrup Variation

A no-cook raspberry syrup is perfect for summer, capturing the essence of fresh berries without heating them. This method preserves the bright, fresh flavor of raspberries, making it an ideal choice for those who prefer a lighter taste.
Fresh Method Instructions
To make a no-cook simple syrup, combine fresh or frozen berries with sugar and water in a blender. Strain the mixture through a fine-mesh sieve to remove the seeds. This way, you’ll achieve a smooth syrup that retains the vibrant color and fresh flavor of the raspberries.
Benefits of the No-Cook Method
The no-cook method is not only quick and easy but also helps retain more of the raspberries’ natural nutrients. It’s perfect for hot summer days when you don’t want to heat up the kitchen. By use fresh ingredients, you’ll end up with a syrup that’s bursting with fresh flavor, ideal for enhancing drinks, desserts, and more.
Creative Ways to Use Your Raspberry Syrup
Unlock the full potential of your homemade raspberry syrup with these creative ideas. This versatile syrup can elevate various dishes and drinks, from breakfast to desserts and cocktails.
Drinks and Cocktails
Raspberry syrup is a perfect addition to various cocktails, such as the Floradora and Clover Club. You can also use it to create unique mocktails or add flavor to lemonade and iced tea. Experiment with different combinations to find your new favorite drink.
Breakfast Applications
Start your day with a sweet treat by drizzling raspberry syrup over pancakes or waffles. You can also add it to oatmeal or yogurt for a burst of flavor.
Dessert Ideas
Indulge in the sweetness of raspberry syrup by using it as a topping for ice cream or as a glaze for cakes and pastries. It’s also a great addition to desserts like chocolate mousse or fruit salads.
Homemade Raspberry Syrup Recipe Storage Tips and Shelf Life

Proper storage is crucial to maintaining the quality and extending the shelf life of your homemade raspberry syrup. By choosing the right storage method, you can enjoy your syrup for weeks to come.
Proper Container Selection
Selecting the right container is vital. Use a sterilized airtight container to prevent contamination and spoilage. Glass jars with tight-fitting lids are ideal for storing syrup in the refrigerator.
Refrigeration Guidelines
Stored in a sterilized airtight container in the refrigerator, raspberry syrup can last for up to 3 weeks. Ensure your refrigerator is at the optimal temperature to maintain the syrup’s quality.
Freezing Options
For longer storage, consider freezing your raspberry syrup. You can freeze it in ice cube trays or freezer-safe containers for up to 3 months. Simply thaw overnight in the refrigerator when you’re ready to use it. This method is particularly useful if you’ve made a large batch and want to enjoy it over a longer period.
By following these storage tips, you can enjoy your homemade raspberry syrup for a longer time. Remember, if the syrup appears cloudy or off, it’s best to discard it and make a fresh batch, which only takes a few minutes!
Final Thoughts on Your Homemade Raspberry Syrup Journey
As you finish making your homemade raspberry syrup, you’ll appreciate the simplicity and flavor it brings to various dishes. This simple syrup recipe is not just a condiment; it’s a versatile ingredient that can elevate your favorite recipes. By using 2 parts fresh berries, 1 part sugar, and 1 part water, you’ve created a vibrant syrup that adds a pop of flavor to drinks, breakfast, or desserts.
Feel free to experiment with this basic recipe by substituting different berries or adjusting the sugar to your taste. Making ingredients from scratch, like this raspberry syrup, connects us to our food and enhances our appreciation for simple flavors. With your homemade syrup, you’ll enjoy the cost-effectiveness and quality advantages over store-bought alternatives. As you explore various ways to use your syrup, consider sharing your experiences and creative applications with others.
Mastering this simple syrup recipe opens doors to creating other fruit syrups and culinary experiments. So, savor the satisfaction of creating something delicious from simple, natural ingredients, and enjoy the journey of exploring new flavors and recipes.
FAQ
Can I use fresh or frozen raspberries to make the syrup?
What type of sugar is best for making raspberry syrup?
How do I strain the syrup to remove the seeds?
Can I make a no-cook version of the syrup?
How long does the syrup last when stored properly?
What are some creative ways to use raspberry syrup?


