


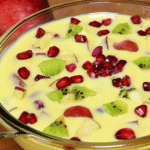
Fruit Simple Syrup Ice Cream
4
servings30
minutes40
minutes300
kcal1
hour10
minutesHomemade fruit simple syrup ice cream with everyday ingredients.
Keep the screen of your device on
Ingredients
1 cup 1 whole milk
2 cups 2 heavy cream
0.75 cup 0.75 granulated sugar
1 tablespoon 1 vanilla extract
2 cups 2 fruit simple syrup
Directions
- In a medium saucepan, combine the whole milk, heavy cream, and granulated sugar over medium heat until the sugar fully dissolves.
- Stir in the vanilla extract and remove the saucepan from heat. Let the mixture cool to room temperature.
- Once cooled, cover the saucepan and refrigerate the mixture for at least 2 hours or until thoroughly chilled.
- After chilling, add the fruit simple syrup, then pour the mixture into an ice cream maker and churn for 20-25 minutes.
- Transfer the churned ice cream to an airtight container and freeze for an additional 2 to 3 hours until firm.
- Before serving, let the ice cream sit at room temperature for 5 minutes for easier scooping.
Nutrition Facts
- Total number of serves: 6
- Calories: 250kcal
- Fat: 15g
- Saturated Fat: 10g
- Trans Fat: 0g
- Polyunsaturated Fat: 0.5g
- Monounsaturated Fat: 3.5g
- Cholesterol: 60mg
- Sodium: 35mg
- Potassium: 60mg
- Carbohydrates: 28g
- Fiber: 0g
- Sugar: 25g
- Protein: 2g
- Vitamin A: 500IU
- Vitamin C: 1mg
- Calcium: 80mg
- Iron: 0.1mg
- Vitamin D: 1mg
- Vitamin E: 0.5mg
- Vitamin K: 0mg
- Thiamin: 0.02mg
- Riboflavin: 0.1mg
- Niacin: 0.1mg
- Vitamin B6: 0.02mg
- Vitamin B12: 0.2mg
- Folate: 3mg
- Biotin: 0mg
- Pantothenic Acid: 0.3mg
- Phosphorus: 60mg
- Iodine: 0mg
- Magnesium: 8mg
- Zinc: 0.1mg
- Selenium: 1mg
- Copper: 0.02mg
- Manganese: 0mg
- Chromium: 0mg
- Molybdenum: 0mg
- Chloride: 0mg
Did you make this recipe?
Tag @https://www.instagram.com/ice_cream_haven/ on Instagram and hashtag it with #IceCreamIceCreamHavens
Like this recipe?
Follow @https://www.pinterest.com/Ice_Cream_Haven/ on Pinterest
Join our Facebook Group!
Follow https://www.facebook.com/icecreamhavens/ on Facebook
Why Make Homemade Fruit Syrup: Fresh Flavor, Simple Ingredients, Inspiring Results
When you craft small-batch cordial on the stove, flavor stays bright and honest. Choosing homemade fruit syrup gives you clear control over what goes into every jar. Store-bought bottles often hide preservatives and artificial color. Your version uses real, fresh fruit and balanced sugar for a cleaner taste.
Real fruit over preservatives: the case for DIY syrups
Make sure you simmer gently for about 5–15 minutes to extract peak flavor. Then strain for a smooth finish and adjust thickness to suit drinks or drizzles.
- Control ingredients—no hidden additives, only fruit, water, and sugar.
- Quick on the stove: small batches take only minutes and scale easily.
- Cost-effective and waste-cutting—use surplus produce to lift breakfasts and cocktails.
- Customize sweetness and citrus brightness to build a signature flavor.
Result: a fridge-ready, versatile syrup that invites experimentation and tastes far fresher than shelf options.
Simple Ingredients and Tools You’ll Need
A handful of everyday ingredients and one sturdy pan were all I needed to get started. This section lists the essentials so you can work confidently and keep flavor bright.
Sweeteners that work
Granulated sugar gave a clean balance and dissolves quickly for a glossy finish. Brown sugar added a hint of caramel depth that paired well with darker fruits.
When you wanted a more nuanced sweetness, try honey or maple syrup. Each option changed the aroma and mouthfeel while keeping the base familiar.
Essentials for the kitchen
Use a medium saucepan with a heavy bottom to keep heat even and prevent scorching as the sugar dissolves. A wooden spoon made stirring steady and safe.
Measure with reliable cups and spoons to keep the 1:1:1 balance right: one cup fruit, one cup sugar, one cup water when the method calls for it.
- Fine mesh strainer for a bar-quality finish.
- Clean glass jar for storage and easy pouring.
- Measuring cups and a good thermometer if you want precise control during cooking.
Tip: A quick blend before heating speeds infusion and yields a silkier texture. Watching for when the sugar dissolves signaled a glossy base ready for flavor extraction.
The Best Fruits for Homemade Syrup and How to Pair Them

Choose the right produce and you’ll turn each batch into a vivid, memorable topper for drinks and desserts. Pick ripe, soft options when you want quick infusion and bright color. Firmer picks can be cooked longer for jammy depth.
Berries that burst with flavor
Strawberry, raspberry, blueberry, and blackberry give vivid color and concentrated brightness. Use them in spritzes, iced tea, or over yogurt for lively results.
Stone fruits for jammy notes
Peach, apricot, cherry, and plum add lush, rich character. These suit evening desserts and bold cocktails that need depth.
Tropical choices for a sunny twist
Mango, pineapple, and passion fruit bring a fragrant, sunny balance. They pair well with sparkling water or rum-based cocktails.
Citrus for zesty brightness
Orange, lime, and grapefruit brighten syrups with tang and aroma. Use them to lift other flavors or to cut sweetness.
Flavor combos to try
- Raspberry-lime for spritzes and cocktails.
- Mango-pineapple for tropical punches.
- Peach-ginger for desserts and warm pours.
Fruit Simple Syrup Recipe: Step-by-Step Method

Start by measuring equal parts to set a reliable base: 1 cup fruit, 1 cup sugar, and 1 cup water. This balance gives body and sweetness that adapts well to drinks and desserts.
Prep and ratio basics
Measure first, then blend if you want a faster infusion. Optional blending breaks down the produce and helps the sugar dissolve quickly before cooking in a medium saucepan.
Simmer time and heat
Bring the mix to a gentle boil, then lower the heat to maintain a steady simmer for 5–15 minutes. Stir occasionally and watch for color, aroma, and light thickening as your cues.
Strain and cool
Strain through a fine mesh to remove pulp, pressing gently to capture every drop. Cool to room temperature, funnel into a clean jar, label, and refrigerate.
- Tip: Granulated sugar gives a neutral sweetness; adjust amounts to taste.
- For a lighter variation, use 1/4 cup sugar, 1/4 cup water, a splash of lemon, and 1 cup berries.
Flavor Upgrades: Citrus, Herbs, Spices, and Extracts

Brighteners like citrus zest and a splash of lemon awaken each batch and lift every pour. Add zest during the simmer and fold in juice off heat to keep fresh aroma intact.
Fresh herbs refresh the profile. Mint brings coolness, basil adds sweet-peppery notes, rosemary gives woodland depth, and lavender lends floral grace. Add herb sprigs near the end of the simmer for a clear, green note.
Warm spices and extracts build rounded depth. Simmer cinnamon, nutmeg, or allspice gently so the base stays balanced. Stir in vanilla extract or almond and maple-style extracts off the heat for a clean finish that complements baked flavors.
- Brighten with citrus for spritzers and cocktails.
- Infuse herbs to refresh iced drinks and yogurt drizzles.
- Use spices for cozy pours and dessert toppings.
- Experiment different small batches to find your ideal taste.
Tip: Keep additions subtle so the primary flavor stays central. Log changes and repeat your favorites to craft a boutique-quality flavor syrup at home.
Texture Control: From Light Syrup to Pourable Sauce

How long you cook will decide whether the finished liquid is sippable or spoonable. Small shifts in time and gentle heat change body, color, and flavor without extra ingredients.
Reduction vs. quick cook: adjusting thickness by time
A brief simmer (just a few minutes) yields a light, drinkable pour perfect for cocktails and iced tea. A longer reduction concentrates sugars and fruit, turning the mix into a richer topper for desserts.
Optional cornstarch slurry for thicker, glossy results
For a fast, shiny finish, whisk 1 tablespoon cornstarch with about 2 tablespoons cold water. Stir this slurry smooth, then add it as the fruit softens in the saucepan. Simmer briefly until glossy and slightly thickened.
“Watch how the liquid coats a spoon and falls in a steady ribbon — that cue tells you to stop the cooking so it sets just right.”
- Use time as the primary lever: short cook = sippable; long cook = spoonable.
- Keep heat low to avoid scorching and keep clean, bright taste.
- Mix slurry with cold water first to prevent lumps and add while simmering.
- Remember it thickens as it cools — pull from heat a touch early.
Storage, Freezing, and Reheating: Keep It Fresh and Safe

Proper bottling and chilling kept each jar clear, flavorful, and ready for use. After cooling, pour the liquid into a clean, airtight jar and label it with the date and the main fruit. This simple step saved guesswork and helped you repeat favorite batches.
Refrigeration window
Store in the fridge for short-term use. In a sealed glass jar the syrup kept well for about 1–2 weeks. Check aroma and clarity; discard any batch that smells off or looks cloudy.
Freeze for later
For longer storage, freeze portions for up to 3 months. Leave headspace in containers to allow for expansion, or pour into ice trays and freeze cubes for single-serve convenience.
Gentle reheat
To serve warm, thaw overnight in the refrigerator, then warm gently in a small saucepan over low heat. Stir occasionally and heat for a few minutes until the liquid flows smoothly without boiling.
- Label jars with date and contents to track freshness.
- Keep lids, funnels, and tools clean and dry during bottling.
- Save a few frozen cubes to chill and flavor iced tea or sparkling water fast.
“Small habits—clean jars, clear labels, and low, slow reheating—kept the cordial tasting its best.”
Ways to Use Your Syrup: Drinks, Breakfasts, and Desserts
Keep a bottle on hand and you’ll reach for it all week to boost flavor across drinks and plates. This cordial brightened iced tea, sparkling water, and lemonade in seconds. Stir a spoon into pitchers or scale up for parties.
Cocktails, iced tea, lemonade, and sparkling water
Shake it into cocktails for quick balance, or spoon into iced tea and lemonade to lift sweetness and aroma. A dash in sparkling water turns plain bubbles into a craft sip.
Pancakes, waffles, crepes, and French toast
Use a thicker batch as a sauce over pancakes, waffles, crepes, or French toast. Warm the jar slightly for a pourable finish that clings to warm bread.
Ice cream, yogurt, snow cones, and bakery drizzles
Drizzle over ice cream and yogurt, or swirl into whipped cream and frosting for bakery-style flair. Pour over crushed ice for snow cones and slushies that pop with color and taste.
Fruity ice cubes and quick vinaigrettes
Freeze portions as fruity ice cubes to chill drinks without dilution. For a fast dressing, whisk strained cordial with vinegar, oil, and a pinch of salt to make a sweet-tart vinaigrette.
“A small bottle at the fridge door made weekday meals and cocktails feel special.”
Tip: Add a touch of vanilla extract or citrus zest to match berries or stone fruits and compare taste across uses to find favorites.
Conclusion
,What started as a small stove-top batch ended as a go-to jar that lifted drinks and desserts all week. You followed the 1:1:1 baseline, used a gentle 5–15 minute simmer, and learned to strain for a smooth, clear finish.
Try small tweaks—a splash of lemon, a sprig of herbs, or a hint of vanilla extract—to find signature flavors. Use granulated sugar for a classic balance, or swap in brown sugar, honey, or maple when you want depth.
Store jars in the fridge for about 1–2 weeks or freeze portions for up to three months. With that framework, you can make syrup with confidence and enjoy vibrant fruit and berries across drinks, breakfasts, and desserts.
FAQ
What ratio of fruit, sugar, and water makes a reliable homemade syrup?
How long should I simmer the fruit mixture to get good flavor without burning?
When should I strain the syrup, and what tools work best for a smooth result?
Can I use alternative sweeteners like honey, maple, or brown sugar?
How long does homemade syrup keep in the refrigerator and freezer?
How can I make the syrup thicker for drizzling over desserts?
What flavor additions pair well with different fruits?
Are there safety tips when making and storing homemade syrups?
Can I use frozen produce, and do I need to change the method?
How can I experiment without wasting ingredients?


