


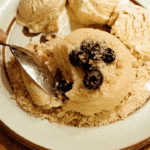
Easy Homemade Vanilla Ice Cream
4
servings30
minutes40
minutes300
kcal1
hour10
minutesBeginner-friendly ice cream with everyday ingredients.
Keep the screen of your device on
Ingredients
2 cups 2 heavy cream
1 cup 1 whole milk
0.75 cup 0.75 granulated sugar
1 tablespoon 1 pure vanilla extract
1/8 teaspoon 1/8 salt
Directions
- In a medium bowl, whisk together heavy cream, whole milk, and granulated sugar until the sugar is completely dissolved and the mixture is smooth.
- Stir in pure vanilla extract and a pinch of salt, ensuring everything is well mixed and there are no sugar granules left.
- Transfer the mixture to an ice cream maker, following the manufacturer's instructions for assembling and starting the machine.
- Churn the mixture in the ice cream maker for about 20-30 minutes, or until it thickens and reaches a soft-serve consistency.
- For firmer ice cream, transfer it to an airtight container and freeze for at least 2 hours or until desired consistency is achieved.
- When ready to serve, let the ice cream sit at room temperature for a few minutes to soften slightly for easy scooping.
Nutrition Facts
- Total number of serves: 4
- Calories: 250kcal
- Cholesterol: 70mg
- Sodium: 50mg
- Potassium: 120mg
- Sugar: 20g
- Protein: 3g
- Calcium: 100mg
- Iron: 0mg
- Thiamin: 0mg
- Riboflavin: 0mg
- Niacin: 0mg
- Folate: 10mg
- Biotin: 0mg
- Phosphorus: 0mg
- Iodine: 0mg
- Magnesium: 0mg
- Zinc: 0mg
- Selenium: 0mg
- Copper: 0mg
- Manganese: 0mg
- Chromium: 0mg
- Molybdenum: 0mg
- Chloride: 0mg
Did you make this recipe?
Tag @https://www.instagram.com/ice_cream_haven/ on Instagram and hashtag it with #IceCreamIceCreamHavens
Like this recipe?
Follow @https://www.pinterest.com/Ice_Cream_Haven/ on Pinterest
Join our Facebook Group!
Follow https://www.facebook.com/icecreamhavens/ on Facebook
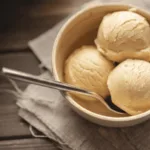
Introduction to Blender Ice Cream
Discover the joy of making homemade ice cream with your kitchen appliances. Blender ice cream, or the no-churn method, lets you make creamy treats without an ice cream machine. Just use a blender and an ice cube tray to make different flavors that will excite your taste buds.
What is Blender Ice Cream?
Blender ice cream is a homemade frozen dessert made smooth and creamy by your blender. It mixes milk, cream, sweeteners, and flavorings to get a rich ice cream texture without churning. The no-churn method adds air to the mix through blending.
Benefits of Making Ice Cream at Home
Making ice cream at home has many benefits. You can choose the ingredients, making it healthier with natural sweeteners and vegan options. It’s also cheaper than buying it and lets you try new flavors.
“The beauty of homemade ice cream lies in the ability to craft flavors that reflect your creativity and satisfy your cravings.”
Essential Tools and Ingredients
To start making blender ice cream, you need a few things. A high-speed blender is key for a smooth texture. You also need an ice cube tray for freezing parts of the mix. Other important ingredients include:
- Liquid base (dairy or non-dairy milk)
- Sweeteners (sugar, honey, maple syrup)
- Flavoring options (cocoa powder, fruits, extracts)
- Thickeners (cream, avocado, nut butters)
With these tools and ingredients, you’re set to make homemade blender ice cream that will wow your friends and family.
Choosing the Right Ingredients

When making blender ice cream at home, picking the right ingredients is key. The quality and type of ingredients you choose will affect the taste and texture of your ice cream. Let’s look at the options for making the perfect blender ice cream.
Types of Bases: Dairy vs. Non-Dairy
The base of your ice cream can be dairy or non-dairy, based on your preferences and dietary needs. For a creamy ice cream, choose dairy bases like heavy cream or whole milk. Most people find that 12%-20% butterfat is best for homemade ice cream.
If you prefer a dairy-free option, coconut milk is a great choice. It gives a creamy texture similar to traditional ice cream. Nut milks like almond or cashew milk are also good for a lighter, healthier option.
Flavoring Options for Blender Ice Cream
One of the best things about blender ice cream is customizing the flavors. Use pure extracts like vanilla extract or peppermint extract for classic tastes. For a rich chocolate flavor, add cocoa powder.
Fresh fruit purées, like strawberry or mango, add natural sweetness and color. Try instant coffee, nut butters, or fresh mint leaves for unique flavors. Steeping fresh mint in the cream base before blending adds freshness.
Sweeteners: Natural vs. Processed
For sweetening your ice cream, choose between natural and processed options. Natural sweeteners like honey, maple syrup, or dates offer subtle sweetness and depth. They’re great for avoiding refined sugars.
Sweeteners make up 12% to 16% of ice cream compositions.
If you prefer traditional sweetness, use granulated sugar or condensed milk. The type and amount of sweetener you choose will impact the texture and freezing point of your ice cream. Finding the right balance is key.
By choosing high-quality ingredients and experimenting with flavors, you can make delicious blender ice cream. The secret to success is using fresh, pure ingredients that work well together and please your taste buds.
Step-by-Step Guide to Making Blender Ice Cream

Making creamy blender ice cream at home is simple. With the right ingredients and techniques, you can make a delicious ice cream base that’s as good as store-bought. Follow these steps for the perfect soft-serve consistency in your homemade ice cream.
Preparation: Chilling Ingredients
Chill your ice cream base ingredients before blending. This step is key for the best results and to avoid ice crystals. Here’s how to prepare your ingredients:
- Freeze your chosen fruit (about 30-40g) at approximately -5°C (23°F) for the ideal consistency.
- Cut fruits like strawberries, kiwi, mango, and banana into roughly 1cm x 1cm cubes before freezing.
- Keep your ice cream or frozen yogurt (around 120g) at -14 to -16°C (3.2 to 6.8°F) for the best texture.
Blending Techniques for Creaminess
Once your ingredients are chilled, it’s time to blend. To get a creamy texture without overwhipping, follow these techniques:
- Start blending on a low speed to combine the ingredients evenly.
- Gradually increase the speed, using the tamper tool of your Vitamix to push the ingredients towards the blades.
- Blend until you reach a thick and creamy consistency, being careful not to over-blend.
Be cautious not to over-blend to maintain a rich ice cream consistency.
Freezing Process and Tips
After blending, freeze your ice cream for the perfect scoopable texture. Here’s how to get the best results:
Pour your blended ice cream base into a freezer-safe airtight container, cover with plastic wrap, and freeze for 4-6 hours, stirring occasionally. If you’re adding mix-ins, freeze the ice cream for 2 hours, stir in your desired toppings, then freeze for another 2-4 hours. Your homemade ice cream can be stored in the freezer for up to a month.
When serving, let the ice cream sit at room temperature for a few minutes to soften slightly for the perfect scoopable consistency. Top with your favorite additions like brownie chunks, whipped cream, syrup drizzles, or sprinkles for a delightful treat.
Creative Flavor Combinations

Blender ice cream lets you mix and match flavors in endless ways. You can make classic favorites or try new, trendy ones. Here are some tasty ideas to enhance your blender ice cream.
Classic Vanilla and Chocolate Recipes
Vanilla and chocolate are always in style. For vanilla ice cream, blend a creamy base with vanilla extract or beans. For chocolate, add cocoa powder or melted chocolate chips. These flavors are great for adding mix-ins and toppings.
Fruit-Infused Blender Ice Cream Ideas
Adding fresh fruits to your ice cream is refreshing. Strawberry ice cream is a favorite, full of sweet berries. Try blueberry, raspberry, mango, and peach too. Just blend the fruit with your ice cream base for a tasty treat.
“I love experimenting with different fruits in my blender ice cream. The natural sweetness and vibrant colors make every scoop a delight!”
Unique Flavor Trends: Herbs and Spices
For those who love trying new things, herbs and spices can spice up your ice cream. Mint chocolate chip is a hit, mixing mint’s coolness with chocolate’s richness. Try basil with lemon or strawberry, or cinnamon with apple or pumpkin. These unique flavors will amaze your taste buds.
Don’t be shy to mix things up in your blender ice cream. Try different ingredients to find your favorite. Whether you like classic, fruity, or herb and spice flavors, there’s always something new to try. So, grab your blender and start making these amazing flavors today!
Troubleshooting Common Issues

Making blender ice cream at home can be fun and rewarding. But, it comes with its own set of challenges. Knowing how to fix common problems is key to making sure your ice cream is always creamy and delicious.
Ice Cream Too Hard or Too Soft
If your ice cream is too hard, it might have too much water from mix-ins. To fix this, add stabilizers like xanthan gum or pectin. These help stop ice crystals from forming, making your ice cream smoother.
If it’s too soft, it might lack enough fat. Fat is important for ice cream’s texture and structure. Cream has 59% water, while skim milk has 90%.
Grainy Texture Challenges
Grainy ice cream comes from ice crystals during freezing. To avoid this, blend in batches and don’t over-blend. Then, quickly put the mixture in a freezer-safe dish and cover it with plastic wrap.
Pre-chilling the mixture before blending can also help. This reduces ice crystal size.
“Ice cream troubleshooting is 10% flavor development and 90% managing water and ice.” – Ice Cream Guru
Flavor Mismatches and Fixes
Off flavors can come from bad ingredients or freezer burn. Use fresh ingredients and store ice cream in the back of the freezer. Remember, fruits like strawberries are very watery. Roasting them can help concentrate their flavors before adding to your ice cream.
By understanding and fixing these common issues, you’ll make ice cream that’s smooth, creamy, and full of flavor.
Storing and Serving Blender Ice Cream
Once you’ve made blender ice cream, it’s key to store it right. Use an airtight container and press plastic wrap on the surface before sealing. This keeps it smooth and tasty for up to a month in the freezer.
Serving blender ice cream is fun. You can scoop it into bowls or top ice cream cones. Try it in sundaes, milkshakes, or as ice cream sandwich filling. Pair it with warm desserts for a cool contrast.
Best Practices for Storage
Keep your blender ice cream fresh by storing it in an airtight container. Press plastic wrap on the surface before sealing. This stops ice crystals and freezer burn. Leftover mango ice cream can be stored in a sealed container for later.
Serving Suggestions and Pairings
Blender ice cream is versatile. Enjoy it in cones or bowls with toppings. Make sundaes with brownies, nuts, and cherries. Blend it with milk for milkshakes. Try it with warm desserts for a nice contrast.
Enjoying Ice Cream Responsibly
Homemade blender ice cream is tasty but should be enjoyed in moderation. Use small dishes or ice cream cones for portion control. Be careful with toppings that add calories and sugar. Enjoy it as an occasional treat to satisfy your cravings.
FAQ
Can I make ice cream without an ice cream maker?
What are the benefits of making blender ice cream at home?
What types of milk can I use for the ice cream base?
How can I flavor my blender ice cream?
What sweeteners work best for blender ice cream?
How long does it take to make blender ice cream?
Can I add mix-ins to my blender ice cream?
How long can I store homemade blender ice cream?
What can I do if my blender ice cream turns out too hard or too soft?
How can I serve blender ice cream?


