


Chocolate Marshmallow Ice Cream
4
servings30
minutes40
minutes300
kcal1
hour10
minutesA rich, creamy chocolate ice cream with a swirl of marshmallows.
Keep the screen of your device on
Ingredients
2 cups 2 heavy cream
1 cup 1 whole milk
0.75 cup 0.75 granulated sugar
0.5 cup 0.5 unsweetened cocoa powder
1 teaspoon 1 vanilla extract
1 cup 1 mini marshmallows
Directions
- In a large mixing bowl, whisk together the heavy cream, whole milk, sugar, and cocoa powder until the sugar is fully dissolved.
- Add the vanilla extract to the mixture and stir until evenly combined. Ensure the mixture is smooth with no cocoa powder lumps.
- Cover the mixing bowl with plastic wrap and chill in the refrigerator for at least two hours or until the mixture is very cold.
- Pour the cold mixture into an ice cream maker and churn according to the manufacturer's instructions, usually for about 20 to 25 minutes.
- In the last five minutes of churning, add the mini marshmallows gradually into the ice cream maker to incorporate them evenly.
- Once the churning is complete, transfer the ice cream to an airtight, freezer-safe container. Cover and freeze for at least three hours or until firm.
- Before serving, allow the ice cream to sit at room temperature for five minutes to soften slightly for easier scooping.
Recipe Video
Nutrition Facts
- Total number of serves: 8
- Calories: 300kcal
- Cholesterol: 80mg
- Sodium: 40mg
- Potassium: 250mg
- Sugar: 20g
- Protein: 3g
- Calcium: 100mg
- Iron: 1mg
Did you make this recipe?
Tag @https://www.instagram.com/ice_cream_haven/ on Instagram and hashtag it with #IceCreamIceCreamHavens
Like this recipe?
Follow @https://www.pinterest.com/Ice_Cream_Haven/ on Pinterest
Join our Facebook Group!
Follow https://www.facebook.com/icecreamhavens/ on Facebook
Introduction to a Decadent Dessert
Some recipes aren’t just about taste—they’re about connection. This frozen creation captures the essence of shared laughter, crackling campfires, and hands sticky with melted sweetness. It’s where culinary artistry meets heartwarming nostalgia.
Discovering the Inspiration Behind the Recipe
Picture a moonlit picnic where creamy swirls became the backdrop for whispered promises. That’s the magic we’ve bottled here. Our signature blend draws from generations of dessert lovers who knew the power of contrasting textures—silky meets pillowy, rich dances with airy.
The Story of a Sweet Tradition
Long before freezers existed, people gathered around fires to roast fluffy clouds over flames. The marriage of toasted confections and velvety cocoa became legend. Today’s version honors that history while adding modern precision—a tribute to timeless joy in every scoop.
Three elements make this treat unforgettable:
- A base that whispers of midnight cocoa forests
- Swirls resembling clouds caught mid-drift
- Surprise crumbles echoing campfire crackles
Essential Ingredients and Equipment Chocolate Marshmallow Ice Cream

Great desserts begin with thoughtful preparation. The magic happens when premium components meet purpose-built tools, creating textures that linger in memory long after the last bite. Let’s explore what transforms simple mixtures into spoonable artistry.
Dairy, Cocoa, and Fluffy Essentials
Start with heavy cream and whole milk—the dynamic duo that builds a silky foundation. Dutch-process cocoa powder steals the show, offering deeper color and bolder flavor than standard varieties. For those signature swirls, real marshmallow fluff adds authenticity, while mini versions provide playful texture.
Dark chocolate chips melt seamlessly into the base, ensuring every scoop delivers richness without graininess. Measure precisely: one cup of milk balances two cups of cream for optimal consistency. Sift your cocoa powder through a fine mesh sieve to eliminate lumps—your taste buds will thank you.
Must-Have Tools for Silky Results
Your ice cream maker is the MVP here, churning air into the mixture for that coveted creamy mouthfeel. Freeze the bowl solid 24 hours beforehand—patience rewards you with perfect texture. A stand mixer whips ingredients to velvety peaks, while rubber spatulas scrape every precious drop from the bowl.
Don’t overlook storage! Airtight containers prevent freezer burn, preserving your creation’s integrity. With these tools, you’re not just making dessert—you’re engineering joy.
Chocolate Marshmallow Ice Cream Step-by-Step Preparation Process

Transform ordinary ingredients into spoonable magic through careful technique and precision. This stage separates casual attempts from masterpiece creations, where temperature control and timing become your greatest allies. Every action here builds toward that perfect balance of silkiness and structure.
Creating the Chocolate Ganache and Bloomed Cocoa
Awaken your cocoa powder by blending it with steaming coffee—this blooming process releases hidden depths of flavor. Watch as the dry powder transforms into a fragrant paste within minutes. Meanwhile, pour simmering cream over dark chocolate chips in a separate bowl, letting the heat work its alchemy into velvety ganache.
Whipping and Combining for a Smooth Ice Cream Base
Beat cold heavy cream until it forms sturdy peaks that hold their shape. Use a rubber spatula to gently fold this cloud-like mixture into your cooled ganache base. Work in three stages, rotating the bowl with each fold to maintain airiness while ensuring even distribution.
For custard enthusiasts: Temper eggs by streaming warm milk slowly into the yolks, whisking constantly. This dance between heat and motion creates a lush foundation. No-churn methods shine through patient layering—alternate between creamy elements and whispered secrets of pastry chefs for professional-grade results.
Expert Tips for Perfect chocolate marshmallow ice cream

Crafting unforgettable desserts requires both science and soul. These techniques elevate homemade creations to artisanal masterpieces, blending technical precision with playful experimentation. Let’s explore methods that turn simple ingredients into symphonies of taste and texture.
Balancing Flavors and Textures
Awaken your cocoa’s potential by blooming it with hot coffee—this flavor-enhancing trick releases hidden depth. For silky swirls, warm marshmallow fluff briefly until it flows like liquid silk. Dark chocolate (70% or higher) adds sophistication, balancing the sweetness of pillowy mix-ins.
Layer like a pro: spread your base in thirds, alternating with melted fluff ribbons. Freeze each layer briefly before adding the next—this prevents sinking and creates distinct textural contrasts. Watch temperatures closely when combining elements; even 5°F differences affect consistency.
Timing transforms results. Add mini marshmallows when the base thickens to soft-serve stage—they’ll stay chewy rather than turning rock-hard. For showstopping patterns, use a chopstick to swirl toppings in figure-eight motions, creating pockets of gooey delight.
Chocolate Marshmallow Ice Cream Variations, Substitutions, and Customization Ideas

Turn this foundation into your culinary canvas—endless possibilities await. Swap ingredients to match dietary needs or pantry availability without sacrificing quality. A simple switch like natural cocoa powder creates brighter flavors, while Dutch-process delivers bold intensity.
Mix-Ins and Flavor Enhancements
Crushed cookies add satisfying crunch, while swirls of peanut butter create nostalgic Fluffernutter vibes. Try folding in seasonal berries for tart contrast or toasted nuts for earthy depth. Store-bought marshmallow fluff works perfectly for busy creators, though homemade versions let you control sweetness.
Involve kids by letting them choose colorful add-ins. Mini marshmallows and chocolate chips transform preparation into edible confetti art. For themed twists, layer graham cracker crumbs between batches or crumble brownies into the churning base.
Adaptations shine with simple changes:
- Use sweetened condensed milk for no-churn convenience
- Replace coffee with chai tea in the blooming process
- Fold freeze-dried fruit powder into the base for vibrant streaks
Premium upgrades like single-origin cocoa or vanilla bean paste elevate everyday treats into gourmet experiences. Remember—every tweak tells a new story through flavor.
Troubleshooting Common Chocolate Marshmallow Ice Cream Recipe Challenges

Even the most carefully crafted desserts can hit unexpected snags—here’s how to turn kitchen hiccups into triumphs. Whether you’re battling temperature tantrums or texture troubles, these solutions transform frustration into culinary empowerment.
Managing Consistency and Avoiding Curdling
Watch your sugar and egg ratios like a hawk. Too much sweetness can prevent proper freezing, while too few yolks might leave your base thin. If eggs scramble during tempering, don’t panic—pour the mixture through a fine sieve to rescue it.
Chilling matters more than you think. Always refrigerate your base for at least 4 hours before churning. This allows flavors to meld while ensuring your cream maker works efficiently. Cold ingredients = smoother results.
Quick Fixes for Temperature and Texture Issues
Is your mixture refusing to thicken? Check freezer bowl temperature—it needs 24 hours at -0°F minimum. For stubborn cocoa clumps, blend the base briefly before freezing. Grainy texture often comes from undissolved sweeteners.
When time feels like the enemy, remember: patience creates perfection. Let churned desserts harden in the freezer for 6 hours minimum. Serve too soon, and you’ll miss that dreamy scoopability. Every minute counts when crafting velvety textures.
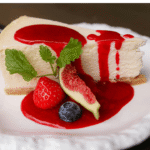
Serving, Storage, and Presentation Ideas
Presentation transforms treats into edible art. Serve your creation in chilled bowls for immediate texture preservation. Top with toasted coconut flakes or crushed candied nuts for contrasting crunch. Drizzled caramel adds glossy sophistication while maintaining flavor balance.
Store leftovers in airtight containers with parchment pressed directly on the surface. This prevents ice crystals and preserves creamy consistency. For portion control, freeze individual scoops on wax paper before transferring to bags—perfect for quick indulgences.
Elevate gatherings with creative displays. Layer alternating flavors in parfait glasses for visual drama. Use cookie cutters as molds for themed shapes during holidays. Garnish with fresh mint leaves or edible flowers to highlight seasonal ingredients.
Remember: temperature impacts enjoyment. Let desserts soften slightly at room temperature before serving. This unlocks hidden flavor notes and ensures smooth scooping. Every thoughtful detail turns homemade creations into unforgettable moments worth savoring.
FAQ
Can I use cocoa powder instead of melted chocolate for the base?
How do I prevent the mixture from curdling during preparation?
What’s the secret to achieving fluffy swirls of marshmallow?
Can I make this without an ice cream maker?
How long does homemade ice cream stay fresh?
What mix-ins pair well with this flavor profile?
Why does my ganache sometimes seize or separate?


