


Homemade Ice Cream with Condensed Milk
4
servings30
minutes40
minutes300
kcal1
hour10
minutesRich and creamy ice cream using simple ingredients.
Keep the screen of your device on
Ingredients
2 cups 2 heavy cream
1 teaspoon 1 vanilla extract
14 ounces 14 sweetened condensed milk
Directions
- In a mixing bowl, combine the heavy cream and vanilla extract. Whip the mixture with a whisk or electric mixer until stiff peaks form.
- Gently fold in the sweetened condensed milk until well combined, avoiding deflating the whipped cream as much as possible.
- Pour the mixture into an ice cream maker and churn according to the manufacturer's instructions until it reaches a soft-serve consistency.
- Transfer the churned ice cream to an airtight container and smooth the top with a spatula for even freezing.
- Cover the container with a lid or plastic wrap and freeze the ice cream for at least 4 hours or until firm.
- To serve, let the ice cream sit at room temperature for a few minutes to soften slightly before scooping.
Nutrition Facts
- Serving Size: 1g
- Total number of serves: 6
- Calories: 300kcal
- Fat: 18g
- Saturated Fat: 12g
- Trans Fat: 0.5g
- Polyunsaturated Fat: 0.5g
- Monounsaturated Fat: 4g
- Cholesterol: 60mg
- Sodium: 50mg
- Potassium: 130mg
- Carbohydrates: 34g
- Fiber: 0g
- Sugar: 28g
- Protein: 4g
- Vitamin A: 700IU
- Vitamin C: 2mg
- Calcium: 160mg
- Iron: 0.3mg
- Vitamin D: 10mg
- Vitamin E: 0.5mg
- Vitamin K: 1mg
- Thiamin: 0.03mg
- Riboflavin: 0.15mg
- Niacin: 0.1mg
- Vitamin B6: 0.05mg
- Vitamin B12: 0.5mg
- Folate: 10mg
- Biotin: 1mg
- Pantothenic Acid: 0.5mg
- Phosphorus: 130mg
- Iodine: 10mg
- Magnesium: 10mg
- Zinc: 0.6mg
- Selenium: 3mg
- Copper: 0.06mg
- Manganese: 0.01mg
- Chromium: 1mg
- Molybdenum: 2mg
- Chloride: 80mg
Did you make this recipe?
Tag @https://www.instagram.com/ice_cream_haven/ on Instagram and hashtag it with #IceCreamIceCreamHavens
Like this recipe?
Follow @https://www.pinterest.com/Ice_Cream_Haven/ on Pinterest
Join our Facebook Group!
Follow https://www.facebook.com/icecreamhavens/ on Facebook
Why this easy no‑churn ice cream belongs in your recipe box
This no‑churn method turns three pantry staples into reliably scoopable frozen dessert without a stovetop or machine.
No cooking, no churning: the key is sweetened condensed milk. It replaces the custard step and supplies dissolved sugar that lowers the freezing point. That keeps the texture soft and helps prevent large ice crystals.
Use full‑fat heavy dairy for the richest results. Substituting low‑fat or low‑sugar products often produces icy, grainy texture instead of a smooth, scoopable finish.
Practical perks: prep takes minutes, cleanup is minimal, and the method is forgiving for beginners and busy families. Readers report more consistent creaminess and fewer freezer‑burn issues when they follow the base closely.
- Define: no‑churn means whip, fold, and freeze—no stovetop custard or machine needed.
- Science: dissolved sugar from sweetened condensed milk keeps the final product scoopable.
- Reliability: full‑fat dairy plus real sweetened condensed milk gives dependable texture.
Homemade Ice Cream Condensed Milk recipe Simple ingredients for ultra‑creamy results

Focus on fat, sweetness, and pure vanilla to lock in a smooth, velvet mouthfeel. The base is short and purposeful: 2 cups heavy whipping cream, 14 oz sweetened condensed milk, 1 tsp vanilla extract, and a pinch of salt.
Core ingredients and why they matter
Heavy whipping cream supplies richness and body. Higher fat stabilizes air and gives a silky texture. Use full‑fat heavy cream for best results.
Sweetened condensed milk brings dissolved sugar and viscosity. That sugar keeps the mix scoopable and slows ice crystal growth.
Vanilla extract adds aroma and depth. One teaspoon is subtle; increase up to one tablespoon for a bolder vanilla profile. Other extracts like mint or almond are potent—add them sparingly.
Smart swaps and what to avoid
- A pinch of salt brightens flavors without making the dessert salty.
- Do not substitute evaporated milk; it lacks sugar and body and leads to icy texture.
- Whole milk or lighter creams cut fat and often produce a less creamy, icier finish.
For a tested vanilla version, try this classic vanilla guide to fine‑tune extract levels and texture.
Tools you need (and what you can skip)
You don’t need fancy gadgets—just a few basic tools to get perfect texture. A good mixer and roomy bowl make whipping fast. A sturdy spatula keeps folds gentle and a solid scoop gives neat servings.
Minimal toolkit:
- Hand or stand mixer (a whisk works in a pinch).
- Large mixing bowl for volume and stable whipping.
- Rubber spatula and a quality scoop for clean portions.
For storage, metal loaf pans chill fastest while glass pans act as insulators and slow the freeze. Insulated tubs keep texture stable for longer, and paper pint containers with tight lids are handy for gifting.
An ice cream maker or cream maker is optional here—the method is built for an ordinary freezer and a simple mixer. Label containers with flavor and date for easy rotation.
For a tested vanilla version, see the linked vanilla version to fine‑tune technique and timing.
Homemade ice cream condensed milk recipe: step‑by‑step

Begin with chilled cream and a cold bowl to speed whipping cream and boost volume. Cold tools help you reach defined soft to stiff peaks without overworking the fat.
Whip to peaks
Beat the chilled whipping cream until peaks stand when the beaters lift. Look for a glossy, smooth texture — not grainy. Stop at soft or firm peaks depending on how airy you want the final product.
Fold to keep it airy
Whisk vanilla into the sweetened base, then add the whipped cream to the bowl in batches. Gently fold the mixture with a spatula, sweeping from center to edge and turning the bowl to keep air in the mix.
Freeze for scoopable texture
Transfer the smooth mixture to a freezer‑safe container and press plastic wrap directly on the surface. Freeze for 4–6 hours; overnight chills firmer, scoopable results.
Temper the container a few minutes at room temp before serving. For neat portions, run your scoop under warm water, dry it, and make confident swipes.
For more flavor variations and tested tips, see a helpful guide on sweetened condensed milk variations.
Why sweetened condensed milk makes the creamiest Homemade Ice Cream Condensed Milk recipe

The secret to a velvety no‑churn treat lies in concentrated milk solids and dissolved sugar. A can of sweetened condensed combines reduced water with added sugar. That concentration raises viscosity and changes how the mix freezes.
Sugar science: lowering the freezing point
Dissolved sugar binds free water. When less water is available to form crystals, the result stays soft. Smaller crystals mean a smoother mouthfeel and fewer icy bites.
“Sugar acts like antifreeze at a molecular level, improving scoopability.”
Skip the custard and the machine
Traditional custard needs tempering eggs and careful cooking. The canned base replaces that step and the churn. Fewer steps reduce risk of overcooking or curdling. Use quality vanilla and a cold freezer‑safe container for a classic vanilla ice cream profile without a maker.
- Concentrated solids + sugar = stability
- Less cooking, fewer failures
- Standard freezers and proper containers suffice
Flavor boosts and mix‑ins to customize your Homemade Ice Cream Condensed Milk recipe

Start with a single concentrated swirl or chopped mix‑in to test how it freezes and tastes. That keeps texture controlled and lets you fine‑tune intensity.
Vanilla upgrades
- Use scraped vanilla bean or paste for speckles and deeper aroma.
- Increase extract for a bolder profile when you want a clear vanilla note.
Chocolate and mix‑ins
- Whisk sifted cocoa into the base for a fast chocolate ice cream.
- Fold in chocolate chips or sprinkle cooled ganache ribbons for dramatic swirls.
Fruit and candy bar ideas
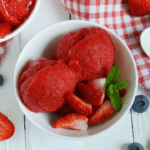
- Fold diced strawberries or swirl berry coulis for bright pints.
- Recreate Almond Joy, Oreo, mint‑chip, or Cookie Monster with small chunks and toasted coconut.
- Assemble s’mores with graham crumbles, toasted marshmallows, and chocolate chunks.
Advanced infusions: gently warm a can to infuse lavender, citrus zest, or matcha, strain, cool, then use as the flavored base.
Pro tips: chop additions small to avoid hard bites and loosen nut butters with a splash of cream before folding. For more flavor ideas and Aroma maker ideas, see Aroma maker ideas.
Serving suggestions, storage, and make‑ahead tips
Plan service and storage before you freeze to get the best texture and presentation. A few small choices—container, timing, and how you thaw—will keep texture smooth and flavors bright.
Freezer timing and serving ideas
Freeze the base at least 4–6 hours; overnight yields firmer scoops ideal for cones.
Temper pans on the counter for a few minutes before scooping so the scoop glides without crushing the texture. Wet and warm the scoop between servings for neat portions.
Serve in sugar or waffle cones, sundae bowls with warm sauce, or sandwich between cookies for portable treats.
Longer storage and make‑ahead habits
- Press plastic wrap directly on the surface, then seal with a tight lid to minimize air exposure and ice crystals.
- Use airtight, rigid containers; insulated tubs help maintain texture for longer stashes. Metal pans freeze faster for quick batches.
- Label each container with flavor and date. Enjoy within a few weeks for peak taste, though quality can hold longer with excellent sealing.
- For parties, make several shallow containers rather than one deep tub—this freezes faster and preserves texture.
Troubleshooting and pro tips for perfect texture
Small adjustments in handling and containers make the difference between silky texture and unwanted frost.
No more ice crystals: proper container, quick freezing, and sugar balance
Keep the sugar balance by using real sweetened condensed milk; its dissolved sugars reduce large ice crystals and help a creamier spoonfeel.
Speed matters: freeze in shallow metal pans for quicker chilling and fewer ice crystals. Press plastic wrap directly onto the surface before sealing to limit air pockets.
Mix‑ins that don’t turn rock‑hard: chop small and swirl wisely
Chop nuts and chocolate into small pieces so add‑ins stay pleasant, not rock‑hard. Ribbon sticky fillings like jam or ganache in thin layers to avoid dense frozen pockets.
For nut butters, loosen them with a tablespoon of heavy whipping cream before folding. That keeps swirls soft and spreadable after freezing.
Using an ice cream maker with this base (optional churn approach)
If you prefer to churn, chill the mixed base thoroughly, then follow your machine’s directions. Churn until the mix lifts like soft serve, then transfer promptly to a shallow container to set.
- Use real canned sweetener to limit ice crystals.
- Freeze shallow pans and avoid frequent door openings.
- Stop whipping at peaks; if overwhipped, fold in a splash of heavy whipping cream.
For more tested tips and variations, see a guide to the creamiest icy variations.
Nutrition, yield, and batch sizing
Planning yield and nutrition helps you scale this cream recipe for any gathering. A single standard batch yields about 8–10 servings, depending on scoop size and mix‑ins.
Typical calories run roughly 293 kcal per serving when you divide into 10 portions. Larger portions push that range to about 363–403 kcal for 8 or fewer scoops.
Practical scaling and portion tips
Richer additions like nuts, chocolate, or caramel raise calories. Fruit adds bulk with fewer calories and brightens flavor.
- Set expectations: one batch = 8–10 servings, variable by scoop size.
- Calorie range: ~293–403 kcal per serving based on portion and mix‑ins.
- Scale smart: double or triple the base and split into 2–3 shallow containers for faster freezing and better texture.
- Portion & gift: pre‑portion into paper pints, seal and label with flavor and date for events.
These measures keep texture steady and make this cream recipe easier to batch for parties. For variety, consult tested ice cream recipes when adding heavy inclusions so you can adjust portion expectations ahead of time.
Conclusion
Homemade Ice Cream Condensed Milk recipe, this no‑churn method proves you can get café‑style texture with three pantry staples and minimal effort. Follow the base ratio—2 cups heavy cream, 14 oz sweetened canned base, and vanilla—then whip, fold, and freeze 4–6 hours for scoopable results.
Use shallow metal pans or insulated tubs and press plastic wrap on the surface to cut ice crystals. Avoid evaporated swaps to keep texture rich and smooth.
Make batches ahead for gatherings: label flavors, freeze in shallow containers, and set up a DIY bar. Try vanilla bean, ganache ribbons, or herb infusions to expand your post options while keeping technique simple.
These cream recipes deliver consistent results with little fuss—replicate the steps, experiment with mix‑ins, and enjoy reliable texture from first scoop to last.
FAQ
What makes this easy no‑churn dessert so creamy?
Can I use evaporated milk or low‑fat dairy instead?
Do I need an ice cream maker to get good results?
How do I know when my cream is whipped enough?
What’s the best way to fold the ingredients without losing air?
How long should I freeze the mixture for scoopable texture?
How do I prevent ice crystals from forming?
Can I add mix‑ins like chocolate chips or fruit without problems?
Are there easy flavor swaps or add‑ins to try?
How should I store leftovers and how long will they keep?
Can I make larger batches for a party and scale this up?
Is this base suitable for using in an ice cream maker?
What common mistakes should I avoid?
How can I make a dairy‑free or lower‑fat version?


