


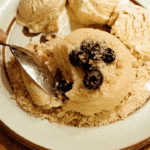
Camping Ice Cream
4
servings30
minutes40
minutes300
kcal1
hour10
minutesEasy ice cream recipe using everyday ingredients for beginners.
Keep the screen of your device on
Ingredients
2 cups 2 heavy cream
1 cup 1 whole milk
0.75 cup 0.75 granulated sugar
1 tablespoon 1 vanilla extract
0.5 teaspoon 0.5 salt
Directions
- In a mixing bowl, whisk together the heavy cream and whole milk until well combined.
- Add the granulated sugar to the cream and milk mixture and whisk until the sugar is fully dissolved.
- Stir in the vanilla extract and salt, ensuring all ingredients are thoroughly incorporated.
- Pour the mixture into an ice cream maker and churn for about 15-20 minutes or until it reaches a soft serve consistency.
- Transfer the churned ice cream into an airtight container and freeze it for at least 2 hours or until firm.
- When ready to serve, allow the ice cream to sit at room temperature for a few minutes for easier scooping.
- Store any leftover ice cream in the freezer, covered with plastic wrap or a lid to prevent freezer burn.
Recipe Video
Nutrition Facts
- Total number of serves: 4
- Calories: 250kcal
- Cholesterol: 65mg
- Sodium: 90mg
- Potassium: 0mg
- Sugar: 18g
- Protein: 3g
- Calcium: 100mg
- Iron: 0mg
- Thiamin: 0mg
- Riboflavin: 0mg
- Niacin: 0mg
- Folate: 0mg
- Biotin: 0mg
- Phosphorus: 0mg
- Iodine: 0mg
- Magnesium: 0mg
- Zinc: 0mg
- Selenium: 0mg
- Copper: 0mg
- Manganese: 0mg
- Chromium: 0mg
- Molybdenum: 0mg
- Chloride: 0mg
Did you make this recipe?
Tag @https://www.instagram.com/ice_cream_haven/ on Instagram and hashtag it with #IceCreamIceCreamHavens
Like this recipe?
Follow @https://www.pinterest.com/Ice_Cream_Haven/ on Pinterest
Join our Facebook Group!
Follow https://www.facebook.com/icecreamhavens/ on Facebook
Why Camping Ice Cream is the Perfect Treat
Being outdoors is amazing, but nothing beats a cool treat. Store-bought ice cream is hard to pack, even with coolers. But, making hiking ice cream at camp is fun for everyone.
Benefits of Camping Ice Cream
Homemade camping ice cream has many perks over other freeze-dried desserts or camp food:
- It’s a cool treat after a long day
- Making it is a fun activity that brings people together
- You can choose your flavors and ingredients
- It’s a unique and memorable camping dessert
The Joy of Homemade Ice Cream
Making ice cream at camp is easy, even without power or an ice cream maker. You can mix the ingredients in a bag and shake it in ice and salt for 15 minutes. This method is fun and makes delicious ice cream.
Making mint chocolate chip camp ice cream takes only 20 minutes and yields two servings, using simple ingredients like chocolate chips, peppermint oil, shelf-stable whole milk, powdered sugar, and ice.
The demand for camping recipes like no-churn ice cream is high. So, make homemade ice cream next time you camp for a memorable experience.
Essential Ingredients for Camping Ice Cream

Making delicious camping ice cream starts with the right ingredients. Freeze-dried food is convenient, but homemade ice cream with fresh ingredients tastes better. You’ll need a few key ingredients for the perfect cold camping treat.
Choosing the Right Base Ingredients
The base of great ice cream is half and half, sugar, and vanilla extract. For creamier ice cream, use 2 cups of heavy cream and 1 cup of whole milk. Add 2/3 cup of sugar and 1 tablespoon of vanilla extract for sweetness and flavor.
For vegan or dietary-restricted options, try coconut, soy, oat, or almond milk. These alternatives can change the ice cream’s texture due to their fat content.
Flavor Options and Add-Ins
Customizing your ice cream is the best part. You can add your favorite flavors and mix-ins. Some favorites include:
- Chocolate chips or chunks
- Fresh or frozen fruit (berries, peaches, mangoes)
- Nuts (almonds, pecans, walnuts)
- Swirls of chocolate or caramel syrup
- Crushed candy bars or cookies
Rock salt, or ice cream salt, is also key. It lowers the ice’s freezing point for the right consistency. Just 1/4 teaspoon is needed per batch.
With these ingredients, you’re ready to make the ultimate cold camping dessert. It will impress your friends and satisfy your sweet tooth.
Methods to Make Ice Cream While Camping

Making your own ice cream while camping is a treat. You can enjoy classic flavors or try new ones. Here are ways to make camping ice cream without eggs.
Using an Ice Cream Maker
If you have electricity at your campsite, a portable ice cream maker is easy to use. Just mix your ingredients, pour them in, and wait. Soon, you’ll have fresh ice cream to enjoy by the campfire.
No-Churn Ice Cream Techniques
No-churn methods are great for those without an ice cream maker. Mix heavy cream, sweetened condensed milk, and flavorings in a bowl. Whip it until thick, then freeze it. You’ll get creamy ice cream with little effort.
Alternative Methods (e.g., Ziplock Bag)
The Ziplock bag method is fun and works well. It’s a great way to make ice cream with your family. Here’s how:
- Put your ice cream base in a quart-sized Ziplock bag, seal it, and remove air.
- Put the bag in a gallon-sized bag filled with ice and rock salt.
- Shake the bag for 10-15 minutes until it hardens.
- Take out the bag, rinse off salt, and enjoy your ice cream!
You can also use a coffee can. Put your mixture in a sealed can, then in a larger can with ice and salt. Roll it until the ice cream is ready.
“The key to making great camping ice cream is to keep the mixture moving. Whether you’re shaking a Ziplock bag or rolling a coffee can, the constant motion helps incorporate air and prevents ice crystals from forming, resulting in a smooth and creamy texture.”
Making ice cream while camping is a fun way to enjoy a sweet treat. It’s a great way to make memories with your loved ones. So, next time you go camping, make sure to bring your ingredients and try one of these methods. You’ll have a cool treat to enjoy under the stars.
Tips for the Best Camping Ice Cream Experience

Making homemade ice cream while camping is fun and rewarding. To make sure your ice cream is perfect, follow these tips. They will help you have the best camping ice cream adventure.
Perfecting the Freezing Process
The secret to creamy ice cream is the right freezing temperature. As you mix, ice will melt. Add ice and rock salt as needed to keep it freezing.
For longer trips, use dry ice under frozen water jugs. This keeps things cool. Experts say to store dry ice safely and follow handling tips.
Serving Suggestions and Pairings
Enjoy your ice cream right away for the best taste and texture. You can have it alone or with other treats. Try these tasty pairings:
- Dutch oven peach cobbler with vanilla ice cream
- Campfire baked apples with caramel ice cream
- Banana boats with chocolate ice cream and marshmallows
For a healthier option, make dairy-free and sugar-free ice cream. Use coconut milk and natural sweeteners like monk fruit. These recipes are great for keto, vegan, or gluten-free diets. They let everyone enjoy homemade ice cream while camping.
Creative Variations for Camping Ice Cream
When making ice cream while camping, you can try many unique flavors. Get creative and mix in different ingredients for your perfect treat. Add fresh fruits like strawberries or bananas for a refreshing taste. Or, mix in candy pieces for a fun and colorful treat.
Looking for healthier options? You can make changes to your ice cream recipe. Use low-fat milk or yogurt instead of heavy cream. Swap refined sugar for natural sweeteners like honey or maple syrup. These changes make your ice cream healthier without losing flavor.
Unique Flavor Combinations
Try new flavors inspired by classic desserts or seasonal tastes. Make a s’mores version with graham cracker crumbs, chocolate, and marshmallow swirls. Or, create a pumpkin spice ice cream for fall with cinnamon and nutmeg. For a festive treat, make red, white, and blue ice cream with berries and white chocolate chips.
Healthy Alternatives and Modifications
For a vegan or dairy-free option, use coconut or almond milk as your base. Add cocoa powder, vanilla, or fresh mint for different flavors. You can also make a protein-rich ice cream by blending Greek yogurt with fruits and freezing it in an ice cream maker. With a bit of creativity, you can enjoy healthy treats on your camping trips.
FAQ
Can I make camping ice cream without an ice cream maker?
What ingredients do I need to make camping ice cream?
How long does it take to make camping ice cream?
Can I make vegan or dairy-free camping ice cream?
What are some creative flavors for camping ice cream?
How can I prevent my camping ice cream from melting too quickly?


