


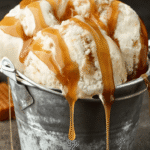
Frozen Pudding Ice Cream
4
servings30
minutes40
minutes300
kcal1
hour10
minutesA creamy homemade ice cream with basic ingredients.
Keep the screen of your device on
Ingredients
3/4 cup 3/4 sugar
2 tablespoons 2 cornstarch
1/4 teaspoon 1/4 salt
2 cups 2 milk
2 large 2 eggs
1 tablespoon 1 vanilla extract
1 cup 1 heavy cream
Directions
- In a medium saucepan, combine sugar, cornstarch, and salt. Gradually stir in milk until smooth.
- Cook over medium heat, stirring constantly, until the mixture thickens and begins to bubble.
- Beat eggs in a small bowl, then slowly stir in about 1 cup of hot milk mixture to temper the eggs.
- Pour the egg mixture back into the saucepan, stirring constantly. Cook for another 2 minutes, then remove from heat.
- Stir in vanilla extract and allow the mixture to cool to room temperature. Chill in the refrigerator for at least 1 hour.
- Pour the chilled mixture into an ice cream maker and churn according to the manufacturer's instructions, usually about 25-30 minutes.
- Transfer the mixture to an airtight container and freeze for at least 2 hours before serving.
- Before serving, let the ice cream sit at room temperature for a few minutes to soften slightly.
Nutrition Facts
- Total number of serves: 6
- Calories: 250kcal
- Fat: 13g
- Saturated Fat: 8g
- Trans Fat: 0g
- Polyunsaturated Fat: 0g
- Monounsaturated Fat: 4g
- Cholesterol: 95mg
- Sodium: 65mg
- Potassium: 125mg
- Carbohydrates: 30g
- Fiber: 0g
- Sugar: 28g
- Protein: 4g
- Vitamin A: 500IU
- Vitamin C: 0mg
- Calcium: 120mg
- Iron: 0mg
- Vitamin D: 1mg
- Vitamin E: 0mg
- Vitamin K: 0mg
- Thiamin: 0mg
- Riboflavin: 0mg
- Niacin: 0mg
- Vitamin B6: 0mg
- Vitamin B12: 0mg
- Folate: 0mg
- Biotin: 0mg
- Pantothenic Acid: 0mg
- Phosphorus: 0mg
- Iodine: 0mg
- Magnesium: 0mg
- Zinc: 0mg
- Selenium: 0mg
- Copper: 0mg
- Manganese: 0mg
- Chromium: 0mg
- Molybdenum: 0mg
- Chloride: 0mg
Did you make this recipe?
Tag @https://www.instagram.com/ice_cream_haven/ on Instagram and hashtag it with #IceCreamIceCreamHavens
Like this recipe?
Follow @https://www.pinterest.com/Ice_Cream_Haven/ on Pinterest
Join our Facebook Group!
Follow https://www.facebook.com/icecreamhavens/ on Facebook
Introduction to a Decadent Frozen Pudding Ice Cream Experience
What if you could create a gourmet dessert in minutes? This innovative sweet redefines convenience without sacrificing richness. By blending pantry staples with smart techniques, it delivers restaurant-quality indulgence straight from your freezer.
What Makes This Dessert Irresistible?
The magic lies in its surprisingly airy texture. Unlike heavy alternatives, this treat uses almond milk for a lighter base that still feels luxuriously smooth. A clever mix of ingredients creates a melt-in-your-mouth consistency – sweet enough to satisfy cravings but balanced enough to avoid overwhelming sweetness.
Dietary flexibility shines here. Whether avoiding dairy or seeking simpler recipes, this approach welcomes everyone to the table. The no-churn method skips complicated steps, letting you focus on flavor experiments instead of equipment hassles.
Inspiration Behind This Recipe
Born from the need for quick, crowd-pleasing options, this formula celebrates modern home cooking. Busy parents and novice bakers alike appreciate its 10-minute prep time and forgiving nature. One tester remarked, “It’s like having a pastry chef’s secret – without the fancy tools!”
The recipe adapts to whatever you have on hand. Swap chocolate for fruit swirls, or add crunchy toppings for contrast. This versatility ensures every batch feels fresh and exciting, while the reliable base guarantees consistent results.
How to Make frozen pudding ice cream at Home

Transform basic ingredients into a luxurious treat with minimal effort. This approach turns everyday items into something extraordinary, letting you skip complex methods while achieving professional-quality results.
Step-by-Step Recipe Guide
Start by blending one box of chocolate pudding mix with almond milk and cocoa powder. Use a vigorous whisking motion to eliminate lumps – this creates the silky base crucial for the final texture. Fold in crushed cookies or other add-ins just as the mixture thickens slightly.
Pour into a loaf pan lined with parchment paper. Smooth the top with a spatula for even freezing. Cover tightly with plastic wrap, pressing it directly onto the surface to prevent ice crystals.
Mixing, Freezing, and Serving Techniques
Your creation needs at least five hours in the freezer to set properly. For batches stored longer, let them rest at room temperature briefly before scooping. This softens the edges while maintaining that ideal creamy feel.
Serve in chilled bowls or cones for maximum enjoyment. Experiment with drizzles or sprinkles to elevate each serving. The beauty lies in its adaptability – once you master the base, endless flavor adventures await.
Ingredient Essentials and Essential Kitchen Tools

Crafting exceptional desserts starts with quality components and practical gear. This approach strips away complexity while delivering rich textures that rival professional creations. Let’s explore what transforms simple items into something extraordinary.
Key Ingredients and Their Roles
The chocolate pudding mix acts as your foundation, creating instant thickness without hours of chilling. Almond milk offers a lighter silky base compared to heavy creams, making every scoop feel indulgent yet airy. Two tablespoons of cocoa powder deepen the flavor profile, turning basic sweetness into a sophisticated treat.
Crushed cookies or fresh berries? Both work beautifully. Mix-ins add personality while maintaining the ideal consistency – fold them in just before freezing to preserve texture contrasts.
Must-Have Tools for a No-Churn Process
You’ll need three basics: a large mixing bowl, sturdy whisk, and loaf pan. The bowl’s wide rim lets you incorporate ingredients evenly, while the pan’s shape ensures uniform freezing. No fancy gadgets required – just reliable tools that every kitchen stocks.
Pro tip: Line your pan with parchment paper for effortless removal. As one baker shared, “It slides out perfectly every time, ready for slicing or scooping!” Store leftovers in an airtight container to maintain freshness for up to two weeks.
Creative Add-ins and Flavor Variations

Unlock endless possibilities by personalizing your creation. The beauty of this treat lies in its adaptability – a blank canvas waiting for your culinary artistry. Let’s explore how to elevate every spoonful.
Enhancing Your Dessert with Mix-Ins
Crushed Biscoff cookies add caramel warmth, while fresh berries bring juicy bursts. For crunch lovers, try toasted coconut flakes or chopped peanuts. Balance soft and crispy elements by folding in add-ins when the mixture reaches pudding-like consistency.
Sturdy ingredients like candy pieces hold up best in the freezer. Delicate items like cookie dough bits should be frozen first. Spread your creation in a lined loaf pan for even distribution – no special molds needed.
Customizing for Dietary Preferences and Unique Flavors
Swap regular milk for oat or coconut alternatives. Use gluten-free cookies or sugar-free pudding mixes. One baker shared, “My vegan version with cashew milk tasted just as rich!”
Seasonal twists keep things exciting. Try peppermint crunch for holidays or mango puree in summer. Let the recipe rest at room temperature briefly before serving – about 10 minutes ensures perfect scoopability.
Conclusion
Unlock the secret to making decadent treats that impress every time. Your homemade creations now rival boutique bakery offerings, thanks to a method that combines simplicity with stunning results. Store batches in the freezer for up to three months – just thaw briefly before serving to maintain perfect texture.
For firmer variations, let slices rest at room temperature until slightly softened, like traditional semifreddo. This technique preserves the velvety mouthfeel while allowing flavors to shine. Whether using a classic loaf pan or experimenting with molds, each serving delivers consistent quality.
Celebrate your role as a dessert innovator. The base recipe adapts effortlessly – swirl in fruit purees, layer with crumbled cookies, or drizzle with melted chocolate. Every adaptation showcases your growing expertise.
This approach proves gourmet outcomes don’t require complex tools. With proper storage and creative flair, you’ve mastered a skill that delights crowds and creates lasting memories. The possibilities evolve with each season, inviting endless delicious exploration.
FAQ
Can I skip the churning process for this dessert?
How long does it stay fresh in the freezer?
What mix-ins work best for added crunch or flavor?
Can I use almond milk instead of regular milk?
Why does the recipe call for pudding mix?
How do I prevent a grainy texture?


