


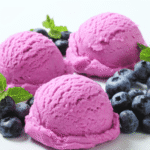
Homemade Hazelnut Ice Cream
4
servings30
minutes40
minutes300
kcal1
hour10
minutesDelicious homemade hazelnut ice cream using everyday ingredients.
Keep the screen of your device on
Ingredients
1.5 cups 1.5 whole milk
1.5 cups 1.5 heavy cream
3/4 cup 3/4 granulated sugar
5 large 5 egg yolks
1/2 cup 1/2 hazelnut spread
1 teaspoon 1 vanilla extract
Directions
- In a medium saucepan, combine the milk and heavy cream, and heat over medium heat until just simmering. Do not let it boil.
- While the milk is heating, whisk together the sugar and egg yolks in a separate bowl until well combined and pale yellow in color.
- Gradually whisk the hot milk mixture into the egg yolk mixture, a little at a time, to temper the eggs and avoid curdling.
- Return the combined mixture to the saucepan. Cook over low heat, stirring constantly with a wooden spoon, until it thickens enough to coat the spoon.
- Remove from heat and stir in the hazelnut spread and vanilla extract until fully incorporated. Pour the mixture through a fine-mesh sieve into a clean bowl.
- Cover the bowl with plastic wrap, pressing it directly onto the surface of the custard to prevent a skin from forming. Refrigerate for at least 4 hours or until completely chilled.
- Once chilled, pour the custard into an ice cream maker and freeze according to the manufacturer's instructions, usually about 20–25 minutes.
- Transfer the churned ice cream to an airtight container and freeze for at least 2 hours or until firm before serving.
Recipe Video
Nutrition Facts
- Total number of serves: 6
- Calories: 240kcal
- Cholesterol: 140mg
- Sodium: 30mg
- Potassium: 130mg
- Sugar: 26g
- Protein: 4g
- Calcium: 100mg
- Iron: 2mg
- Thiamin: 0mg
- Riboflavin: 0mg
- Niacin: 0mg
- Folate: 0mg
- Biotin: 0mg
- Phosphorus: 100mg
- Iodine: 0mg
- Magnesium: 0mg
- Zinc: 0mg
- Selenium: 0mg
- Copper: 0mg
- Manganese: 0mg
- Chromium: 0mg
- Molybdenum: 0mg
- Chloride: 0mg
Did you make this recipe?
Tag @https://www.instagram.com/ice_cream_haven/ on Instagram and hashtag it with #IceCreamIceCreamHavens
Like this recipe?
Follow @https://www.pinterest.com/Ice_Cream_Haven/ on Pinterest
Join our Facebook Group!
Follow https://www.facebook.com/icecreamhavens/ on Facebook
Introduction to the Nutty World of Homemade Ice Cream
There’s a special satisfaction in making your own ice cream from scratch: you control the cream, the fat content, and the exact balance of sweetness and flavor. In this guide you’ll learn how to coax deep hazelnut flavor into a silky custard base, how long to steep the milk and cream for optimal extraction, and simple temperature and timing targets so your mixture sets with ideal texture. Expect active hands-on time of roughly 40–50 minutes and total time (including chilling/freezer time) of several hours depending on whether you infuse overnight.
Discovering the Rich Flavors of Hazelnuts
Toasted hazelnuts add a warm, roasted sweetness and toasted oil notes that lift the whole dessert. Proper toasting (watch for a golden-brown color) releases the nuts’ natural oils; those oils dissolve into the milk and cream during infusion, producing a fragrant, nut-forward base. You can steep the toasted hazelnuts in warm dairy for an hour for noticeable flavor or in the fridge overnight for the deepest aroma.
Infusing milk and cream is both an art and a bit of food science: gentle heat helps extract nut oils and flavor compounds, while time allows the dairy to absorb them without breaking the emulsion. The result is a smooth, aromatic mixture that becomes the backbone of your hazelnut ice cream.
Why Homemade Ice Cream Inspires Creativity
Making hazelnut ice at home invites experimentation — from swapping mascarpone for a richer cream recipe to adding a swirl of chocolate or a ripple of caramel during the last minutes of churning. Texture-wise, homemade custard offers a dense, creamy mouthfeel with more presence than many store-bought options because of higher fat and protein from whole milk and egg yolks.
This introduction sets the tone for the step-by-step instructions that follow. Whether you plan to use an ice cream maker or a no-churn approach, these core principles — toast, infuse, temper, chill, and churn — will guide you to a luxurious hazelnut ice cream that’s both satisfying to make and to enjoy.
Hazelnut Ice Cream Recipe Essential Ingredients and Preparation Essentials
Hazelnut Ice Cream Recipe Essential Ingredients and Preparation Essentials
The success of any homemade ice cream starts with top-notch ingredients and the right tools. For a classic hazelnut ice cream with a creamy mouthfeel, prioritize fresh dairy with sufficient fat, quality hazelnuts, properly measured sugar, and egg yolks for a stable custard. Below you’ll find guidance on selecting, preparing, and handling each component so your final batch churns into a smooth, flavorful dessert.
Gathering Fresh Ingredients and Quality Hazelnuts
Use whole hazelnuts (not pre-chopped) for toasting and infusion. Toast them in a single layer—watch for golden-brown color and fragrant aroma rather than strictly the clock; most ovens roast whole hazelnuts well at 350°F for about 10–12 minutes, but visual cues are key to avoid burning. After toasting, let the nuts cool slightly, then rub them in a clean kitchen towel to remove as much skin as possible—this improves flavor and texture though you may lose a bit of weight in the process.
For the dairy base, choose whole milk and heavy cream to give the ice cream the fat content needed for a rich, scoopable texture. The combination of milk (protein) and cream (fat) contributes to body and mouthfeel; higher fat content reduces iciness and improves richness. Granulated sugar is the primary sweetener; it also lowers freezing point to keep the ice cream soft. Egg yolks provide emulsification and structure to the custard — if you’re concerned about raw eggs, use pasteurized yolks or bring the custard to the recommended safe temperature during cooking.
Tools and Equipment for a Smooth Process
Having a modest set of reliable tools makes the process efficient and helps protect the texture of your cream recipe. A 3-quart stainless steel saucier or saucepan is ideal for a standard batch; it heats evenly and gives you room to whisk without spilling. A fine-mesh sieve or chinois is essential to strain out hazelnut solids and any coagulated bits so the mixture is silky.
Your equipment checklist should include: a mixing bowl or two (a large bowl for tempering and a small bowl for sugar/yolks), a sturdy whisk, a digital thermometer to monitor temperature accurately, and an ice cream maker for best texture. If you don’t have a machine, a freezer-safe container and intermittent stirring will still produce good results. Optional: an ice bath to cool the pot quickly, and an airtight container sized for your freezer to store the churned ice cream.
“Precision in ingredients and temperature makes the difference between ordinary and exceptional ice cream.”
Notes on quantities and alternatives: for a standard recipe yield (approximately 1 quart), typical ingredient proportions are whole milk + heavy cream, 3/4–1 cup sugar, and 4–6 egg yolks — but exact quantities, metric conversions, and nutrition are best presented as a dedicated ingredient list in the recipe card. Mascarpone can be used to enrich the base (adds creaminess and fat), while lighter swaps like Greek yogurt or reduced-fat dairy will change texture and freezing behavior. If using mascarpone or butter for richness, adjust sugar and chill times as needed.
Food-safety tip: when making an egg-based custard, heat the mixture to reach a safe coagulation point (temperatures around 160–170°F held briefly pasteurize the yolks). Use a thermometer and strain the custard through the sieve into a bowl set over an ice bath to stop cooking and cool quickly before refrigeration. For more equipment ideas and recipe variations, visit Ice Cream Haven.
Step-by-Step: hazelnut ice cream recipe

Step-by-Step: hazelnut ice cream recipe
Every great ice cream begins with clear steps and a little attention to timing and temperature. Below is a tested, straightforward process to infuse, make a silky custard, chill, and churn a creamy hazelnut ice cream that freezes to scoopable perfection. Read through once, gather your ingredients and tools, then work methodically — the result is worth the wait.
Infusing Milk and Cream with Toasted Hazelnuts
1) Toast and prepare the hazelnuts: Spread whole hazelnuts in a single layer on a baking sheet and roast at 350°F for 10–12 minutes, watching for a golden-brown color and nutty aroma. Let cool slightly, then rub them in a clean kitchen towel to remove most of the skins. Roughly chop or pulse in a food processor — coarse pieces help extraction without turning to sludge.
2) Infuse the dairy: Combine whole milk and heavy cream in a saucepan (use a 3-quart saucier for a standard batch). Add the chopped toasted hazelnuts and, if using, a split vanilla bean. Warm the mixture gently over low–medium heat — do not boil — and keep it at a low simmer for about 8–12 minutes to extract oils and flavor. For stronger hazelnut aroma, you can steep off heat and refrigerate overnight; warm infusions (1 hour) give good flavor more quickly.
3) Strain and cool: Remove from heat and let the mixture sit 5–10 minutes, then strain through a fine mesh sieve into a clean saucepan or bowl to remove solids. Press gently on the hazelnuts to recover flavorful liquid but avoid forcing bits through. At this stage the mixture should be fragrant and smooth.
Creating the Custard Base with Egg Yolks and Mascarpone
4) Prepare the yolk mixture: In a large bowl, whisk together 4–6 egg yolks and granulated sugar until pale and slightly thickened. This creates the emulsion that stabilizes the custard.
5) Temper the eggs: Slowly add about one cup of the warm hazelnut-infused milk to the yolks in a steady stream while whisking constantly — this prevents the yolks from scrambling. Continue adding warmed milk until ~1/3–1/2 of the dairy is incorporated.
6) Cook to safe doneness: Return the tempered egg–milk mixture to the saucepan and cook over low heat, stirring constantly with a spatula or whisk. Use a digital thermometer and aim for a target range of 160–170°F (commonly a safe pasteurization window and thickening point). A good doneness test: the custard should coat the back of a spoon and leave a defined line when you run your finger through it.
7) Enrich and strain: If using mascarpone for extra richness, whisk it in off heat (add about 2–4 ounces depending on desired richness) until smooth. Immediately strain the custard through a fine mesh sieve into a large bowl to remove any coagulated bits and any remaining solids from the nuts or vanilla. Place the bowl in an ice bath to stop cooking and cool the mixture quickly.
Chilling, Churning, and Achieving the Perfect Texture
8) Chill thoroughly: Cover the cooled custard (press a piece of plastic wrap directly on the surface to prevent a skin) and refrigerate for at least 6 hours, preferably overnight. Proper chilling (mixture at or below refrigerator temperature, ~39°F) improves body and helps your ice cream maker work efficiently.
9) Churn: Pour the chilled mixture into your ice cream maker following the manufacturer’s instructions. For most home machines, churn time is roughly 20–40 minutes depending on machine capacity and settings; aim for a soft-serve consistency (the mixture should thicken and climb the dasher slightly). How long depends on your machine (make sure the freezer bowl is fully frozen if using a freeze-bowl machine).
10) Freeze to set: Transfer the churned ice cream into a freezer-safe container, smoothing the surface. Press parchment or plastic directly on the surface and seal with an airtight lid. Freeze for 2–4 hours to firm up to scoopable texture. For best results, allow 3 hours for a firmer set. If the ice cream is too soft straight from churn, check your freezer temperature and the fat content of the base; adding a touch more cream or using mascarpone increases scoopability.
“Check thickness at every stage: infusion, custard, and post-churn — each step affects the final texture.”
Troubleshooting quick tips: If the custard curdles, remove from heat and whisk vigorously, then strain. If the churned ice cream is grainy or icy, ensure the base was fully chilled before churning and consider adding 1–2 tablespoons of inverted sugar (corn syrup) or a stabilizer. Over-churning can create a butter-like texture; if this happens, gently fold in a few tablespoons of cold cream and refreeze.
Timing and temperature summary: toasty hazelnuts 10–12 minutes at 350°F; infusion ~8–12 minutes warm or overnight cold steep; cook custard to 160–170°F; chill 6+ hours; churn 20–40 minutes; final freeze 2–4 hours. These checkpoints keep your mixture consistent and your ice cream reliably rich and creamy.
For printable ingredient quantities, metric conversions, and a recipe card you can save, refer to the recipe card in this article. With measured technique and patience, you’ll turn a simple list of ingredients into a decadent, nut-forward ice cream that holds its texture in the freezer and shines on the spoon.
Tips and Techniques for Perfect Nutty Hazelnut Ice Cream Recipe

Tips and Techniques for Perfect Nutty Hazelnut Ice Cream Recipe
Small adjustments in technique and temperature have a big impact on the final texture and flavor of your hazelnut ice cream. Use these targeted tips to optimize flavor extraction, protect the cream’s structure, and troubleshoot common issues so your batch comes out creamy and scoopable every time.
Optimizing Flavor with Overnight Infusions
For maximum hazelnut aroma, steep toasted hazelnuts in the milk and cream for 12 hours or overnight in the refrigerator — this cold infusion draws out oils gently and builds a deep, nutty profile. If you’re short on time, a warm infusion (8–12 minutes over low heat) still extracts excellent flavor. Consider adding a split vanilla bean or a splash of Frangelico for complementary notes that enhance the hazelnut without overpowering it.
Make sure the nuts are well-toasted and roughly chopped before infusing; larger pieces are easier to strain and still release plenty of flavor. After infusion, always strain through a fine-mesh sieve to keep the final mixture silky.
Managing Temperature and Texture for the Ideal Consistency
Temperature control is critical at every stage. After infusion and straining, chill the mixture to refrigerator temperature (around 39°F) — this helps your ice cream maker reach the ideal churn consistency faster and reduces ice crystal formation. Use a digital thermometer to monitor temperatures precisely.
Churning times vary by machine and batch size; most home machines take 20–40 minutes to reach a soft-serve stage. Over-churning can cause the mixture to deflate or become butter-like, while under-churning leaves the ice cream icy. Aim for a thickened, spoonable texture that still flows slowly when scooped.
“A cold, well-chilled mixture and correct churn time prevent iciness and yield a creamy mouthfeel.”
Practical Troubleshooting
- Mixture too soft after freezing: check freezer temperature and fat content. Increase cream or add a small amount (1–2 tbsp) of mascarpone or butter to improve scoopability.
- Grainy or icy texture: ensure the base was fully chilled (6+ hours) before churning and that churn time was adequate. Try adding 1–2 tablespoons of corn syrup or inverted sugar to reduce crystallization.
- Custard curdled or scrambled eggs: immediately remove from heat, whisk vigorously, strain through a fine sieve, and, if needed, gently reheat while whisking to re-emulsify. Alternatively, start over and temper more slowly next time.
- Over-churned (buttery) texture: gently fold in 1–2 tablespoons of cold cream, then refreeze to restore a more ice-cream-like structure.
Quick Temperature & Time Checklist
- Toast hazelnuts: 350°F for 10–12 minutes (watch for golden-brown).
- Warm infusion: 8–12 minutes on low heat; cold infusion: 12+ hours.
- Cook custard: heat to 160–170°F (coat-the-spoon test).
- Chill custard: 6+ hours, ideally overnight (target ~39°F).
- Churn: ~20–40 minutes depending on machine; follow manufacturer’s guidance.
- Final freeze: 2–4 hours to reach scoopable firmness.
Extra tips: use an ice bath to cool the custard quickly after cooking, and press plastic or parchment directly on the surface of the mixture before freezing to reduce ice formation. If you rely on a freezer-bowl style ice cream maker, make sure the bowl is fully frozen (per your machine’s instructions) — depending on machine and size, freeze times and performance will vary.
With these adjustments — attention to temperature, a properly chilled mixture, and careful churn times — your hazelnut ice cream will be rich, creamy, and stable in the freezer. For more no-churn alternatives and stabilization options, check the linked resources in this article and experiment within the suggested timings.
Hazelnut Ice Cream Recipe Creative Serving Ideas and Delicious Variations

Hazelnut Ice Cream Recipe Creative Serving Ideas and Delicious Variations
Turn your hazelnut ice cream into a memorable dessert with simple serving techniques and a few inspired variations. Thoughtful pairings and textures make each scoop sing — from bright, fresh fruit to rich chocolate swirls — so don’t be afraid to experiment with plating, mix-ins, and accompaniments.
Pairing with Fresh Fruits and Homemade Nutella
Fresh fruit provides a bright contrast to the creaminess. Try one scoop of hazelnut ice cream with 50–75g sliced strawberries or raspberries, or pair with banana slices for a sweeter, softer combo. For an indulgent option, swirl in homemade Nutella or a good-quality chocolate-hazelnut spread at a ratio of roughly 1–2 tablespoons per pint — fold gently during the last few minutes of churning or ripple in by hand after churning to keep distinct ribbons.
Sprinkle toasted hazelnut pieces or cookie crumbles on top for crunch. If you want a fruit-forward twist, serve a small spoonful of warm berry compote alongside (a tablespoon per serving) — the temperature contrast enhances the ice cream’s cream texture and makes a delightful soft serve–style experience.
Storage, Presentation, and Serving Tips
Store leftover ice cream in an airtight container sized to the batch and label it with date/batch notes. To prevent freezer burn and large ice crystals, press a piece of parchment or plastic wrap directly on the surface before sealing the lid. For best scoopability, remove from the freezer and let sit at room temperature for 3–5 minutes before serving.
Serve in chilled bowls or coupe glasses to keep the ice cold longer and to showcase garnishes: a mint sprig, a drizzle of dark chocolate, or a dusting of crushed hazelnuts. If you want a café-style presentation, place one scoop on warm waffles or a warm brownie — the contrast between warm and cold is especially pleasing.
“A small crunchy topping or a warm sauce transforms a simple scoop into a plated dessert.”
Allergen note: this recipe contains hazelnuts. For nut-free guests, swap in toasted sunflower seeds or toasted oats for crunch and a sunflower-seed butter swirl in place of Nutella. If you plan to keep multiple batches in the freezer, use appropriately sized container freezer-safe tubs (pint or quart) and rotate older batches to the front so nothing gets forgotten.
Finally, don’t hesitate to get creative: combine a scoop with a shot of espresso for an affogato-style dessert, or mound it on top of a warm fruit crumble. Photograph your plated creations and share — it’s a fun way to track variations and inspire others to try your hazelnut ice cream recipe.
Conclusion
Making your own Hazelnut Ice Cream Recipe at home is both satisfying and dependable when you respect the key principles: toast the hazelnuts for depth, properly infuse the milk and cream, control temperatures during custard-making, and chill the mixture thoroughly before churning. Follow those checkpoints and you’ll get a rich, creamy ice cream with clear hazelnut character that holds up well in the freezer.
Quick facts: yields ~1 quart (adjust size for double batches), active prep ~40–50 minutes, chill 6+ hours (or overnight), churn 20–40 minutes, final freeze 2–4 hours. If your final product is icy, make sure the fat content and chill time were correct and that the mixture was fully cold before churning — small adjustments to cream ratio or additional stabilizer (like a tablespoon of mascarpone) can help.
Experimenting with add-ins and presentations — from a simple Nutella ribbon to fresh berries or an affogato pour — is part of the fun. The fusion of technique and creativity turns a straightforward cream recipe into something uniquely yours. Save or print the recipe card for precise ingredient amounts and metric conversions so you can replicate your best batch.
Thanks for following along — we hope this guide inspires you to make, share, and refine your hazelnut ice cream. For more ideas and decadent alternatives, check out this decadent chocolate ice cream recipe and other recipes in our collection.
FAQ
Can I use store-bought hazelnut spread instead of fresh hazelnuts?
Do I need an ice cream maker for this recipe?
How long does it take to infuse the milk with hazelnuts?
Can I substitute mascarpone with another ingredient?
What’s the best way to store homemade hazelnut ice cream?
Can I add mix-ins like chocolate chips or caramel swirls?
How can I achieve a dairy-free version?
Troubleshooting quick fixes


