


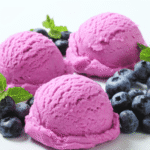
Butterfinger Ice Cream
8
servings30
minutes4
hours450
kcalDelicious homemade Butterfinger ice cream with simple ingredients.
Keep the screen of your device on
Ingredients
1 cup 1 granulated sugar
2 cups 2 heavy cream
1 cup 1 whole milk
1 teaspoon 1 vanilla extract
5 pieces 5 Butterfinger candy bars
Directions
- Chop the Butterfinger candy bars into small pieces, around 1/4 inch in size, and set them aside for later use.
- In a medium bowl, combine the granulated sugar, heavy cream, whole milk, and vanilla extract; whisk until sugar is dissolved.
- Cover the mixture and refrigerate for at least 1 to 2 hours, or until it is completely chilled.
- Pour the chilled mixture into the ice cream maker and churn according to the manufacturer's instructions, typically for 20 to 25 minutes.
- About 5 minutes before the churning is complete, add the chopped Butterfinger pieces to the ice cream maker.
- Once the ice cream is thick and creamy, transfer it to an airtight container and freeze for 3 to 4 hours before serving.
- For best results, let the ice cream sit at room temperature for a few minutes before scooping to soften slightly.
Recipe Video
Nutrition Facts
- Calories: 450kcal
- Cholesterol: 85mg
- Sodium: 120mg
- Potassium: 150mg
- Sugar: 40g
- Protein: 5g
- Calcium: 15mg
- Iron: 2mg
- Thiamin: 2mg
- Riboflavin: 2mg
- Niacin: 1mg
- Folate: 2mg
- Biotin: 2mg
- Phosphorus: 15mg
- Iodine: 2mg
- Magnesium: 10mg
- Zinc: 5mg
- Selenium: 5mg
- Copper: 2mg
- Manganese: 2mg
- Chromium: 1mg
- Molybdenum: 1mg
- Chloride: 0mg
Did you make this recipe?
Tag @https://www.instagram.com/ice_cream_haven/ on Instagram and hashtag it with #IceCreamIceCreamHavens
Like this recipe?
Follow @https://www.pinterest.com/Ice_Cream_Haven/ on Pinterest
Join our Facebook Group!
Follow https://www.facebook.com/icecreamhavens/ on Facebook
Origins & Essential Ingredients
Ever wondered how tangy buttermilk earned a place in frozen desserts? Once a traditional dairy byproduct, cultured buttermilk is valued today for its acidity and flavor balance. That tang helps cut richness in custard-based ice cream recipes, producing a refreshing profile similar to frozen yogurt but richer in texture.
The Story Behind Buttermilk in Ice Cream

Regional cooking traditions—particularly in Southern U.S. kitchens—have long used buttermilk in baked goods and desserts. Its acidity balances sugar and fat, giving frozen treats a bright, layered flavor that stands out from typical cream-forward recipes.
Key Ingredients & Their Roles
Every ingredient has a job: egg yolks (yolks) add richness and structure, sugar balances tang and sweetness, and a measured amount of heavy cream smooths the mouthfeel. Buttermilk contributes that signature tang and keeps the overall fat content lower than an all-cream base. Exact cups and ratios belong in the recipe card below so you can follow precise measurements when you make this ice cream.
For variations, small additions like a splash of brandy or a tablespoon of turbinado sugar can deepen flavor. Whether you choose a churned or no-churn technique, the right proportions—measured in cups—and attention to temperature make this recipe accessible to home cooks and recipes veterans alike.
Mastering the Buttermilk Ice Cream Recipe

Ready to elevate your dessert game? Below are the essential principles for a smooth, creamy, tangy buttermilk ice cream — focus on technique and precise timing for the best results.
Preparing the Custard Base with Buttermilk
1. Whisk egg yolks and granulated sugar in a bowl until the mixture is pale and thick — this builds the custard’s rich foundation.
2. Warm milk (and any cream called for in the recipe) in a saucepan over medium heat. Temper the yolks by adding a thin stream of the warmed milk to the yolk mixture while whisking constantly to prevent curdling.
3. Transfer the tempered mixture back to a heavy-bottomed pan and cook over medium-low heat, stirring constantly with a wooden spoon or heatproof spatula until the custard thickens and coats the back of a spoon. (If using a thermometer, aim for roughly 170–180°F for a safe, velvety custard.)
4. Remove from heat, stir in buttermilk and vanilla, then strain the custard through a fine sieve into a clean bowl to remove any cooked bits for a perfectly smooth texture.
These steps — tempering, gentle heat, and straining — prevent curdling and produce the silky base that makes this ice cream stand out.
Temperature, Technique, and Texture Tips
Maintaining the right heat is crucial: too hot and the custard will scramble; too cool and it won’t thicken. Use a thermometer and stop heating when the custard coats the back of a spoon or reaches about 170–180°F for a silky, safe result.
For a lump-free texture, strain the mixture through a fine sieve into a clean bowl. Straining removes any cooked bits of egg yolk or impurities and guarantees a smooth finish.
Chilling, Churning, and Final Adjustments
Chill the custard until refrigerator-cold—aim for roughly 40°F—by using an ice bath, then refrigerate at least 1 hour (ideally overnight) so flavors meld and the mixture is ready for the maker.
Pour the well-chilled mixture into your ice cream maker or machine and churn according to the manufacturer’s instructions (many home machines take 20–30 minutes). Don’t overfill the maker; leave room for expansion so the texture stays creamy.
After churning, transfer the soft-packed ice cream to a freezer-safe container, press plastic wrap onto the surface to prevent ice crystals, and freeze for at least 4 hours—overnight is best for firm scoops.
Quick tips: cool the mixture promptly after cooking to minimize bacterial growth, label containers with the date, and store in an airtight container in the freezer for best texture.
Enhancing Flavors, Tools, and Customizations

Small tweaks turn a good buttermilk ice cream into a showstopper. Below are targeted techniques and sensible options for texture, flavor, and equipment so you can tailor the recipe to your taste and tools.
Secret Tips for Perfect Consistency
Avoid a runny, milkshake-like finish by chilling and stabilizing the mixture properly. For most home batches (about 4 cups of base), add 1 teaspoon light corn syrup to improve scoopability and reduce large ice crystals. If you prefer an alcohol lift, add 1–2 tablespoons of brandy or another liqueur—note that alcohol lowers the freezing point, so use sparingly or the final ice cream will be noticeably softer.
For extra richness and structure, incorporate one large egg yolk into the custard base (in addition to the yolks called for in the recipe). That adds protein and fat, which help create a velvety mouthfeel. Always whisk thoroughly and strain after cooking to remove any bits for a perfectly smooth texture.
Tools & Machine Notes
If using an ice cream maker, freeze the bowl per the manufacturer’s instructions (many require 12–24 hours) and churn the chilled custard for 20–30 minutes until it reaches soft-serve consistency. For compressor machines, follow the maker’s timing but still expect about 20–40 minutes depending on model and batch size. Don’t overfill your machine—leave room for expansion so the texture stays creamy.
Alternatives & Eggless Options
If you want to skip eggs, boost the mouthfeel with a tablespoon of powdered milk or 1–2 teaspoons of cornstarch (dissolved into the warm milk) as a stabilizer. These keep the fat lower while mimicking some of the richness eggs provide.
Final practical tip: cool the mixture rapidly after cooking, label your container with the date, and store in an airtight freezer-safe container to preserve flavor and prevent freezer burn.
Flavor Variations & Creative Pairings

Customize your buttermilk ice cream with thoughtful add-ins and pairings to highlight its tangy-sweet profile. Here are a few tested ideas with quick ratios so you can try them right away.
Fruity Swirls
For a bright berry version, fold in 1/2 cup homemade berry puree (cook down 1 cup berries with 2 tablespoons sugar, cool) into the churned ice cream for a ribboned effect. Or gently stir 3/4 cup fresh diced peaches or berries into the finished churn for fruit-forward buttermilk ice cream.
Vanilla & Caramel Pairings
Enhance the base with a scraped vanilla bean or 1 teaspoon vanilla extract for a classic flavor. Drizzle warm caramel sauce over scoops or swirl 1/3 cup caramel into the soft-packed ice cream before freezing for a rich, complementary pairing.
Boozy & Nutty Twists
Add 1–2 tablespoons of brandy or liqueur to the chilled mixture for complexity—use sparingly since alcohol softens freezing. Mix in 1/2 cup chopped toasted nuts or a 1/3 cup chocolate chunk for texture contrasts.
Eggless & Alternative Mix-ins
If you prefer an eggless version, stir 1/2 cup fruit jam or 1/2 cup fruit puree into the base after chilling, or use 1–2 teaspoons dissolved cornstarch in the warm milk as a stabilizer. For creamier, lower-fat options, increase buttermilk slightly and reduce heavy cream by 1/4 cup.
Storage tip: cover the ice cream tightly—press plastic wrap directly onto the surface, then seal in an airtight freezer-safe container—to prevent ice crystals and preserve flavor. For best texture, store at a consistent freezer temperature and enjoy within a week.
Conclusion
Making this buttermilk ice cream recipe is a rewarding process: from crafting a silky custard in a saucepan to chilling and churning, each step builds the balanced tang-and-cream flavor that makes this dessert special. Use high-quality vanilla and fresh, fat-rich ingredients for the best results.
Preparation matters. Heat the custard gently, cool it quickly to refrigerator temperature (about 40°F), and follow your ice cream machine or maker instructions during churn time. Allow the churned ice cream to firm in the freezer for at least 4 hours (overnight is ideal) so the texture sets properly.
Don’t be afraid to experiment—add fruit purees, a swirl of caramel, or a dash of vanilla extract to customize the flavor. For a lighter take, increase buttermilk slightly and reduce heavy cream; for extra richness, fold in an additional yolk or a splash of cream before churning.
Share your creations and tweaks—this recipe is a canvas for tradition and innovation. Tip: let frozen ice cream sit at room temperature 10–15 minutes before scooping for perfect serving consistency.
FAQ
What makes buttermilk a unique ingredient in this dessert?
Buttermilk adds a bright, tangy note that balances sweetness and lightens the overall mouthfeel compared with an all-cream base.
Can I use an ice cream maker for this recipe?
Yes—using an ice cream maker or machine gives the creamiest texture. Freeze your maker bowl as the manufacturer recommends (many require 12–24 hours) and expect about 20–30 minutes of churn time for most home machines.
How do I achieve the perfect custard base?
Whisk egg yolks and granulated sugar until pale, temper with warm milk in a pan, and cook gently until the custard coats the spoon (about 170–180°F). Strain before chilling for the smoothest result.
What are some creative flavor variations I can try?
Try fresh berries folded in after churning, a caramel swirl, vanilla bean, or a splash of liqueur. For fruit ribbons, stir in 1/2 cup berry puree; for nuts or chocolate, fold in 1/2 cup chopped mix-ins.
How long should I chill the mixture before churning?
Cool the mixture in an ice bath and refrigerate until cold—at least 1 hour, but overnight yields better flavor and a firmer churn.
Can I make this recipe without eggs?
Yes—omit the egg yolks and use a stabilizer like 1–2 teaspoons cornstarch dissolved into the warm milk or 1 tablespoon powdered milk to help body and texture.
What’s the best way to store homemade ice cream?
Store in an airtight, freezer-safe container; press plastic wrap directly on the surface before sealing to prevent ice crystals. For best flavor and texture, enjoy within a week.


