


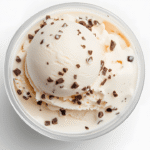
Easy No Churn Ice Cream
4
servings30
minutes40
minutes300
kcal1
hour10
minutesA simple no-churn ice cream recipe requiring minimal ingredients and effort, perfect for satisfying cravings quickly.
Keep the screen of your device on
Ingredients
2 cups 2 heavy cream
1 14 oz can 1 sweetened condensed milk
1 tablespoon 1 vanilla extract
1/4 teaspoon 1/4 salt
Directions
- In a large mixing bowl, combine the sweetened condensed milk, vanilla extract, and salt. Stir well so all ingredients are evenly mixed.
- Using a mixer, whip the heavy cream in a separate chilled bowl at medium-high speed until stiff peaks form.
- Gently fold the whipped cream into the sweetened condensed milk mixture using a spatula, ensuring not to deflate the whipped cream.
- Once combined, transfer the mixture into a loaf pan and cover with plastic wrap, ensuring it touches the surface to prevent ice crystals from forming.
- Place the loaf pan in the freezer for at least 8 hours or until the ice cream is firm to touch and scoopable.
Recipe Video
Nutrition Facts
- Total number of serves: 8
- Calories: 210kcal
- Cholesterol: 44mg
- Sodium: 45mg
- Potassium: 123mg
- Sugar: 21g
- Protein: 3g
- Calcium: 10mg
- Iron: 0mg
Did you make this recipe?
Tag @https://www.instagram.com/ice_cream_haven/ on Instagram and hashtag it with #IceCreamIceCreamHavens
Like this recipe?
Follow @https://www.pinterest.com/Ice_Cream_Haven/ on Pinterest
Join our Facebook Group!
Follow https://www.facebook.com/icecreamhavens/ on Facebook
Why No-Churn Ice Cream Is the Easiest Homemade Win
“A simple swap—whipped cream folded into condensed milk—gives a shop-style texture at home.”
Folded aeration replaces mechanical churning in this fast, stress-free way to a frozen dessert. Using sweetened condensed milk streamlines sweetness and lowers the freezing point so fewer ice crystals form.
Whipping builds light, stable air in the cream), which mimics the mouthfeel of churned batches. A hand mixer is all you need; no machine or custard stirring is required.
- Sweetness and structure come from condensed milk and a little sugar, reducing icy texture.
- Whip to soft peaks, fold gently, then freeze; the base is scoopable in about 4–6 hours.
- This method is a flexible base for many flavors and family-friendly builds.
“Whipping adds air that keeps frozen treats soft and scoopable without churn.”
In short: the technique turns pantry staples into a creamy, satisfying result with minimal fuss and maximum flavor freedom.
Ingredients That Make It Work: Cream, Sweetened Condensed Milk, Vanilla

A reliable base starts with heavy cream for lift, sweetened condensed milk for freeze control, and vanilla for classic aroma.
Heavy whipping cream is the texture engine. Whip until stiff peaks for a lighter, airy scoop. Stop at thickened peaks for a denser, gelato-like finish.
Sweetened condensed milk does the heavy lifting for sweetness and freeze point. Its concentrated sugars and milk solids limit ice formation and deliver a smooth bite without cooking. Measure carefully: too little condensed milk invites ice crystals; too much makes the mix overly soft.
- Vanilla extract gives instant warmth; swap in a scraped vanilla bean for visible specks and deeper flavor.
- A splash of liquor, a pinch of salt, or a bit of evaporated milk refines scoopability and mouthfeel.
- Cocoa powder blends smoothly for chocolate bases and pairs well with a touch of coffee liqueur for depth.
“Simple ingredient choices shape texture as much as technique.”
Gear & Setup: The Best Way to Freeze Without an Ice Cream Maker

How you freeze the mix matters as much as the recipe. The right gear and placement in your freezer control how quickly the slab sets and how smooth each scoop will be.
Metal loaf pan vs. glass
Choose a metal pan. A 9×5 metal bread pan conducts cold fast and helps the ice set evenly for cleaner scoops. Metal chills quicker than glass and reduces large ice crystals.
If you only have glass, give the batch extra time and protect the surface well to avoid uneven texture.
Seal, protect, and position
Stretch plastic wrap directly over the surface, then add a tight lid or double-wrap the pan. This blocks airflow and helps prevent freezer burn.
- Clear a flat spot in the freezer so the pan sits level for an even freeze.
- Reserve a cold zone away from the door to avoid temperature swings that can burn texture.
- For frequent batches, use insulated tubs or single-serve paper containers with lids to limit exposure when serving.
“Good gear and careful sealing turn a basic mix into scoopable, stable ice cream right from the freezer.”
Easy No Churn Ice Cream
Start by chilling your tools so the mix whips quickly and holds air. This short guide walks you through whipping, folding, flavoring, and freezing so each scoop feels deliberate and joyful.
Step-by-step: whip, fold, flavor, freeze
Chill a bowl and beaters, then use your mixer to whip heavy cream. Stop at stiff peaks for a lighter texture or just before for a denser result.
In a separate bowl, whisk vanilla into sweetened condensed milk. Fold the whipped cream into the mixture in batches to keep air in the mix. Use broad, slow strokes so the final mixture stays fluffy.
Timing guide: quick set or firmer finish
- Transfer the mixture to a metal pan and press plastic onto the surface.
- Freeze 4–6 hours for a ready-to-serve slab; 8–12 hours yields a firmer, gelato-like scoop.
- Dip your scoop in warm water and wipe between servings for clean rounds.
“Chill the bowl, whip with care, and fold gently—those small steps lift every spoonful.”
Flavor Roads to Wow: From Vanilla to Chocolate, Coffee, and Beyond

Bright, bold flavors turn a simple base into something unforgettable. Start by deciding if you want a classic scoop or a bolder twist. Small technique notes make a big difference in flavor clarity and texture.
Chocolate and coffee bases
For chocolate depth, whisk natural cocoa into the sweetened condensed milk before folding in whipped cream. This hydrates the powder so the flavor is even and smooth.
For coffee, dissolve instant espresso powder in a tablespoon of warm milk first. Whisk until fully dissolved so the café notes cut cleanly through the base.
Fresh mix-ins and bright accents
Berries, citrus zest, and chopped mint add lively pops that contrast rich bases. Warm a spoonful of peanut butter into a ribbon for a soft swirl that blends easily.
Texture-smart add-ins
Chop nuts and chocolate finely to avoid rock-hard bites. Use sauces—caramel, fruit purée, or ganache—for swirls that stay soft and give visual appeal.
- Liquor (bourbon, rum, amaro) keeps scoops silkier and adds character.
- Balance sweetness with a pinch of salt or a touch of extract for lift.
- Keep a few signature combos—vanilla with dark chocolate, mocha with cocoa nibs, or citrus-berry swirls.
“Turn the base into showstoppers: layer for an ice cream cake, pour into a crumb crust for a pie, or float a scoop over soda.”
For more creative builds and recipes, check this keto ice cream recipe for inspiration and plating ideas.
Pro Tips to Beat Ice Crystals and Freezer Burn

Small adjustments in sugar and storage make the difference between a silky scoop and large, crunchy ice crystals.
Why sugar and alcohol help.
Higher sugar levels lower the freezing point and limit crystal growth. Using sweetened condensed milk or condensed milk concentrates sweetness and stabilizes the mix so fewer ice pockets form.
A splash of alcohol interrupts crystallization and keeps the texture scoopable. Use a tablespoon of rum or vodka for subtle lift without changing flavor.
Container, headspace, and surface protection.
Choose sturdy containers that seal tightly and keep headspace minimal. Press plastic wrap directly onto the surface before sealing to block air and prevent freezer burn.
Metal pans conduct cold fastest for an even set; once firm, transfer to lidded tubs for long storage. Store in the coldest zone away from the door to avoid temperature swings that roughen the cream.
- Revive muted flavor with a pinch of salt or a drop of extract before serving.
- Label dates and flavors so every ice cream slab tastes as vivid as day one.
“Protect the surface and control sweetness—those small steps preserve texture and flavor.”
Troubleshooting Your No-Churn Ice Cream

A few simple checks — whipping level, milk balance, and mix-in prep — solve most problems. Use this quick troubleshooting guide to rescue a soft or grainy slab and learn how small changes yield better texture and flavor.
Too soft or melts fast? Whip the whipping cream only to thickened peaks for a denser hold, or stir in a small splash of evaporated milk before freezing to lower the set point. If you usually stop at stiff peaks, try a slightly firmer finish for warm bowls.
Greasy or waxy feel? That usually signals overwhipped whipped cream. Stop before the fat separates and fold gently to protect the emulsion. Add a tablespoon of evaporated milk to adjust butterfat balance.
Rock-hard mix-ins? Chop add-ins finer and pre-mix nut butters or caramel with a little cream. This keeps ribbons soft and prevents solid chunks from turning into ice hard bites.
- Use a metal pan and set it flat in the coldest zone of the freezer to avoid uneven freezing.
- If ice crystals appear, smooth the top, re-cover tightly, and return to the coldest area.
- Keep a labelled container and notes about whipping level or add-ins for future batches.
“Small fixes in technique make the difference between a foamy bowl and scoopable dessert.”
Conclusion
A strong, simple method and a steady technique let you make memorable no-churn ice cream at home. Whip the cream to the right peaks, fold in sweetened condensed milk, and trust the process.
Choose a metal pan, press plastic directly onto the surface, and seal well to prevent freezer burn. Plan for about 4–6 hours for a softer set or 8–12 hours for a firmer, scoop-shop texture.
Keep a chilled bowl, a reliable mixer, and a light hand when folding. Build flavors—vanilla, chocolate, coffee—and adjust sugar or alcohol to lift texture and flavor.
Make this recipe your ritual: take notes, tweak peaks, and enjoy each pan from freezer to bowl.
FAQ
What makes this no-churn frozen treat work without an ice cream maker?
How do I know when whipped cream has reached stiff peaks?
Can I use evaporated milk instead of sweetened condensed milk?
How do I boost vanilla flavor—extract or vanilla bean?
Which pan freezes the fastest: metal or glass?
How can I prevent freezer burn and ice crystals on the surface?
What’s the recommended freezing time for soft vs. firm texture?
How do I add chocolate or coffee flavor without making texture gritty?
What are the best mix-in tips to avoid rock-hard chunks?
My final product melted too quickly—how can I improve melt resistance?
Why did my mixture feel greasy or separated?
Can I make variations like fruit, peanut butter, or swirl flavors?
How should I store leftovers to maintain quality?
Is it safe to add alcohol to the recipe, and how much should I use?
Any tips for serving and scooping for a beautiful presentation?


