


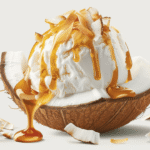
French Vanilla Bean Ice Cream
4
servings30
minutes40
minutes300
kcal1
hour10
minutesCreamy ice cream with rich vanilla flavor using real vanilla beans.
Keep the screen of your device on
Ingredients
1 cup 1 whole milk
3/4 cup 3/4 granulated sugar
2 tablespoons 2 cornstarch
2 cups 2 heavy cream
2 teaspoons 2 vanilla extract
1 whole 1 vanilla bean
1/4 teaspoon 1/4 salt
Directions
- In a medium saucepan, combine the whole milk, granulated sugar, and cornstarch. Whisk to dissolve the cornstarch completely over medium heat.
- Split the vanilla bean lengthwise and scrape out the seeds. Add the seeds and the pod to the milk mixture for flavor.
- Continue to cook the mixture, stirring constantly, until it thickens enough to coat the back of a spoon, about 10 minutes.
- Remove the pan from the heat and stir in the heavy cream, vanilla extract, and salt until well combined.
- Pour the mixture through a fine-mesh sieve into a large bowl to remove the vanilla pod and any solids.
- Cover the bowl with plastic wrap, pressing it directly onto the surface to prevent a skin from forming, and chill in the refrigerator.
- Once chilled, process the mixture in an ice cream maker according to the manufacturer's instructions until it reaches a soft-serve texture.
- Transfer the ice cream to an airtight container and freeze for at least 2 hours until firm before serving.
Recipe Video
Nutrition Facts
- Total number of serves: 8
- Calories: 250kcal
- Cholesterol: 75mg
- Sodium: 65mg
- Potassium: 110mg
- Sugar: 20g
- Protein: 3g
- Calcium: 10mg
- Iron: 0mg
Did you make this recipe?
Tag @https://www.instagram.com/ice_cream_haven/ on Instagram and hashtag it with #IceCreamIceCreamHavens
Like this recipe?
Follow @https://www.pinterest.com/Ice_Cream_Haven/ on Pinterest
Join our Facebook Group!
Follow https://www.facebook.com/icecreamhavens/ on Facebook
Why This French-Style Vanilla Bean Ice Cream Is So Creamy
A yolk-enriched custard creates the deep, silky body that sets this style apart. The cooked custard blends milk, cream, and egg yolks into a stable base that holds fat and water together. Heat the mixture to about 170–175°F to thicken without scrambling the eggs.
French custard vs. Philadelphia style
The custard method uses yolks to emulsify dairy, so the final product is denser and richer than a no-yolk version made from only milk and cream. The simpler style skips yolks and delivers a lighter, cleaner finish but lacks the same body and color.
How egg yolks and churning improve texture and flavor
Egg proteins thicken the base and, once chilled, yield a luscious mouthfeel after churning. The dasher folds in air while the mix freezes, breaking up large ice crystals and producing a fine, scoopable texture.
“Cooked to the right temp, the custard will coat a spoon and resist any eggy notes.”
- Yolks stabilize fat for a creamy body.
- Controlled churning limits crystals and adds lightness.
- True vanilla bean infusion brings depth beyond extract-only approaches.
Follow the temperature and chilling steps in this classic guide for repeatable flavor and scoopability.
Ingredients You’ll Need
Good results begin with measured dairy and eggs plus a high-quality vanilla for depth. Use measured cups of heavy cream and whole milk to keep the fat-to-liquid ratio stable. Fat gives body while milk proteins and water balance the richness for a refined custard base.
Whole milk and heavy cream
Heavy cream supplies the creamy mouthfeel; whole milk tempers that richness so the mixture churns smoothly. Stick to the prescribed cups to prevent excess iciness or an overly stiff set.
Vanilla bean vs. vanilla extract
Split beans release tiny seeds and layered aroma that show in the final product. A quality extract is a fine substitute when beans are unavailable and still gives clear vanilla flavor.
Egg yolks, sugar, and a pinch of salt
Yolks emulsify fat and water, thicken the custard, and add a pale, golden hue. Sugar sweetens and lowers freezing point for scoopable texture. Many pros whisk half the sugar into the dairy and the rest into the yolks to reduce scorching and protect proteins during tempering.
- Tip: Add a small pinch of kosher salt to lift the vanilla and round sweetness.
- Choose fresh eggs and quality dairy for a stable, clean-tasting custard.
Essential Equipment and Prep
A tidy workspace and chilled gear make the difference between silky and grainy results. Gather your ice cream maker, digital thermometer, fine-mesh strainer, and a cold container before you start. Plan for pre-freezing the bowl at least overnight so the unit freezes the mixture fast and produces smaller ice crystals.
Ice cream maker and pre-freezing the bowl
Choose a dependable ice cream maker or cream maker from reputable manufacturers; KitchenAid and Cuisinart are popular choices. Follow the manufacturer’s instructions and pour the cold base into the bowl while the machine is running to avoid the mixture freezing to the sides.
Why a fine-mesh strainer and thermometer matter
Use a digital thermometer to hit 170–175°F (or 180°F/85°C per chef method). This ensures the custard thickens safely without boiling and preserves flavor.
Strain the hot custard through a fine-mesh strainer to catch any curdled egg bits and the spent vanilla bean. Cool the base quickly in an ice bath, then chill before churning to limit ice formation.
- Containers: Pick a 1‑quart loaf pan or airtight freezer-safe container for ripening.
- Cold tools: Make sure spatulas and ladles are clean and chilled if possible.
- Timing: Account for bowl pre-freezing, active cooking minutes, and chilling time in your prep plan.
Step-by-Step: Make the French Vanilla Bean Ice Cream Recipe

Make a flavorful, stable custard by working steadily and watching temperature cues. This step turns dairy and yolks into the foundation for smooth, scoopable ice cream.
Infuse milk and cream with vanilla bean
Combine milk and cream in a saucepan. Split a vanilla pod lengthwise and scrape the seeds into the dairy, then add the pod. Warm the mixture over medium heat until it steams and small bubbles form at the edges.
Whisk egg yolks and sugar until pale and airy
In a chilled bowl, whisk the egg yolks and sugar for several minutes until the color lightens and the texture thickens. This airy stage helps the yolks emulsify the base.
Temper the eggs to prevent curdling
Slowly ladle a cup of the hot dairy into the yolks while whisking constantly. Repeat until the yolk mix feels warm and fluid. This prevents scrambled bits when you return the yolks to the pot.
Cook to 170–175°F, then strain for a silky base
Pour the tempered yolks back into the saucepan and cook over steady heat, stirring and scraping the bottom. Cook until the custard coats a spoon and reaches 170–175°F. For a chef-leaning finish, you may heat to 180°F/85°C, stirring continuously to avoid boiling.
“Straining immediately removes any tiny solids and the spent pod, leaving a truly silky base.”
- Strain the hot custard through a fine-mesh sieve.
- Use an ice bath to cool quickly and limit crystal formation.
- Note minutes and viscosity so you can reproduce your preferred thickness next time.
Chill, Churn, and Ripen for Perfect Texture
After cooking, cool the custard quickly so the base stays smooth and free of large crystals. Set the pot over an ice bath and stir until the mixture drops to about 70–80°F.
Press plastic wrap directly onto the surface to stop a skin from forming, then chill the bowl to roughly 40°F for several hours or overnight. This short pause preserves aroma and improves final mouthfeel.
Churn per the maker’s directions
Follow your manufacturer’s instructions and pour the cold base into the pre-frozen bowl while the machine runs. Churn until the mix reaches a soft-serve consistency with clear trails from the dasher.
Transfer and ripen
Pack the churned ice cream into a freezer-safe container, smooth the top, and seal. Place it at the rear of the freezer to ripen for 2–4 hours so the texture firms and flavors round out.
- Tip: Stir extract into the cooled base if you used extract instead of whole bean to protect delicate aromatics.
- Avoid over-churning; it can make the finished product grainy or overly stiff after ripening.
- Pre-chilled tools and containers cut transfer heat and help preserve the smooth texture customers expect.
For a step-by-step reference to timing and handling, see the full method.
Pro Tips for Ultra-Smooth Homemade French Vanilla Bean Ice Cream Recipe

Master a few handling habits and timing steps to cut down on crystals and produce a silky texture every time.
Completely chill the custard base to about 40°F before you pour it into the ice cream maker. A cold base freezes faster and forms smaller ice crystals, which improves mouthfeel.
Make sure to strain the hot custard after cooking. Straining removes any tiny curdled bits so the finished pint stays smooth and clean on the palate.
- Keep gear cold: a pre-frozen bowl and chilled storage container buy time during transfer and protect the base.
- Avoid over-churning: stop at soft-serve thickness to prevent fat separation and a waxy texture.
- Split the sugar: adding some sugar to the dairy and some to the yolks reduces scorching and helps a silkier custard.
Optional: add ½ teaspoon of xanthan gum per 3 cups liquid if you need longer storage life. Fold in chocolate or sauces gently right after churning to keep swirls distinct.
“Work cold, strain well, and stop when it’s just thick enough — those three steps make a world of difference.”
Troubleshooting Texture and Flavor
Many faults come down to temperature, timing, or handling. Check the heat you used, how long you cooked, and how quickly the base cooled.
Custard too thin or too thick
If the custard is thin, return it to very gentle heat and stir until it coats the back of a spoon or reaches 170–175°F. If it feels too thick, you may have overcooked it; strain, thin with cold milk, and chill before churning.
Eggy taste or curdled bits
An eggy flavor usually means the mix overheated or boiled. Next time, cook over medium heat and watch the minutes with a thermometer. Visible curdles mean tempering failed — strain the mixture to save the batch.
Icy or grainy after freezing
Icy results come from a warm base, a lukewarm bowl, or slow freezing. Cool the custard in an ice bath, press plastic wrap on the surface, pre-freeze the bowl, and churn promptly. Stop churning when the mixture looks like soft serve to avoid a fatty, overworked finish.
- Fix flavors: Adjust sugar slightly and boost vanilla after cooling if notes feel muted.
- Persistent iciness: Add mix-ins after churn or try a stabilizer for longer storage.
- Further reading: See our full troubleshooting guide for more tips.
French Vanilla Bean Ice Cream Recipe Flavor Variations and Mix-Ins

Add-ins are the easiest way to customize texture and taste. Work quickly after churning so the cold base keeps its light body while you fold in swirls and bits.
Add aroma and extract
For bean-free options, stir vanilla paste or a quality vanilla extract into the cooled base. Add it after the custard has chilled so aromatic compounds stay bright and true.
Swirls and sauces
Fold ribbons of caramel, chocolate sauce, or fruit jam into the churned ice cream immediately to create pockets of flavor. Work gently to avoid deflating the mixture.
Crunch, layers, and storage
Sprinkle cookie crumbles, streusel, or chocolate chips for texture. Fold them in with a light hand and keep add-ins cold so they don’t melt the base.
- Portion swirls thoughtfully: too much sauce can disrupt freezing and create ice.
- Layer for effect: alternate sauce and ice cream in a shallow, freezer-safe container and drag a knife for marbling.
- Label the container: note the variation and date so you can repeat favorite ratios.
Serving Ideas: Sundaes, Milkshakes, and A La Mode
A few smart serving moves turn a good pint into an unforgettable sundae or shake. Start with a rich custard-based scoop and plan contrasts in temperature, texture, and sweetness.
Build better sundaes with hot fudge or caramel
Elevate sundaes by layering warm hot fudge or salted caramel over cold scoops so the sauce slowly cascades. Add toasted nuts and a dollop of whipped cream for crunch and lift.
Blend into thick milkshakes or frappes
For shakes, combine cold milk and quality vanilla ice with a measured cup of chocolate syrup. Pulse in short minutes to reach the desired thickness and avoid over-thinning.
Pair with pies, cobblers, cakes, and baked fruit
Serving a scoop a la mode over warm pie or roasted fruit creates a pleasing aroma and mouthfeel contrast. Try air-fried peaches or a slice of tender cake with a small scoop alongside.
- Portion in chilled bowls or glasses to slow melting and keep textures distinct.
- Drizzle sauces as thin ribbons rather than pooling to maintain structure.
- Pre-scoop onto a lined tray and freeze for an hour to speed service at events.
- Pair with bittersweet chocolate shards or a shot of espresso for an adult-friendly finish.
“A chilled scoop beside a warm slice makes every bite feel curated and balanced.”
French Vanilla Bean Ice Cream Recipe Storage, Make-Ahead, and Safety

A stable freezer environment and smart packing go a long way toward preserving texture and aroma. Store chilled churned ice cream in an airtight container at the rear of the freezer. That area has the most stable temperature and limits thaw-refreeze cycles.
Freezer best practices
Press plastic wrap directly onto the surface of the custard before sealing the container to slow ice crystal growth. Fill the container near the top to reduce trapped air and freezer burn.
How long it keeps and signs of ice crystals
Label the date and enjoy within a month for best texture. If you see a frosty layer or large crystals, soften the top slightly and scrape away the affected portion. Avoid repeated thaw-refreeze cycles; scoop portions and return the container promptly.
Safe eggs and handling
Follow safe handling: cook the custard to 170–175°F (or 180°F/85°C) to pasteurize eggs, then cool quickly in an ice bath. Make sure to follow your manufacturer’s instructions for churn times and capacities to prevent overflow and under-freezing.
“Churn a day ahead to let flavors ripen and the texture firm up for easier scooping.”
French Vanilla Bean Ice Cream Recipe
Prep cold gear first: pre-freeze the ice cream maker bowl and your storage container so the mixture freezes fast and forms small crystals.
Heat 1½ cups whole milk and 1½ cups heavy cream with a split and scraped vanilla bean over medium heat until steaming. Remove from heat, and set aside.
Whisk 4 egg yolks with sugar for several minutes until pale and thick. Temper the yolks by adding warm dairy slowly while whisking constantly.
- Return the mix to the pot; stir and cook until it coats a spoon and reaches 170–175°F (or 180°F/85°C), then strain.
- Cool over an ice bath, press plastic wrap on the surface, and chill to ~40°F.
- Churn per manufacturer instructions until soft-serve thickness appears, then transfer to a freezer-safe container and ripen 2–4 hours or overnight.
Tip: if you use vanilla extract instead of a bean, stir in 1–2 teaspoons after cooling to keep aroma bright. Yield is about 1 quart.
“Cold tools and timely chilling make homemade ice cream smooth and scoopable.”
Conclusion
, A well-timed temper and a patient chill turn a simple custard into a reliably smooth ice cream.
Make sure, pre-freeze your bowl, cool the warm base quickly, and churn only until soft‑serve. Then pack the pint into an airtight container and place it at the back of the freezer to ripen for a few hours.
The rich custard base highlights vanilla without feeling heavy. Whether you steep a French Vanilla Bean Ice Cream Recipe or stir in extract, disciplined steps let the aroma and flavor shine.
Use this foundation for sundaes, milkshakes, or a la mode pairings with chocolate and baked fruit. Keep notes on milk ratios and churn time so your homemade ice cream improves each batch.


