 Skip to content


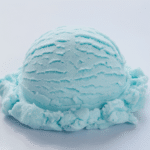
Sugar Free Lactose Free Ice Cream
4
servings30
minutes40
minutes300
kcal1
hour10
minutesDelicious sugar-free and lactose-free treat for everyone.
Keep the screen of your device on
Ingredients
2 cups 2 canned coconut milk
1/2 cup 1/2 erythritol
1/4 teaspoon 1/4 salt
1 tablespoon 1 vanilla extract
1/2 cup 1/2 almond milk
Directions
- In a medium saucepan, combine coconut milk, erythritol, and salt. Stir over medium heat until erythritol dissolves completely.
- Remove from heat and stir in vanilla extract and almond milk, ensuring the mixture is well combined.
- Pour the mixture into a shallow container, cover, and chill in the refrigerator for at least 2 hours until very cold.
- Once chilled, pour the mixture into an ice cream maker and churn according to manufacturer's instructions, about 20-25 minutes.
- Transfer ice cream to an airtight container and freeze for another 1-2 hours until firm before serving.
Recipe Video
Nutrition Facts
- Serving Size: 1g
- Total number of serves: 6
- Calories: 100kcal
- Fat: 9g
- Saturated Fat: 8g
- Trans Fat: 0g
- Polyunsaturated Fat: 0.3g
- Monounsaturated Fat: 0.7g
- Cholesterol: 0mg
- Sodium: 20mg
- Potassium: 50mg
- Carbohydrates: 2.5g
- Fiber: 1g
- Sugar: 0g
- Protein: 1.5g
- Vitamin A: 0IU
- Vitamin C: 0mg
- Calcium: 10mg
- Iron: 0.5mg
- Vitamin D: 0mg
- Vitamin E: 0mg
- Vitamin K: 0mg
- Thiamin: 0.01mg
- Riboflavin: 0.02mg
- Niacin: 0mg
- Vitamin B6: 0mg
- Vitamin B12: 0mg
- Folate: 0mg
- Biotin: 0mg
- Pantothenic Acid: 0mg
- Phosphorus: 10mg
- Iodine: 0mg
- Magnesium: 3mg
- Zinc: 0mg
- Selenium: 0mg
- Copper: 0mg
- Manganese: 0mg
- Chromium: 0mg
- Molybdenum: 0mg
- Chloride: 0mg
Did you make this recipe?
Tag @https://www.instagram.com/ice_cream_haven/ on Instagram and hashtag it with #IceCreamIceCreamHavens
Like this recipe?
Follow @https://www.pinterest.com/Ice_Cream_Haven/ on Pinterest
Join our Facebook Group!
Follow https://www.facebook.com/icecreamhavens/ on Facebook
Why this creamy lactose-free ice cream works right now
A warm custard gently cooked on medium-low yields the silkiness that defines great homemade frozen desserts. This method keeps the classic dairy flavor while easing digestion for those who benefit from lactose free milk.
Informational intent: a homemade base that’s gentle on digestion
Using lactose free whole milk preserves milk proteins and the familiar mouthfeel people expect. Tempering yolks with hot milk and holding the pot over heat medium prevents scrambling and creates a stable cream base.
Dairy-free vs. lactose-free: what to know before you churn
Dairy-free options use plant milks like coconut milk or oat milk and suit vegan needs. They taste different from dairy but work well in an ice cream base when balanced with sugar and fat.
- Chill thoroughly: cool the mixture to fridge temps (~39°F) to limit large ice crystals.
- Consistent batches: this balance of milk, eggs, sugar, and cornstarch cuts iciness and accepts add-ins like cookies or chocolate smoothly.
Ingredients and tools for a silky Lactose Free Ice Cream recipe base

Assemble your ingredients and equipment so the process moves smoothly from stovetop to churn.
- 6 egg yolks
- 1 cup sugar (170 g)
- 3 cups lactose free whole milk (740 g)
- 1 vanilla bean (or 1 tbsp vanilla bean paste)
- 2 tbsp cornstarch (15 g)
- Pinch of salt
Smart swaps:
- Replace 1/4 of the sugar with corn syrup for a softer scoop and fewer ice crystals.
- Use 1 tbsp pure vanilla extract per bean and stir it in off heat to keep aroma.
- For a dairy-free path, try canned coconut milk or a plant cream like Country Crock Plant Cream; expect a subtle coconut note.
Equipment checklist:
- Reliable ice cream maker or KitchenAid attachment (both work well when the base is chilled)
- Thermometer — accurate to hit 175–180°F when cooking the custard
- Fine-mesh sieve to strain out any coagulated egg bits or pod fibers
- Measure by grams where possible for consistent results
Where to buy milk: For consistent U.S. results, look for Lactaid, Horizon Organic, Organic Valley, Market Pantry, or Lucerne. These options keep fat and taste steady across batches.
Step-by-step: from custard to churned homemade Lactose Free Ice Cream recipe

Whisk the yolks and sugar until pale, then warm the milk with the split vanilla bean over heat medium until it just begins to simmer. This infuses flavor and keeps the mixture ready for tempering.
Make the ice cream base
Temper slowly: add a few tablespoons of hot milk into the yolks while whisking, repeat until safe to return to the pot. Cook on medium-low, stirring, until the custard reaches 175–180°F (about 4–5 minutes) and coats a spoon.
Thicken and stabilize
Stir in a cornstarch slurry about 30 seconds before removing from heat to boost stability and reduce large ice crystals. Finish with a pinch of salt off heat to lift the vanilla bean aroma and balance sweetness.
Chill, churn, and set
Strain the warm mixture through a fine-mesh sieve into a clean bowl to remove any curds or pod fibers. Cool, then refrigerate until it reaches ~39°F.
- Do not pour hot custard into your frozen machine bowl—this can melt the coolant and ruin texture.
- Churn about 20 minutes to soft-serve, then pack into an airtight container and freeze 4+ hours to harden.
- For an alternative method without eggs, try an egg-free method that still yields rich texture.
lactose free ice cream recipe

Plan your workflow: timing and temperature make a big difference in texture.
At-a-glance
At-a-glance: time, yield, and temperature cues
Active cook time: about 20 minutes. Chill to ~39°F (overnight ideal). Churn ~20 minutes and freeze at least 4 hours for a firm scoop.
Yield: roughly 1–1.5 quarts — perfect for a standard home freezer container.
Ingredient ratios for a reliable, creamy base
Use a dependable ratio: 3 cups lactose free whole milk, 6 egg yolks, and 1 cup sugar. Add 2 tbsp cornstarch and a pinch of salt to improve body and reduce large crystals.
- Heat the custard to 175–180°F and watch for the mixture to coat the back of a spoon.
- Add vanilla extract off heat (or use a split vanilla bean for specks) to preserve aroma.
- Expect a silky ice cream base that churns in ~20 minutes and firms after 4+ hours.
“The base should coat a spoon cleanly — that visual cue tells you it’s ready to chill.”
For an egg-free method, try an alternative shown here: egg-free method. For a vanilla-focused variation, see this classic batch at vanilla bean guide.
Flavor variations and mix-ins to try
Small additions—chips, swirls, or sauces—make a big difference in every scoop. Start by choosing a base that fits your needs, then layer in textures and sauces to match the mood.
Dairy-free and vegan option: Use full-fat coconut milk or a plant cream to build a non-dairy ice cream that churns into a rich texture. Balance fat with a touch of sweetener and a pinch of salt to avoid an icy bite after longer storage.
Vanilla two ways
For deep, speckled flavor use a split vanilla bean. For a bright, clean note add 1 tbsp pure vanilla extract off heat. Both methods work across dairy and vegan bases.
Classic crowd-pleasers
- Fold chocolate chip pieces in the last minute of churn so they stay suspended.
- Swirl warmed peanut butter for ribbons of nutty richness throughout the pint.
- Mix in crushed sandwich cookies off the machine to preserve crunch.
Sauces and toppings
Top vanilla ice or a chocolate base with cherry compote, rosemary-peach sauce, warm caramel, or a simple chocolate sauce to add acidity, aroma, and shine.
Troubleshooting and pro tips for creamier homemade ice cream
Small adjustments during chilling and churn time are the fastest way to stop large crystals and get a smoother scoop.
Cold and timing first: Fully chill the custard to about 39°F before you run the machine. Limit churn to roughly 20 minutes or follow the maker’s window. This reduces large ice crystals and gives a silkier texture in homemade ice cream.
Stop iciness
Use a cornstarch slurry to stabilize the base and lower iciness. Swap about one-quarter of the sugar with corn syrup to lower the freezing point and soften the final scoop.
Boost creaminess
Raise fat slightly when possible—more milk fat improves mouthfeel and helps the dessert hold structure after a day in the freezer. Add-ins should go in late so they stay suspended.
No machine? Try this
If you lack an ice cream maker or cream maker, use a blender-plus-freezer method. Pulse the chilled mixture, freeze 20–30 minutes, then blend and repeat until creamy. This mimics churn action and limits large ice formation.
Thermal discipline and quick fixes
Cook over heat medium to medium-low, strain the warm mixture, and never pour a warm base into a frozen bowl. If it won’t thicken, check yolk ratios and temperature. If it melts too fast, confirm the freezer bowl was fully frozen and the base was at ~39°F before churning.
“Chill well, churn wisely, and stabilize where needed for the best homemade ice cream texture.”
Serving, storage, and nutrition notes
Serve immediately or store for later — both ways let you enjoy the texture you prefer.
Serve your churned dessert straight from the machine for a silky soft-serve experience, or let it firm in the freezer for scoops that keep their shape. Soft-serve works great in cones; hard-set scoops hold up in bowls, sundaes, and classic banana splits.
How to serve
Soft-serve: Serve immediately after churn for a smooth mouthfeel.
Hard-set: Freeze at least 4 hours for scoopable pints that stay neat in cones or dishes.
Storage best practices
Store in shallow, airtight containers with minimal headspace to limit frost and maintain the base texture. Press a sheet of parchment directly on the surface before sealing to reduce crystal growth. Let frozen pints sit at room temperature a few minutes before scooping to improve taste and scoopability, especially if using coconut milk or higher-fat mixes.
Nutrition reminder
Yields about 1–1.5 quarts; typical serving is ~1/2 cup. Nutrition numbers are automated estimates and vary by ingredients and toppings. Pair with cherry compote, rosemary-peach sauce, warm caramel, or crushed cookies and chocolate chip sprinkles for extra contrast. A pinch of salt in sauces helps the vanilla flavor pop without adding sweetness.
- Keep freezer temp steady and containers sealed to preserve taste.
- For a quick dairy-free tip, see a quick dairy-free option.
- Try a rich coconut milk variant for a coconut-forward alternative.
Conclusion
Bring the method together: balance, chill, churn, and seal to preserve silkiness.
Build a stable custard at 175–180°F, cool it to about 39°F, churn ~20 minutes, then freeze to set. These steps deliver a repeatable, rich homemade ice cream that reads like a shop scoop.
Choose vanilla bean, paste, or extract and use a cornstarch slurry or a partial sugar-to-corn-syrup swap to soften texture. For plant-based needs, adapt this base into vegan ice cream or non-dairy ice cream with coconut or other milks.
Store in shallow, airtight containers and add cookies, chocolate, or chip mix-ins late in the churn. Try more tested ideas and collections of ice cream recipes at ice cream recipes to explore flavors and keep your results consistent.
FAQ
What makes this creamy lactose-free ice cream recipe gentle on digestion?
Can I use coconut milk or another plant-based milk instead of lactose-reduced milk?
Do I need egg yolks for a silky homemade base?
What equipment do I need to make this at home?
How do I prevent large ice crystals and achieve a creamy texture?
What temperatures should I watch for during the process?
Can I make chocolate chip, peanut butter, or cookies & cream variations?
What if I don’t have an ice cream maker — how can I make this at home?
Which brands sell lactose-reduced whole milk in the U.S.?
How should I store homemade batches and keep them scoopable?
Are there quick tips to boost richness without extra dairy?
How do I adapt ingredient ratios for different yields?


 18")


