


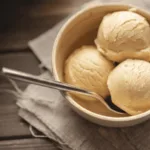
Moose Tracks Ice Cream
8
servings30
minutes1
hour300
kcal1
hour30
minutesA delicious homemade ice cream with fudge and peanut butter cups.
Keep the screen of your device on
Ingredients
2 cups 2 heavy cream
1 cup 1 whole milk
0.75 cup 0.75 granulated sugar
1 teaspoon 1 vanilla extract
1 cup 1 fudge sauce
0.5 cup 0.5 peanut butter cups
Directions
- In a medium bowl, whisk together heavy cream, whole milk, granulated sugar, and vanilla extract until the sugar has dissolved completely.
- Pour the mixture into an ice cream maker and churn according to the manufacturer's instructions. This typically takes about 20-25 minutes.
- In the last 5 minutes of churning, add the chopped peanut butter cups to the ice cream mixture to distribute them evenly.
- Transfer half of the churned ice cream into an airtight container. Drizzle half of the fudge sauce over it and gently swirl with a knife.
- Add the remaining ice cream on top, drizzle with the remaining fudge sauce, and swirl gently again. Cover tightly with a lid.
- Freeze the assembled ice cream for at least 2 hours to harden the consistency before serving.
Recipe Video
Nutrition Facts
- Total number of serves: 8
- Calories: 300kcal
- Cholesterol: 80mg
- Sodium: 50mg
- Potassium: 150mg
- Sugar: 25g
- Protein: 5g
- Calcium: 10mg
- Iron: 2mg
- Thiamin: 0mg
- Riboflavin: 0mg
- Niacin: 0mg
- Folate: 0mg
- Biotin: 0mg
- Phosphorus: 0mg
- Iodine: 0mg
- Magnesium: 0mg
- Zinc: 0mg
- Selenium: 0mg
- Copper: 0mg
- Manganese: 0mg
- Chromium: 0mg
- Molybdenum: 0mg
- Chloride: 0mg
Did you make this recipe?
Tag @https://www.instagram.com/ice_cream_haven/ on Instagram and hashtag it with #IceCreamIceCreamHavens
Like this recipe?
Follow @https://www.pinterest.com/Ice_Cream_Haven/ on Pinterest
Join our Facebook Group!
Follow https://www.facebook.com/icecreamhavens/ on Facebook
Essential Ingredients and Tools
Ready to craft a dessert that’s both creamy and unforgettable? The secret lies in selecting the right ingredients and tools. High-quality components ensure a smooth texture and balanced flavors, making every bite a delight.
Dairy and Sweeteners Breakdown
Start with the basics: heavy cream and whole milk. These dairy staples create a rich base. For sweetness, use granulated sugar or experiment with alternatives like honey or maple syrup. A pinch of salt enhances the overall flavor.
Don’t forget the vanilla bean or extract. It adds depth and aroma. Eggs are optional but can make the mixture creamier. For a twist, try using peanut butter or chocolate fudge as mix-ins.
Recommended Equipment and Ice Cream Maker Tips
Investing in the right tools makes all the difference. An ice cream maker is essential for achieving the perfect texture. Look for models with good reviews and easy-to-use features.
Storage is equally important. Use airtight containers to keep your dessert fresh. For churning, follow the manufacturer’s instructions to ensure even freezing. If you’re new to homemade desserts, check out Ice Cream Haven for more tips and recipes.
Remember, precision matters. Measure ingredients carefully and use high-quality brands. For inspiration, explore this French vanilla bean ice cream recipe. It’s a great example of how simple ingredients can create something extraordinary.
Moose Tracks Ice Cream Recipe 2 Step-by-Step Preparation Process

Transform your kitchen into a dessert haven with this step-by-step guide. Making a creamy, indulgent treat at home is easier than you think. Follow these simple instructions to create a dessert that’s sure to impress.
Creating the Ice Cream Base
Start by combining heavy cream, whole milk, and granulated sugar in a saucepan. Heat the mixture over medium heat, stirring until the sugar dissolves. Add a pinch of salt and vanilla bean for depth of flavor.
For a richer texture, whisk in egg yolks and cornstarch. Continue heating until the mixture thickens slightly. Remove from heat and let it cool in an ice bath for 1-2 hours. This ensures a smooth and creamy base.
Incorporating Fudge Ripple and Peanut Butter Cups
While the base cools, prepare the mix-ins. Chop peanut butter cups into small chunks for even distribution. For the fudge ripple, heat chocolate and cream in a saucepan until smooth. Let it cool slightly before use.
Once the base is ready, gently fold in the chopped peanut butter cups. Swirl the fudge ripple into the mixture for a decadent touch. This combination adds a delightful contrast of flavors and textures.
Churning and Freezing Techniques
Transfer the mixture to an ice cream maker and churn according to the manufacturer’s instructions. This step is crucial for achieving the perfect creamy texture. For a soft-serve consistency, freeze for 1-2 hours.
For a firmer texture, transfer the churned mixture to a freezer-safe container. Freeze for 3-4 hours or until it reaches your desired consistency. Avoid ice crystals by ensuring the container is airtight.
For more inspiration, check out this collection of nostalgic ice cream recipes. It’s a great way to explore new flavors and techniques.
Mastering Moose Tracks Ice Cream Recipe 2

Take your dessert game to the next level with these creative twists. Whether you’re a fan of classic flavors or love experimenting with new combinations, this section will guide you through customizing your treat for a truly unique experience.
Customizing Your Fudge and Peanut Butter Swirl
Personalize your dessert by playing with the swirls. For a richer fudge ripple, try using dark chocolate or adding a hint of espresso. This enhances the depth of flavor without overpowering the base. If you’re a fan of peanut butter, consider mixing in crunchy or creamy varieties for a delightful contrast.
For an extra layer of indulgence, layer your peanut butter cups and fudge swirl as you pour the mixture into the container. This technique ensures every bite is packed with flavor. Want to go gourmet? Add chocolate-covered nuts or caramel bits for a surprising crunch.
Pro Tips for a Creamier, Dreamier Texture
Texture is key to a perfect dessert. To achieve a smoother consistency, ensure your base is well-chilled before churning. This prevents ice crystals and keeps the mixture creamy. If you’re using an ice cream maker, follow the timing instructions carefully to avoid over-churning.
For a richer texture, consider adding a splash of heavy cream or a tablespoon of corn syrup to the base. These ingredients help maintain a velvety finish. Once churned, store your dessert in an airtight container to preserve its smoothness. For more tips on achieving the perfect texture, check out this guide on using an ice cream.
Experiment with layering techniques to keep the swirls and mix-ins distinct. Pour a layer of the base, add your fudge ripple and peanut butter cups, then repeat. This method ensures every scoop is a delightful mix of flavors and textures.
Conclusion
Creating a homemade Moose Tracks Ice Cream Recipe 2 is a rewarding experience that brings joy to both the maker and those who enjoy it. This recipe combines the richness of vanilla, the sweetness of fudge, and the crunch of peanut butter cups for a truly indulgent treat. Every step, from selecting quality ingredients to perfecting the churning process, ensures a creamy and delightful result.
Feel free to experiment with mix-ins and textures to make it your own. Whether you’re sharing it with loved ones or savoring it solo, this dessert is sure to impress. Don’t forget to snap a photo and share your creation on social media—tag us to inspire others!
For those exploring dairy-free options, check out this guide to dairy-free desserts. It’s a great way to enjoy a similar treat while catering to dietary needs. Remember, perfection comes with practice, so keep experimenting and enjoying every spoonful!
FAQ
What makes this homemade treat so creamy?
Can I use store-bought fudge and peanut butter cups?
How do I prevent ice crystals from forming?
Can I make this without a machine?
How can I customize the flavor?
How long does it take to prepare?
Can I use a vanilla bean instead of extract?


