


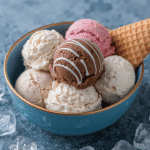
Classic Vanilla Ice Cream
4
servings30
minutes40
minutes300
kcal1
hour10
minutesA simple, homemade vanilla ice cream recipe.
Keep the screen of your device on
Ingredients
2 cups 2 heavy cream
1 cup 1 whole milk
3/4 cup 3/4 granulated sugar
1 tablespoon 1 vanilla extract
1 pinch 1 salt
Directions
- In a large mixing bowl, whisk together the heavy cream, whole milk, granulated sugar, vanilla extract, and salt until the sugar is completely dissolved.
- Cover the bowl with plastic wrap and refrigerate for at least two hours, or until the mixture is thoroughly chilled.
- Once chilled, pour the mixture into your ice cream maker according to the manufacturer's instructions.
- Churn the ice cream for about 20 to 25 minutes or until it reaches a soft serve consistency.
- Transfer the churned ice cream into an airtight container and freeze for at least 2 hours for a firmer texture before serving.
Nutrition Facts
- Total number of serves: 6
- Calories: 280kcal
- Cholesterol: 80mg
- Sodium: 40mg
- Potassium: 138mg
- Sugar: 20g
- Protein: 3g
- Calcium: 100mg
- Iron: 0mg
- Thiamin: 0mg
- Riboflavin: 0mg
- Niacin: 0mg
- Folate: 0mg
- Biotin: 0mg
- Phosphorus: 0mg
- Iodine: 0mg
- Magnesium: 0mg
- Zinc: 0mg
- Selenium: 0mg
- Copper: 0mg
- Manganese: 0mg
- Chromium: 0mg
- Molybdenum: 0mg
- Chloride: 0mg
Did you make this recipe?
Tag @https://www.instagram.com/ice_cream_haven/ on Instagram and hashtag it with #IceCreamIceCreamHavens
Like this recipe?
Follow @https://www.pinterest.com/Ice_Cream_Haven/ on Pinterest
Join our Facebook Group!
Follow https://www.facebook.com/icecreamhavens/ on Facebook
Why Homemade Ice Cream Feels Like Summer Nostalgia
That familiar rotary sound carried down the block, signaling dessert and small, welcome pauses in the heat. Families in places like Oklahoma and the South still recall how a simple batch of homemade vanilla could end a long, hot day.
The ritual matters: a short list of milk, cream, sugar, and vanilla becomes a shared dessert that brings people to porches and patios. Waiting while the maker spins builds small talk and anticipation, so the first spoonful tastes like celebration.
Serving a scoop over a warm brownie or pie turns a recipe into a memory. Neighborhood potlucks, fireworks nights, and backyard BBQs often centered on that comforting aroma and the crowd a single batch could feed.
Start new traditions with weekend “churn nights” where each family member takes a turn at the crank. Save favorite recipes and stories in a family notebook to keep flavors and moments alive year after year.
- Simple ingredients, big rewards: creamy texture from whole milk and heavy cream.
- Patience pays off: time and rhythm make each recipe taste richer.
- Turn ritual into recipe collections that future generations will love.
Ingredients, Tools, and What Makes a Creamy Base
A stable, flavorful base comes from balancing fat, sugar, and vanilla before the freeze. Measure precisely and taste the mix before it chills. That small step ensures the final scoop is balanced.
Core ingredients:
- Whole milk for body and mouthfeel.
- Heavy cream for richness and silkiness.
- Sugar to sweeten and reduce ice crystal size.
- Egg yolks for custard bases or softened cream cheese for no-cook thickness.
- Vanilla extract, vanilla bean, or bean paste for aroma and depth.
Equipment checklist
Prepare an ice cream maker or cream maker, plenty of ice, and rock salt. Use a sturdy saucepan for custard, a whisk, and at least one large bowl.
Notes on milk, cream, and vanilla
More heavy cream increases fat and makes silkier texture. Relying more on whole milk gives a lighter bite with slightly more icy texture. Choose extract for convenience, bean paste for visible specks, or a split vanilla bean for the deepest flavor.
Custard-Base Vanilla Ice Cream (Richer, Classic Texture)

A gentle, cooked custard transforms milk and sugar into a luxuriously smooth base. This method takes a few careful minutes at the stove but rewards you with a dense, scoopable vanilla ice cream that holds on cones and plates.
Tempering and cooking
Temper the eggs with warmed milk and sugar for a silky custard
Whisk egg yolks and sugar in a bowl until pale and ribbony. Warm whole milk in a saucepan until it just begins to steam.
Slowly add hot milk to the yolks while whisking to temper. Return the mixture to the saucepan and stir over low heat.
Heat gently to 165°F without boiling for safe, creamy results
Cook the custard to a temperature of about 165°F, stirring constantly. Do not let it boil; the right temperature gives safety and a spoon-coating texture.
Chill custard to about 65°F for better body and cleaner churn
Pour the finished custard into a bowl and seal in an airtight container. Chill until near 65°F to improve body and reduce crystallization during processing.
Stir in heavy cream and vanilla, then process in your ice cream maker
Fold in cold heavy cream and your vanilla choice—vanilla extract or scraped vanilla bean—for fragrant depth.
Pour the base into an ice cream maker and process per manufacturer instructions. Listen for the churn to slow as the mixture thickens toward scoopable texture.
- Scales easily from one quart to a gallon.
- Cook step: quick; chill step: patient; churn: the payoff.
- Expect neat scoops that hold shape for cones and dishes.
No-Cook, No-Egg Method for Quick Homemade Ice Cream

Skip the stovetop: this quick method yields a rich, scoopable dessert using fridge time alone. It uses a bit of cream cheese to mimic custard body so you avoid eggs and long cook times.
The cream cheese tip:
The cream cheese tip: thicker body without eggs or cooking
Whisk softened cream cheese with a splash of milk, a pinch of salt, and vanilla until perfectly smooth. This slurry gives the base stability and a silky feel that fights iciness.
Whisk sugar until dissolved, add vanilla, and chill thoroughly
In a larger bowl, combine cold heavy cream and the remaining milk. Whisk in sugar until no graininess remains. Blend in the cream cheese mixture and taste for balance.
- Cover and chill the base for at least 3 hours, or overnight for best texture.
- Pour the chilled base into your machine and process until it reaches soft-serve consistency.
- Add mix-ins near the end so pieces distribute evenly without sinking.
Notes: Choose vanilla extract for quick flavor or bean paste for visible specks and deeper vanilla notes. This ice cream recipe is fast, allergy-friendly, and perfect when you want dessert in minutes of active prep time.
Churning with an old fashioned ice cream churn

Setting up the bucket correctly makes the difference between icy shards and silky scoops. Position the canister in the bucket, pour the chilled base to the fill line, and leave a little headspace for expansion.
Ice and rock salt setup:
Start with about 4 lbs of frozen cubes and 1/2 cup rock salt. Alternate layers—cubes, salt, cubes—keeping the top level below the fill line. Place the unit in a sink or outdoors so meltwater drains easily.
From soft-serve to scoopable:
At first the paddle turns freely. After several minutes the mix thickens to soft-serve and the rotation slows. Continue until the paddle leaves clean ridges and the mechanism strains. Finish by hardening the batch in the freezer for the cleanest scoops.
Hand-crank vs. electric makers
Hand-crank offers ritual and on-the-fly control. Electric units save effort and keep a steady pace for consistent temperature and texture.
“Watch the rhythm, add salt as needed, and trust the texture cues — that’s how great batches are made.”
- Keep adding ice as melt lowers the level.
- Do not overfill the canister; leave headspace.
- If adding mix-ins, work quickly to retain cold and structure.
Flavor Variations & Mix-Ins to Make It Your Own

A few pantry staples and a little patience let you build dozens of memorable flavors. Start by tasting your chilled base and adjust sugar or vanilla before you freeze.
Classic vanilla choices: Use vanilla extract for simplicity, scrape a vanilla bean for a perfumed profile, or stir in bean paste for visible specks and depth. For a beloved twist, label the jar “homemade vanilla” and note the amount used for repeatable results.
- Chocolate or coffee: Heat milk, cream, sugar, and cocoa to a bubble, melt unsweetened chocolate, cool, then process for a rich batch. For coffee, dissolve instant granules in hot water, cool, and add to the mixture.
- Bright citrus: Add finely grated lemon zest and a splash of fresh juice for a lively counterpoint to richer desserts.
- Fruit swirls: Puree strawberries or peaches with a touch of sugar and lemon. Fold the chilled sauce into softened base for ribbons of color and flavor.
- Fold-ins and sauces: Add chopped nuts, cookie pieces, or chocolate chip during the last minute of processing. Drizzle caramel or chocolate sauce and hand-fold for dramatic ribbons.
Keep mix-ins cold so they do not melt and refreeze into icy spots. Use the custard base for bold profiles like chocolate or coffee, and the no-cook base for delicate fruit recipes.
Serving, Storage, and Nutrition Notes

Plate chilled scoops beside a piping-hot slice of pie to create instant crowd-pleasing desserts.
Serve right away for soft-serve texture, or transfer the batch to a freezer-safe container and harden for several hours so cones hold their shape. When you pull leftovers from cold storage, let them sit 10–15 minutes to soften for cleaner scoops.
Smart storage and prep
Store in a container with minimal headspace and a tight lid to reduce frost. Press parchment on the surface before sealing to limit crystals and preserve smooth texture.
Quick tips for serving lines
- Spoon a warm scoop over brownies, cobblers, or pie for an elevated dessert moment.
- Label containers with the recipe name and date so favorites reappear quickly.
- Batch into smaller cups for faster tempering and easier serving at events.
- Keep toppings chilled and ready so guests build bowls in minutes.
Nutrition snapshot: A typical 1/2-cup serving ranges roughly 179–322 calories depending on the base. Custard-style recipes often land near 198 calories; higher cream and fat content push counts higher.
Conclusion
Pull together a chilled base, a steady setup of salt and frozen cubes, and a little patience, and you’ll get reliably smooth results every time.
, Celebrate the craft you learned: two dependable bases and one trusty bucket-style method that turns simple pantry items into memorable ice cream for family gatherings and summer nights.
Choose custard for richness or the no-cook recipe for speed. Note what worked, scale confidently from a quart to large batches, and keep refining flavors like vanilla and fruity swirls.
Serve the first scoop over something warm for contrast. Thanks for keeping this homemade tradition alive—one shared bowl and one good story at a time.
FAQ
What basic ingredients do I need for a classic vanilla base?
How do I temper eggs safely when making a custard base?
What’s the no-cook method that still gives a creamy result?
How do I set up ice and rock salt for an old fashioned churn?
When is the ice cream ready to stop churning?
Should I use a hand-crank or electric maker?
How do I add mix-ins like chocolate chips, nuts, or fruit swirls?
Can I use vanilla bean vs. extract — which is better?
How should I store homemade ice cream for best texture?
What simple flavor variations can I try with pantry staples?
How long should I chill the custard before churning?
Are there nutrition notes I should consider per serving?


