


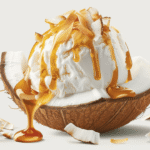
Salt and Straw Ice Cream Recipe
4
servings30
minutes40
minutes300
kcal1
hour10
minutesA creamy, homemade vanilla ice cream recipe for beginners.
Keep the screen of your device on
Ingredients
2 cups 2 heavy cream
1 cup 1 whole milk
3/4 cup 3/4 granulated sugar
1 tablespoon 1 pure vanilla extract
1/4 teaspoon 1/4 salt
Directions
- Combine the heavy cream, whole milk, and sugar in a large bowl. Whisk until the sugar is fully dissolved into the mixture.
- Add the vanilla extract and salt to the cream mixture. Stir until everything is well incorporated and the texture is smooth.
- Transfer the mixture to a refrigerator-safe container. Chill it in the fridge for at least 2 hours or until very cold.
- Pour the cold mixture into an ice cream maker. Churn according to the manufacturer's instructions, usually around 20-25 minutes.
- Once churned, the ice cream should be soft-serve consistency. Transfer it to a lidded container and freeze for at least 4 hours.
- Before serving, let the ice cream sit at room temperature for about 5 minutes to soften slightly for easy scooping.
Recipe Video
Nutrition Facts
- Total number of serves: 6
- Calories: 200kcal
- Cholesterol: 45mg
- Sodium: 80mg
- Potassium: 120mg
- Sugar: 17g
- Protein: 2g
- Calcium: 8mg
- Iron: 0mg
- Thiamin: 0mg
- Riboflavin: 0mg
- Niacin: 0mg
- Folate: 0mg
- Biotin: 0mg
- Phosphorus: 0mg
- Iodine: 0mg
- Magnesium: 0mg
- Zinc: 0mg
- Selenium: 0mg
- Copper: 0mg
- Manganese: 0mg
- Chromium: 0mg
- Molybdenum: 0mg
- Chloride: 0mg
Did you make this recipe?
Tag @https://www.instagram.com/ice_cream_haven/ on Instagram and hashtag it with #IceCreamIceCreamHavens
Like this recipe?
Follow @https://www.pinterest.com/Ice_Cream_Haven/ on Pinterest
Join our Facebook Group!
Follow https://www.facebook.com/icecreamhavens/ on Facebook
Why This Salt & Straw-Style Ice Cream Base Works
A precise balance of milk, cream, and sweeteners keeps this ice cream base scoopable and smooth after freezing. The formula pairs 1/2 cup granulated sugar, 2 Tbsp dry milk powder, 1/4 tsp xanthan gum, 2 Tbsp light corn syrup, 1 1/3 cups whole milk, and 1 1/3 cups heavy cream to build richness and control texture.
Dry milk raises dairy solids so the cream base feels dense yet silky. A tiny amount of xanthan gum ties up free water, which slows ice crystal growth and improves long-term gloss.
Light corn syrup adds invert sugars that lower the freezing point and help the mix stay scoopable. The milk/cream ratio balances fat and proteins for a stable structure.
- Whisk smooth and heat gently to dissolve sugars without simmering.
- Finish off-heat with cream to protect flavor and protein structure.
- Rest cold 6–24 hours so stabilizers hydrate and flavors meld.
For a full walkthrough of the method and proportions, see the detailed guide at this salt straw-style guide.
Salt and Straw Ice Cream Recipe

This section lists the measured ingredients and essential tools to make the base at home.
Ingredients
- 1/2 cup granulated sugar
- 2 Tbsp dry milk powder
- 1/4 tsp xanthan gum
- 2 Tbsp light corn syrup
- 1 1/3 cups whole milk
- 1 1/3 cups heavy cream
Equipment
- small bowl
- whisk
- medium pot
- airtight container
- ice cream maker or cream maker
- freezer
Use a small bowl to combine sugar, dry milk, and xanthan so the stabilizer disperses. Stir well to prevent lumps.
In the medium pot, mix light corn syrup with whole milk. Add the sugar mixture and immediately whisk vigorously until smooth.
Set the pot over medium heat and medium heat cook for about 3 minutes, stirring to dissolve the sugar. Do not let it simmer; control the pot medium heat to protect dairy proteins.
Remove pot heat, pour in the heavy cream, and whisk to combine. Transfer the mixture to an airtight container, label it, and chill 6–24 hours before churning in your ice cream maker.
Make the Salt & Straw Ice Cream Base Step by Step

Follow a precise sequence to build a stable, scoopable ice cream base that chills well overnight.
Stir dry ingredients first
In a small bowl combine 1/2 cup granulated sugar, 2 Tbsp dry milk, and 1/4 tsp xanthan gum. Stir until fully combined so the stabilizer disperses before any liquid touches it.
Warm the liquid
Set a medium pot on medium heat with 2 Tbsp light corn syrup and 1 1/3 cups whole milk. Use a heavy-bottomed pan to keep heat even and reduce scorching.
Add the dry mix and whisk
Add the sugar mixture to the pot and immediately whisk vigorously to prevent lumps. Continue to whisk vigorously while you bring the mix up in temperature.
Cook gently
Keep the pot on medium heat and medium heat cook for about 3 minutes, stirring often until the sugar fully dissolves. If bubbles rise, adjust the burner as heat necessary prevent a simmer; gentle heating protects whole milk proteins.
Finish off-heat
When done, remove pot heat. Pour in 1 1/3 cups heavy cream and whisk until fully combined and glossy.
Store before chilling
Transfer the cream base to an airtight container promptly to limit air exposure. Chill at least 6 hours, ideally overnight, before churning.
Salt and Straw Ice Cream Recipe Chill, Rest, and Refine Texture

After cooking, the most important step is to chill the finished base until it is well chilled. This resting period lets stabilizers hydrate and flavors meld so the final churn is smoother and more stable in the freezer.
Refrigerate until ready
Place the cream base in an airtight container and refrigerate for at least 6 hours, ideally 24. A longer chill improves viscosity and gives the mix a denser mouthfeel when you run it through your cream maker.
Handle separation simply
Minor separation during the resting time is normal. If the mix separates during the resting time, gently stir base to bring it back together before churning. That simple step ensures even texture and consistent freezing behavior.
- Storage: base stored fridge up to 1 week; for longer keep it in the freezer months—up to 3 months.
- Thawing: fully thaw frozen base in the refrigerator, then stir it back together before use.
- Label: mark the date so stored fridge week limits stay clear.
Tip: a well chilled mix gives your machine a head start and helps the ice cream hold shape while staying scoopable.
Churn Like a Pro
How you churn determines texture and the way mix-ins land in each scoop. Pick a machine that fits your routine. An electric ice cream maker automates timing and keeps speeds steady. A hand-crank cream maker gives control and a tactile feel.
Churn to soft-serve before stopping. Pre-chill the cream base so the mix reaches a soft-serve stage with fine crystals. Move fast to containers to trap ideal overrun and reduce melt-back.
Add fragile mix-ins late. Stream warm melted chocolate while the dasher runs to create freckles. For chunks, cut small pieces if your machine has a narrow chute so they fold in without stress.
- Keep the dasher and bowl cold to avoid coarse crystals.
- Layer ribbons when packing to preserve distinct swirls and boost texture flavor.
- Stirring often is unnecessary during machine run; instead watch for the soft-serve stop point.
Signature Variation: Freckled Woodblock Chocolate Technique

Create delicate chocolate shards by pouring a steady ribbon of warm, oiled chocolate into the running dasher.
Melt the chocolate
Use 2 oz finely chopped chocolate with 1 tsp vegetable oil in a bain-marie. Warm gently until fluid so it will pour without seizing.
Freckle the base
When the mix reaches soft-serve in your ice cream maker or cream maker, stream the warm chocolate in a thin, steady ribbon. It will harden on contact and break into micro-flecks.
Pack and freeze
Immediately transfer the churned ice cream base into freezer-safe containers. Press parchment to the surface, seal in an airtight container, and place in the coldest part of the freezer.
- Set time: freeze for at least hours 6 for firm texture.
- Storage: quality holds up to 3 months when sealed well (freezer months).
- Try mixing milk and dark chocolate for layered flavor while keeping the fine fleck texture.
Result: this salt straw-style freckled method yields an even chocolate presence that complements, not overpowers, the ice cream base.
No-Churn Alternative If You Don’t Have an Ice Cream Maker
A straightforward no-churn method makes a rich frozen treat without any special device. Whip cold heavy cream to firm peaks, gently fold in a 14‑oz can of sweetened condensed milk, add your flavorings, and freeze. This produces a creamy texture that approximates a stabilized cream base while keeping the process simple.
Quick no-churn formula
Ingredients: 2 cups cold heavy cream; one 14‑oz can sweetened condensed milk; extracts, purees, or mix-ins as desired.
- Whip the chilled heavy cream to stiff peaks to trap air for volume.
- Fold in the condensed milk gently so the whipped texture stays light.
- Add extracts, fruit puree, cocoa, or small crushed cookies for flavor without an ice cream maker.
- Transfer to a freezer-safe lidded container, smooth the top, and seal to limit ice crystals.
- Freeze for at least hours 6 or overnight until the mixture is firm and scoopable.
- Layer sauces between spooned-in batches for clear swirls; use small mix-ins so they don’t sink as it sets.
“Though the texture is not identical to a churned ice cream base, most cooks will enjoy the convenience and creamy mouthfeel of this no-churn route.”
Tip: If you later get a cream maker, these same flavor ideas transfer easily to a churned approach for a more refined texture.
Scaling, Storage, and Make-Ahead Tips
Large batches behave differently—cooling time, stabilizer dispersion, and stirring all need attention. For consistent results, keep the same ingredient order: mix the sugar mixture (granulated sugar, dry milk, xanthan gum), then combine with light corn syrup and whole milk before cooking and finishing with cream.
Batch sizes: Doubling yields 1 cup sugar; 4 Tbsp dry milk; 1/2 tsp xanthan gum; 4 Tbsp light corn syrup; 2 2/3 cups whole milk; 2 2/3 cups heavy cream. Tripling follows the tested proportions above for stability.
After cooking, cool to room temp and transfer the mixture to an airtight container. The base stored fridge is fine up to 1 week; for longer keep it in the freezer months—up to 3 months. Label contents and date clearly.
When ready to use, thaw fully in the fridge until pourable and well chilled. If separation occurred, gently stir base back together so it is fully combined before your ice cream maker run. Plan for at least hours of chill time for larger volumes.
- Scale dry milk, xanthan gum, and light corn precisely to preserve body.
- Portion into smaller airtight container for multiple flavors.
- Keep mix-ins proportional to avoid a dense freeze.
Conclusion
, Finish by focusing on the key moments that decide a great pint.
You now have a proven cream base and a repeatable method to make Salt and Straw Ice Cream recipe treats at home. Keep the pot steady: set pot medium and watch so you heat necessary prevent simmering. That protects dairy and keeps flavor clean.
Honor the resting time—chill the ice cream base for 6–24 hours before you churn. Run to soft-serve in an ice cream maker or a hand-crank cream maker, add mix-ins at the right moment, then pack with parchment and freeze in the coldest zone.
Store smart: the cream base keeps one week in the fridge or up to three months frozen. Thaw fully and stir if separated before use. With this framework, your straw ice cream will be rich, scoopable, and ready to share.
FAQ
What ingredients make the base stable and creamy?
How long should I chill the base before churning?
My base separated while resting. How do I fix it?
What’s the correct stovetop method to avoid curdling or boiling over?
Can I use a no-churn technique instead of an ice cream maker?
When should I add mix-ins like fruit, nuts, or chocolate?
How do I pack and store the finished frozen dessert for best texture?
Can I scale this base recipe up for larger batches?
How long can the pre-churn base be stored in the fridge?
Any tips for working with freckled chocolate technique at home?


