


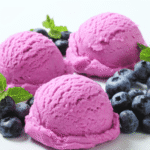
Almond Milk Chocolate Ice Cream
4
servings15
minutes5
minutes250
kcalA rich, creamy dairy-free chocolate ice cream made with almond milk and cocoa powder.
Keep the screen of your device on
Ingredients
1 cup 1 almond milk
0.5 cup 0.5 coconut cream
0.25 cup 0.25 cocoa powder
0.5 cup 0.5 sugar
1 tsp 1 vanilla extract
1 pinch 1 salt
Directions
- In a saucepan, combine almond milk, coconut cream, and sugar over medium heat, stirring until the sugar dissolves completely.
- Whisk in the cocoa powder until smooth and free of lumps, ensuring the mixture does not come to a boil.
- Remove from heat and stir in the vanilla extract and pinch of salt, mixing thoroughly for a consistent flavor.
- Let the mixture cool at room temperature for about 15 minutes, then transfer it to a blender and blend until smooth.
- Pour the mixture into an ice cream maker and churn according to manufacturer's instructions until it reaches a soft-serve consistency.
- Transfer the ice cream to an airtight container, cover, and freeze for at least 4 hours or until firm before serving.
Recipe Video
Nutrition Facts
- Total number of serves: 4
- Calories: 250kcal
- Cholesterol: 0mg
- Sodium: 50mg
- Potassium: 250mg
- Sugar: 25g
- Protein: 2g
- Calcium: 150mg
- Iron: 2mg
Did you make this recipe?
Tag @https://www.instagram.com/ice_cream_haven/ on Instagram and hashtag it with #IceCreamIceCreamHavens
Like this recipe?
Follow @https://www.pinterest.com/Ice_Cream_Haven/ on Pinterest
Join our Facebook Group!
Follow https://www.facebook.com/icecreamhavens/ on Facebook
Why this creamy dairy-free, sugar-free ice cream belongs in your freezer today
Smart technique and a fat-forward base make a big difference. Churning adds air and gives a fluffy, creamy texture that rivals premium pints without additives.
Full-fat coconut milk paired with nut butter stands in for traditional dairy structure. A splash of alcohol or extra vanilla keeps the mix scoopable instead of turning rock hard.
No-churn fans can freeze coconut milk and coconut cream into cubes, then blend to a soft-serve that still feels indulgent. Keto and low-carb eaters will like how coconut fats and monk fruit or erythritol blends provide richness without spiking carbs.
- Vanilla satisfaction: classic flavor without added sugar, while chocolate or other mix-ins stay welcome.
- Clean ingredients: a few pantry staples give reliable texture and taste.
- Consistent results: follow chilling and churn timing for smooth, shard-free scoops.
Key ingredients for rich flavor and creamy texture

Start with concentrated coconut fat and a tablespoon of nut butter to prevent icy texture and add weight. Full‑fat coconut milk keeps the base from turning watery, while a spoon of coconut cream raises silkiness for both churned and no‑churn methods.
Full‑fat coconut milk vs coconut cream: what each contributes
Use full‑fat coconut milk for structure and consistent fat. Add coconut cream when you want extra richness and a softer freeze.
Nut butter for body and scoopability
A scoop of almond or peanut butter supplies protein and bulk that mimics the mouthfeel sugar would give. Nut butter improves scoopability and helps the pint stay spoonable straight from the freezer.
Vanilla extract, cocoa powder, and salt for balanced flavor
Vanilla extract boosts aroma and can slightly lower freezing point for better scoopability. Cocoa powder creates deep chocolate notes and masks coconut undertones. A pinch of salt sharpens all flavors without extra sugar.
Sweeteners that don’t crystallize: monk fruit blends, stevia, allulose
Choose allulose or a monk fruit blend to keep a soft, creamy finish. Avoid relying only on erythritol — it risks grit or an overly firm result. Each ingredient has a role: fat for silkiness, flavor boosters for balance, and targeted sweeteners for ideal texture.
- Tip: tailor nut butter to tweak flavor and protein levels.
- Tip: balance alcohol or extra vanilla to prevent hard freezing.
- Tip: measure sweeteners thoughtfully to avoid crystallization.
Essential tools: ice cream maker, blender method, and smart containers

Great texture starts with gear. A few smart kitchen tools help you get professional texture without fuss. You don’t need a lot, but the right items speed chilling, aeration, and storage.
Choosing an ice cream maker for ultra-smooth results
An ice cream maker gives you that ultra-smooth, fluffy texture in minutes by aerating the base as it freezes. Aim for a model with a removable frozen bowl and stable motor. Many home cooks recommend Cuisinart for reliable churns and consistent results.
Freeze the maker bowl for 12–24 hours in the coldest part of your freezer so no liquid sloshes. Churning roughly 10 minutes produces aeration and a soft-serve consistency that’s hard to beat.
No-churn setup: silicone trays and a powerful blender
For a no-churn route, use silicone ice cube trays and a high-powered blender or food processor. Freeze cubes for at least 4 hours, then blend until silky.
- Pre-chill the base and the bowl to shorten churn times.
- Store finished cream in shallow, lidded containers to avoid melt–refreeze cycles.
- If shopping, look at trusted models like Cuisinart; they pair well with simple techniques.
Want a tested starting point? Try the recommended directions for a Cuisinart in this helpful guide: best Cuisinart tips.
dairy free sugar free ice cream recipe: step-by-step with an ice cream maker

Follow a clear, repeatable path from blender to scoop. Start by pulsing full‑fat coconut milk, nut butter, vanilla, and a non‑crystallizing sweetener in a blender until the mixture is silky and uniform.
Blend the base
Make sure every ingredient is emulsified. This prevents grainy texture and helps the base set smoothly once cold. Some makers suggest placing the blender jar in the freezer for 1 hour to speed up freezing.
Chill deeply and churn
Deeply chill the mixture, then pour mixture into the pre-frozen bowl. Churn about 10 minutes until soft‑serve thickness — that aeration is what makes this homemade ice cream feel light and real.
Freeze briefly, then rest
Transfer the churned cream to a shallow loaf pan and freeze 1 hour to firm the body. Before serving, rest at room temperature for 5–10 minutes so scoops glide easily.
- Dip the scoop in warm water between servings for tidy rounds.
- Work quickly to avoid extra ice formation during transfers.
No-churn blender method: freeze cubes, then blend to soft-serve

For instant soft‑serve without an ice cream maker. Combine full‑fat coconut milk and a spoon of coconut cream with your chosen sweetener and vanilla or cocoa. Pour the smooth base into silicone trays and freeze until solid — at least 4 hours or overnight for best results.
Ready to blend: let the cubes sit 10–15 minutes at room temperature so they soften slightly. This helps the blender cut through the cubes and whip air into the mixture.
- Mix a rich coconut base, then freeze it into cubes so the blender can whip air as it breaks them down.
- Aim for at least 4 hours of freezing; overnight gives dependable, solid cubes.
- Let cubes thaw a few minutes, then blend on high until thick and creamy, stopping to scrape as needed.
- Add a splash of almond milk for a softer finish, then transfer to a loaf pan to firm up or enjoy immediately.
This no-churn approach makes ice cream that rivals churned pints using only a blender and patience. It’s a quick way to make ice at home into a silky, scoopable treat in minutes.
Pro tips to avoid iciness and get a creamy texture every time

Small temperature changes during freezing make the biggest difference in final mouthfeel. Follow a few focused steps and you’ll reduce ice formation and keep texture lush.
Freeze the bowl and chill the mix
Preparation is everything. Freeze your maker bowl 12–24 hours and chill the base well before churning. A cold bowl and cold mix cut down on sticking and visible ice crystals.
Use alcohol or extra vanilla for scoopability
A splash of alcohol or a bit more vanilla lowers the freezing point. This keeps the product softer and more scoopable straight from the freezer without altering flavor balance.
Refreeze briefly and prep to serve
After churning, transfer to a shallow loaf pan and refreeze 30–60 minutes to set structure. Let the container rest at room temperature 5–10 minutes before scooping.
- Ensure your maker bowl is fully frozen and your base is very cold to reduce ice formation.
- Use a splash of alcohol or extra vanilla to maintain a softer texture.
- Refreeze briefly in a shallow pan to lock in structure without over-hardening.
- Let rest at room temperature a few minutes for easier scoops.
- Wet your scoop in warm water between servings for clean, photogenic rounds.
- Small, consistent steps add up to big improvements in mouthfeel and overall enjoyment.
Sweeteners, swaps, and how to dial in sweetness without sugar
Picking the right sweetener makes the difference between silky scoops and a grainy bowl. Texture and taste go hand in hand, so plan swaps before you freeze. Taste the base and adjust while it’s still warm in the blender.
Monk fruit + erythritol blends vs stevia vs allulose
Monk fruit blends give familiar sweetness, but erythritol-heavy mixes can crystallize and firm up after freezing. Allulose usually keeps the texture softer and more scoopable.
Why liquid sweeteners can cause iciness—and the exceptions
Liquid syrups add body that helps scoopability, but water-rich syrups raise ice formation. Choose concentrated allulose syrup or a keto-style syrup to improve glide without watering down the mix.
Taste-and-adjust guidance for balanced flavor
Taste before chilling. Start low, then add increments until the balance feels right. Add a pinch of salt or extra vanilla to round flavors and reduce any artificial aftertaste.
- Pick allulose for softness; monk fruit blends for familiar sweetness.
- Avoid erythritol-heavy formulas to prevent grainy texture.
- Use concentrated syrups, not water-heavy syrups, to protect texture.
- Taste and adjust the base before chilling to hit the right balance.
Flavor variations and mix-ins: vanilla, chocolate, and beyond
A few smart add-ins lift the base from plain to playful. Start with small changes to keep texture smooth and scoopable.
Classic vanilla boost
Increase vanilla extract to amplify aroma and help the mix stay softer in the freezer. Use high-quality extract and taste before chilling.
Deep chocolate options
Whisk in unsweetened cocoa powder for rich chocolate. For extra depth, add a splash of coffee-flavored keto syrup to underline the chocolate notes without adding carbs.
Nutty swirls, crunch, and chips
Swirl in peanut butter for ribbons of richness. Fold in toasted nuts for contrast and sugar-free chocolate chips for candy-like bites.
Fruity twists and extract-based spins
Blend a small amount of berries for bright, lower-sugar fruit versions (note this changes the sugar profile). Use mint, almond, or lemon extract to transform the base quickly and seasonally.
- Mix-ins tip: Add inclusions at the end of churning or after blending to keep structure light and even.
Nutrition-minded notes: low-carb, keto-friendly, and dairy-free
A mindful base choice can make this frozen treat both satiating and aligned with macro goals. Coconut products supply most of the mouthfeel and keep portions filling. That fat helps the dessert feel indulgent so smaller servings satisfy.
Healthy fats from coconut milk; optional almond milk for lighter macros
Coconut milk and cream deliver saturated fats that work well on keto and low-carb plans. If you prefer fewer calories, replace part of the coconut with unsweetened almond milk to lower fat while keeping it milk‑based and plant-forward.
- A coconut milk base provides stable fat that supports fullness and a creamy mouthfeel.
- Cutting in unsweetened almond milk lightens macros without adding dairy or thinning texture too much.
- Choose natural sweeteners like monk fruit, stevia, or allulose to avoid added sugar and reduce cravings.
- High fat content increases satiety, so smaller portions can feel indulgent and portable.
- Tweak coconut-to-almond ratios or pick leaner mix-ins to fine-tune protein, fat, and overall calories.
For a tested keto-friendly option and serving ideas, see this helpful guide: dairy-free keto ice cream.
Storage and serving: from same-day scoops to month-long freezer stash
How you stash and thaw influences whether each serving feels like day‑one perfection. Enjoy the creamiest results on the first day when air and fat are in harmony.
Best day-of texture and how to soften from the freezer
Serve within hours for peak silkiness. If you need to serve later, let the container sit at room temperature for 5–10 minutes before scooping.
Some people prefer a gentler approach: move the pint to the fridge 1–2 hours before serving to soften evenly without melting.
Containers, headspace, and preventing ice crystals
Use shallow, airtight containers and keep headspace minimal to limit ice formation in the freezer.
“Press parchment directly onto the surface, then seal—this simple step preserves texture.”
- Enjoy best on the same day, then store leftovers airtight for up to 1 month (some keep 2 months).
- Press parchment against the surface before lidding to protect the cream and reduce ice build-up.
- Label with date and flavor so your stash stays organized and inviting.
Conclusion
Simple steps—concentrated coconut fat, deep chilling, and proper aeration—deliver a consistently scoopable result at home.
Use a trusted churn like Cuisinart or silicone ice cube trays with a powerful blender to get reliable texture. Choose sweeteners that keep the mouthfeel soft and clean.
Store in shallow, airtight containers and let the pint sit a few minutes at room temp before serving. This small tempering step makes scooping easy and keeps iciness minimal.
Bottom line: this method gives you repeatable, rich ice cream that’s easy to customize. Try flavors, add mix-ins, and keep a chilled container ready for quick dessert bliss with this recipe.
FAQ
What makes this creamy dairy-free, sugar-free vanilla ice so satisfying?
Can I use canned coconut milk instead of coconut cream?
Which sweetener avoids grainy or icy results?
Do I need an ice cream maker?
How long should I chill the base before churning?
Any tips to prevent the final product from becoming hard in the freezer?
Can I make chocolate or peanut butter versions with this method?
How long does homemade vegan, sugar-reduced ice last in the freezer?
Is this suitable for keto or low-carb diets?
How do I adjust sweetness without overdoing it?
Any advice for cleaner scoops and picture-perfect scoops?


