


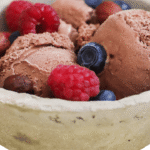
Homemade Chocolate Ice Cream
4
servings30
minutes40
minutes300
kcal1
hour10
minutesA creamy, chocolatey delight using simple ingredients.
Keep the screen of your device on
Ingredients
1/2 cup 1/2 unsweetened cocoa powder
2/3 cup 2/3 granulated sugar
2/3 cup 2/3 brown sugar
1.5 cup 1.5 whole milk
2 cup 2 heavy cream
1 teaspoon 1 vanilla extract
1/4 teaspoon 1/4 salt
Directions
- Whisk the cocoa powder, granulated sugar, and brown sugar in a medium saucepan.
- Gradually add milk and cream, stirring to combine all ingredients thoroughly.
- Place the saucepan over medium heat and stir constantly until the mixture is warm.
- Remove from heat, adding vanilla extract and salt, and stir well.
- Chill the mixture in the refrigerator for at least 2 hours or until completely cold.
- Pour the cold mixture into an ice cream maker and churn according to the maker's instructions.
- Transfer churned ice cream into an airtight container and freeze for at least 4 hours before serving.
Recipe Video
Nutrition Facts
- Total number of serves: 6
- Calories: 250kcal
- Cholesterol: 45mg
- Sodium: 55mg
- Potassium: 150mg
- Sugar: 16g
- Protein: 3g
- Calcium: 8mg
- Iron: 4mg
- Thiamin: 2mg
- Riboflavin: 9mg
- Niacin: 1mg
- Folate: 2mg
- Biotin: 1mg
- Phosphorus: 10mg
- Iodine: 0mg
- Magnesium: 8mg
- Zinc: 4mg
- Selenium: 6mg
- Copper: 11mg
- Manganese: 12mg
- Chromium: 0mg
- Molybdenum: 0mg
- Chloride: 1mg
Did you make this recipe?
Tag @https://www.instagram.com/ice_cream_haven/ on Instagram and hashtag it with #IceCreamIceCreamHavens
Like this recipe?
Follow @https://www.pinterest.com/Ice_Cream_Haven/ on Pinterest
Join our Facebook Group!
Follow https://www.facebook.com/icecreamhavens/ on Facebook
Introduction: Discover the Magic of a Creamy Chocolate Shake
Journey through time with a drink that’s shaped generations. Born in soda fountains during America’s industrial revolution, this frosty creation became a symbol of joy. By the 1920s, electric blenders transformed it into the silky-smooth delight we adore today.
Imagine vinyl booths and jukebox tunes as you explore its cultural legacy. From drive-in diners to family kitchens, this beverage bridges eras. One enthusiast recalls: “Sharing a tall glass with my grandma taught me that happiness comes in cold, sweet sips.”
Modern twists now span continents—think cardamom-infused versions in Mumbai cafes or matcha blends in Tokyo. Yet the core remains unchanged: velvety texture meets bold cocoa notes. It’s not just about taste, but the memories stirred with every pour.
Mastering this classic requires intuition. Too much milk? You’ll lose richness. Not enough ice cream? The magic fades. Like a jazz musician improvising, you’ll learn to balance elements by feel.
Today, you’re joining millions who’ve found comfort in this timeless ritual. Whether crafting it for kids’ birthdays or date nights, you’re part of a story that began with soda jerks and still unfolds in kitchens worldwide.
Chocolate Shake Recipe Ingredients and Essential Tools

Crafting an unforgettable beverage starts with understanding your building blocks. Every element plays a role in creating that velvety texture and balanced sweetness you crave.
Essential Ingredients for Flavor and Texture
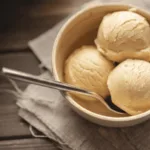
Vanilla ice cream forms the soul of this creation. Premium varieties with 14-16% milk fat deliver unparalleled creaminess. For those preferring homemade options, combine 3 tablespoons of cocoa powder with sugar and warm water to create rich syrup.
Whole milk works best for blending – its fat content helps ingredients harmonize. Need more intensity? Swap regular milk for chocolate varieties. Remember: 6 cups of frozen dairy to 1/3 cup liquid creates the ideal thickness.
Recommended Tools and Equipment
A high-powered blender ensures smooth results in seconds. No heavy machinery? An immersion blender with crushed ice cubes achieves similar silkiness. Even handheld mixers can work with patience and periodic scraping.
Pro tip: Chill glasses beforehand to maintain frosty perfection. Garnishes like whipped cream add flair, but quality cocoa powder in the base makes the real difference. Your tools should empower creativity, not limit it.
How to Create the Perfect chocolate shake recipe

Unlock the secrets to crafting a velvety dessert masterpiece in your own kitchen. This method balances precision with creative freedom, turning basic components into a luxurious experience that delights all senses.
Step-by-Step Blending Instructions
Start by mixing cocoa powder and sugar in warm water to create a rich syrup base. This foundational step develops deeper flavor complexity than store-bought alternatives. Combine chilled dairy, cold milk, and your homemade blend in the blender:
- Pulse 3 seconds to integrate ingredients
- Blend 45 seconds on medium speed
- Scrape sides once for even texture
Watch the mixture transform from separate elements to unified silkiness. The entire process takes under 10 minutes—quicker than waiting in a drive-thru line.
Timing and Temperature Tips
Cold ingredients are non-negotiable. Use milk straight from the fridge and frozen dairy for optimal thickness. Over-blending melts ice crystals, creating a watery result. Stop the blender as soon as ribbons form on the surface.
For intense flavor without bitterness, let your cocoa-based syrup cool completely before mixing. This allows the powder to fully hydrate while preserving its aromatic qualities. A dash of vanilla extract added during the final 5 seconds elevates every sip.
Chocolate Shake Recipe Customizations and Creative Variations

Transform your dessert game by making each sip uniquely yours. Whether accommodating dietary needs or chasing new flavor adventures, these adaptations prove one formula can spark endless delicious possibilities.
Vegan and Dairy-Free Alternatives
Almond milk becomes your secret weapon here. Combined with plant-based vanilla ice options, it creates surprisingly rich textures. Oat and cashew varieties work equally well—their natural creaminess mimics traditional dairy perfectly.
One enthusiast shared: “My coconut-based version fooled my cheese-loving brother!” Skip whipped cream or use aquafaba foam for that airy finish. The magic lies in choosing chocolate ice blends with cocoa butter for authentic mouthfeel.
Adjusting Consistency: Thicker vs. Thinner Shakes
Craving something spoonable? Add ice cream gradually—one extra scoop at a time. For drinkable elegance, drizzle in chilled almond milk by tablespoons. Remember: frozen bowls help maintain that thick creamy texture longer.
Pro tip: Blend base ingredients first before tweaking. This prevents over-diluting your masterpiece. Those using chocolate ice varieties may need less milk initially—their density varies by brand.
Experiment with mix-ins like blitzed frozen bananas or espresso shots. Each addition should enhance—not overpower—the vanilla ice foundation. Your blender isn’t just a tool—it’s a passport to flavor freedom.
Chocolate Shake Recipe Presentation and Serving Ideas

Turn every sip into a feast for the eyes with artful finishing touches. The right garnish transforms your creation from tasty to unforgettable, appealing to both taste buds and social media feeds.
Garnishing Techniques That Wow
Swirl chocolate syrup vertically inside chilled glasses before pouring—this creates mesmerizing drips that enhance flavor layers. For professional flair, hold the bottle high while drizzling to achieve clean, even lines.
Perfectly piped whipped cream crowns your masterpiece. Chill the canister and shake vigorously for stiff peaks that hold their shape. Top whipped clouds with delicate cocoa shavings using a vegetable peeler on room-temperature bars.
Mason jars add rustic charm, while vintage soda glasses evoke retro vibes. Always serve immediately after blending—the contrast between frosty surfaces and creamy interiors makes each sip magical. A maraschino cherry completes the classic diner aesthetic, its vibrant red pop inviting smiles before the first taste.
For ultimate indulgence, add a scoop of chocolate ice cream atop the foam. The melting dollop creates luxurious ripples through the drink. Remember: presentation isn’t vanity—it’s respect for the craft.
Troubleshooting and Pro Tips for the Ultimate Shake
Even the smoothest creations can hit snags—here’s how to pivot like a pro. Mastering texture and taste requires knowing when to adjust ratios and trust your instincts.
Common Pitfalls and How to Fix Them
Too thin? Add frozen dairy one scoop at a time between 5-second blends. Too thick? Drizzle chilled whole milk by the tablespoon while mixing. For weak cocoa notes, mix in melted sauce or a dusting of premium powder before blending.
Separation often stems from ingredient order. Always layer dairy first, then liquids. This maintains that velvety mouthfeel you crave. Want the best chocolate experience? Use full-fat options—they carry flavors better than low-fat alternatives.
Pro tips elevate every sip:
• Chill glasses 15 minutes beforehand
• Blend in pulses to prevent overheating
• Taste-test before pouring to balance sweetness
Remember—great recipes evolve through experimentation. What seems like a mistake today could become your signature twist tomorrow. With these fixes in your toolkit, you’ll turn kitchen hiccups into edible artistry.
FAQ
Can I substitute dairy milk for a plant-based option?
What blender is best for achieving a silky texture?
How do I thicken my shake without adding more ice cream?
Is there a way to make this vegan without sacrificing flavor?
What garnishes elevate the presentation?
My shake turned too watery—how can I fix it?
Can I prep ingredients ahead for quicker shakes?


