


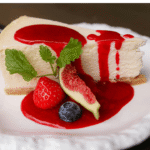
Cuisinart Strawberry Ice Cream Recipe
4
servings30
minutes40
minutes300
kcal1
hour10
minutesHomemade strawberry ice cream using everyday ingredients.
Keep the screen of your device on
Ingredients
3/4 cup 3/4 fresh strawberries, sliced
2/3 cup 2/3 granulated sugar, divided
1 cup 1 whole milk
2 cups 2 heavy cream
1 tsp 1 vanilla extract
Directions
- In a small bowl, combine strawberries with 1/3 cup sugar and let them macerate for 30 minutes, stirring occasionally until syrupy.
- In a medium mixing bowl, use a hand mixer to combine the remaining sugar with milk until dissolved, about 2 minutes.
- Stir in the heavy cream and vanilla extract into the milk mixture until fully combined.
- Mash the strawberries slightly with a fork to release more juices and texture before adding to the cream mixture.
- Cover the bowl with plastic wrap and chill the mixture in the refrigerator for at least 2 hours or overnight for best results.
- Setup an ice cream maker and transfer the chilled mixture into the machine, following the manufacturer's instructions.
- Churn the mixture in the ice cream maker for approximately 20-25 minutes until it reaches a soft-serve consistency.
- Transfer the ice cream to an airtight container and freeze for an additional 2 hours for a firmer texture before serving.
Nutrition Facts
- Total number of serves: 8
- Calories: 210kcal
- Cholesterol: 50mg
- Sodium: 30mg
- Potassium: 120mg
- Sugar: 16g
- Protein: 3g
- Calcium: 80mg
- Iron: 0mg
- Thiamin: 0mg
- Riboflavin: 0mg
- Niacin: 0mg
- Folate: 0mg
- Biotin: 0mg
- Phosphorus: 0mg
- Iodine: 0mg
- Magnesium: 0mg
- Zinc: 0mg
- Selenium: 0mg
- Copper: 0mg
- Manganese: 0mg
- Chromium: 0mg
- Molybdenum: 0mg
- Chloride: 0mg
Did you make this recipe?
Tag @https://www.instagram.com/ice_cream_haven/ on Instagram and hashtag it with #IceCreamIceCreamHavens
Like this recipe?
Follow @https://www.pinterest.com/Ice_Cream_Haven/ on Pinterest
Join our Facebook Group!
Follow https://www.facebook.com/icecreamhavens/ on Facebook
Why this homemade strawberry ice cream belongs in your summer lineup
A spoonful of home churned bliss highlights why this frozen treat belongs on every summer menu. Fresh strawberries provide the bright aroma and natural color that store-bought versions rarely match. Macerating berries with a bit of lemon and sugar deepens the fruit’s sweetness and makes a juicy base that blends smoothly into the dairy.
Choose your method by available time: the custard route calls for macerating 4 cups of berries for several hours and steeping a vanilla bean in hot milk and cream for a nuanced finish. That version churns about 25–35 minutes to soft-serve before firming in the freezer.
The eggless option is faster: berries macerate 15–20 minutes, churn 15–30 minutes, then set 3–6 hours. Both yield roughly 6–8 cups, which is perfect for gatherings and summer cookouts.
Practical perks:
- An ice cream maker or cream maker does the work once the mixture is chilled.
- Adjust milk and cream ratios to control richness and texture.
- Vanilla rounds the fruit without masking it, giving a familiar cream-shop profile.
For a step-by-step version you can try, see this homemade strawberry guide.
Ingredients for the creamiest Classic Strawberry Ice Cream recipe

Gathering the right dairy and fruit makes all the difference in texture and taste.
Custard base essentials: 4 large egg yolks, 1 1/2 cups heavy cream, 1 1/2 cups whole milk, seeds from 1 vanilla bean, 1/2 cup granulated sugar plus 1/4 cup golden brown sugar, and 1/4 teaspoon kosher salt.
Eggless options:
- Small batch: 1 cup heavy whipping cream, 1/2 cup half-and-half, 1 1/2 cups strawberries, 2 tbsp honey, 1/2 cup granulated sugar, 1 tsp lemon juice, 1 tsp vanilla extract.
- Larger batch: 2 cups chopped strawberries, 1 cup sugar (divided), 2 cups heavy cream, 1 cup whole milk, 1/2 tsp vanilla extract, dash of salt.
Use lemon juice and a bit of honey to brighten the fruit. Salt is small but vital—it sharpens flavor without tasting salty.
Choose whole milk over low-fat to keep a rich mouthfeel and avoid an icy mixture. The vanilla bean gives a speckled look and warm aroma; vanilla extract is a handy substitute for the eggless method.
Equipment and prep: make the Classic Strawberry Ice Cream recipe maker work for you

A few setup steps make your maker work smarter and shorten churn time. Plan to freeze the 2QT bowl for at least 12 hours or overnight so it is fully solid and ready to churn efficiently.
Freeze the bowl and stage your tools
Place the bowl in a cold part of the freezer with space around it. Set out spatulas, a ladle, a fine-mesh strainer, and a timer before you begin. A well-staged station keeps the process smooth and fast.
Prep the strawberries
Hull and dice the fruit evenly to avoid large icy pockets. Toss diced strawberries in a large bowl with 1/2 cup sugar.
- Macerate 15 minutes for the quick eggless method or several hours for a custard base.
- Choose to blend for a smooth pink base or mash to leave visible fruit pieces.
- Follow your ice cream maker’s capacity to avoid overfilling and poor aeration.
“Good prep makes a better scoop.”
Storage tip: Transfer finished ice cream to a loaf pan, cover tightly with plastic wrap and foil, and freeze. This keeps the batch sealed and reduces ice crystal formation for up to two weeks.
classic strawberry ice cream recipe: step-by-step instructions

This section walks you through both the old-fashioned custard and a faster eggless method so your batch finishes smooth and flavorful.
Old-fashioned custard method: temper eggs and infuse vanilla
Heat 1 1/2 cups whole milk and 1 1/2 cups heavy cream with a split vanilla bean to just simmer. Remove from heat and let the vanilla steep.
Whisk 4 egg yolks with 1/2 cup granulated sugar, 1/4 cup golden brown sugar, and 1/4 tsp kosher salt until pale. Slowly ladle warm dairy into the yolks while whisking to temper.
Return the mixture to low heat and stir until it coats the back of a spoon. Cool 30 minutes, then chill at least 4 hours or use an ice bath to get the mixture ice-cold.
Quick eggless method: blend or mash the berry mixture
Macerate diced berries in sugar, 2 tbsp honey, and 1 tsp lemon juice for 15–20 minutes. Mash or puree depending on whether you want pieces.
In a large bowl, stir the berry mash into heavy cream and half-and-half (or heavy cream and whole milk) with vanilla extract and a pinch of salt until uniform.
Churn in the ice cream maker: target 20–35 minutes to soft-serve
Pour the cold mixture into your chilled maker. Churn until soft-serve; expect about 20–35 minutes for the custard and 15–30 minutes for the eggless base depending on your maker and batch size.
Fold in any reserved macerated juices or fruit pieces in the last minutes of churning for even distribution.
Freeze to set: transfer to an airtight container for 3-6 hours
Move the soft mixture into an airtight tub, press parchment on the surface to limit air, and freeze 3–6 hours to firm. A couple hours may suffice for custard if you prefer a softer scoop.
Let the container sit 5–10 minutes at room temperature before serving to ease scooping and highlight the smooth texture.
For a tested variation and extra tips, see this detailed guide: best strawberry ice cream.
“Good tempering and a fully chilled bowl are the simplest ways to prevent grainy texture.”
Classic Strawberry Ice Cream Recipe Pro tips for flavor, texture, and perfect churn results

Small technique shifts make a big difference in final texture and flavor. These practical tips will help you control fruit distribution, body, and temperature so your next batch impresses every time.
Choose your texture
Puree the fruit for a silky strawberry ice. Pureeing creates a uniform color and smooth mouthfeel.
Chop or mash for visible pieces that add pops of fruit. Keep pieces small to avoid hard chunks after freezing.
Maceration matters
Macerate berries 15–20 minutes for the eggless path or several hours for a custard base. Add a splash of lemon for brightness and a touch of honey for rounded sweetness.
This produces a syrupy strawberry mixture that blends into the base and boosts overall flavor without extra sugar.
Avoid curdling: temper and control heat
Temper yolks slowly and cook the custard over medium-low until it coats a spoon. Do not boil. Watch visual cues—this typically takes a few minutes at steady heat.
Chill the mixture thoroughly before you make ice cream; colder base freezes faster and yields smaller crystals. Limit room temperature exposure while handling.
- Balance sweetness to the berries; ripe fruit needs less sugar.
- Add vanilla bean to warm cream or extract after cooling for brightness.
- Use a small pinch of salt to sharpen both fruit and dairy notes.
“Good temperature control and proper maceration are the fastest routes to a smooth, flavorful batch.”
Variations and flavor boosts for homemade strawberry ice cream
Small tweaks to the base and add-ins can turn a simple batch into something special. Choose your aromatics and mix-ins with purpose to match the texture you want.
Vanilla choices and citrus lift. Use a split vanilla bean steeped in warm milk and cream for the custard route to get speckled, rich aroma. For the quicker, eggless path, a teaspoon of vanilla extract is a solid swap. Add a splash of lemon juice or a little zest to brighten fruit notes without extra sugar.
Mix-ins, swirls, and color. Fold in finely chopped berries, cookie crumbs, or micro chocolate flecks in the last minutes of churning so pieces stay tender. For pretty ribbons, ripple in a warmed berry compote or jam while transferring the mixture to the container. A couple drops of red coloring deepen the pink if desired.
- Swap raspberries or blueberries for a mixed-berry twist.
- Tune milk and cream ratios to change body and scoopability.
- Keep chunky add-ins small and dry to avoid icy pockets.
Storage, yield, and nutrition: what to expect
Proper storage keeps your batch creamy and ready to serve. After churning, transfer the soft mix to an airtight container. Press plastic or parchment directly on the surface to limit air and reduce ice crystals.
Freezer storage and handling
Place the sealed tub in the coldest part of your freezer. A loaf pan wrapped in plastic and foil is a reliable option if you lack a proper tub.
Keep the airtight container sealed and avoid frequent door openings during the first few hours while the structure sets. If a frosty layer forms later, let the top soften a few minutes and scrape it off before serving.
Yield and serving size
Expect about 6–8 cups total. The custard method usually yields near 8 cups, while the larger eggless batch makes about 6–7 cups (12–14 half-cup servings).
Let the tub sit 5–10 minutes at room temperature before scooping to get clean, smooth servings.
Nutrition at a glance
Nutrition varies by ingredients and ratios. A custard-style serving of about one cup runs roughly ~310 kcal with ~20 g total fat and ~25 g sugar. Swap milk and cream proportions to change calories and fat.
- Store in an airtight container and press wrap on the surface to reduce ice formation.
- Enjoy within about two weeks for best flavor and texture when sealed well.
- If crystals form, soften slightly then remove the frosty top before serving.
“Good sealing and steady freezer conditions are the simplest ways to keep texture intact.”
Serving ideas: easy ways to make it a standout summer dessert
Simple presentation and smart pairings turn a homemade scoop into a memorable finish for any meal. Use quick tricks to keep texture silky and highlight bright fruit notes.
Pairings: sugar cookies, cakes, and fresh berries
Pair with plain sugar cookies for an easy sandwich or serve alongside a slice of pound cake for contrast. The buttery cookie balances the dairy and fruit flavor.
Top each serving with fresh strawberries or mixed berries to add color and a lively bite. Keep any added pieces small so scoops stay smooth and scoopable.
Presentation: pretty-in-pink scoops, cones, and sundaes
Spoon into cones or chilled bowls as pretty-in-pink scoops. For soft-serve vibes enjoy right after churning; for tidy rounds, freeze 3–6 hours then let the tub sit 5–10 minutes before scooping.
- Portion by the cup at parties to save time and ensure fair servings.
- Drizzle a light berry syrup or a swirl of whipped cream for a dessert-shop finish.
- Pre-scoop into a chilled container lined with parchment when you need to transport it.
- Use chilled serving dishes to slow melting and preserve silky texture.
- For sundaes, layer berries, shortbread crumbs, and a hint of lemon zest to echo the fruit.
“Keep pieces small and dishes chilled — small steps make a big difference.”
Conclusion
Good technique wins every time. Pick the custard route for depth or the eggless path for speed, and you’ll still get a rich, fruity result that highlights fresh fruit. Follow the simple flow: macerate, chill the mixture fully, churn in your maker to soft-serve in minutes, then freeze for hours to set tidy scoops.
Classic Strawberry Ice Cream recipe, expect about 6–8 cups, easy storage in an airtight container for up to two weeks, and clean scoops after a brief soften at room temperature. Use a vanilla bean for depth or extract for ease, tune milk and fat to match your texture goals, and balance sugar with a splash of lemon so the strawberry sings without being cloying.
With clear instructions and predictable times, this is a go-to homemade ice cream for summer gatherings and weeknight treats alike.
FAQ
How long should I macerate fresh berries before churning?
Can I make a custard base without eggs?
Do I need an ice cream maker to get creamy results?
How long should the ice cream maker bowl stay in the freezer?
What’s the ideal churn time in most machines?
How do I prevent a cooked custard from curdling when tempering eggs?
Can I add pieces of fruit without making the texture icy?
How long should the churned mixture set in the freezer?
What container is best for storing homemade frozen dessert?
How much yield can I expect from a typical batch?
Can I substitute vanilla bean with extract?
What steps reduce ice crystals for smoother texture?
Is it safe to use frozen fruit directly in the base?
How should I flavor-swap or add mix-ins like cookies or chocolate?


