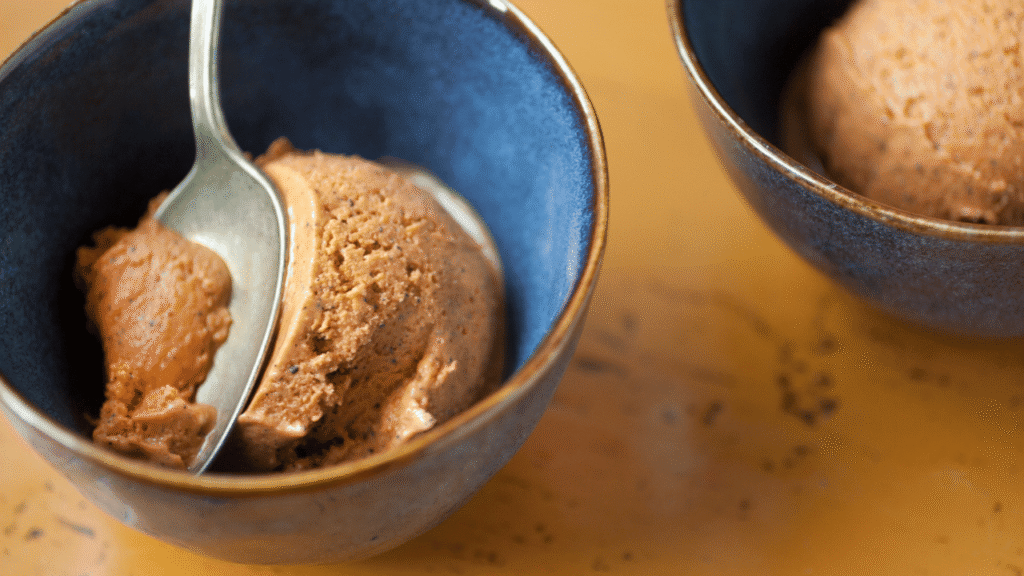
Bright orange color, roasted aroma, and silky texture define this beloved frozen treat. This introduction outlines a custard-style approach that captures the drink’s bold flavor while adding body and scoopability.
Thai Tea Ice Cream Recipe, The method steeps an authentic blend to build flavor, tempers egg yolks, and cooks the custard to about 170°F for safety and silkiness. After fine straining, the base chills for several hours before churning to soft-serve and then freezing overnight.
Thorough chilling reduces ice crystals and improves creaminess, while avoiding over-churning preserves a scoopable texture. Optional melted dark chocolate with a touch of coconut oil can be folded in during churn for a pleasant crackle that contrasts the tea’s roasted notes.
What you’ll learn here is why timing, temperature, and fine straining matter. Follow measured steps and common kitchen tools to make ice cream with a smooth, custardy finish that echoes the classic café flavor.
Key Takeaways
- Use authentic mixes for true flavor and color.
- Temper yolks and cook custard to ~170°F for safety and silkiness.
- Chill the base 6–8 hours or overnight to reduce ice crystals.
- Churn to soft-serve, then freeze overnight for firm scoops.
- Optional chocolate drizzle adds textural contrast during churning.
- Fine straining and measured timing yield a smooth finish.
Thai Tea Ice Cream
6
servings10
minutes20
minutes300
kcalCreamy Thai tea-flavored ice cream made with everyday ingredients.
Keep the screen of your device on
Ingredients
2 cups 2 heavy cream
1 cup 1 milk
3/4 cup 3/4 granulated sugar
1/4 cup 1/4 Thai tea leaves
5 large 5 egg yolks
1 teaspoon 1 vanilla extract
Directions
- In a saucepan, combine milk and Thai tea leaves and heat over medium heat until steaming but not boiling, then steep for 15 minutes.
- Strain the milk-tea mixture using a fine-mesh sieve, pressing the tea leaves to extract as much liquid as possible.
- Whisk egg yolks and sugar together in a separate bowl until pale and thickened.
- Gradually add the strained tea mixture into the egg-sugar mixture, whisking constantly to prevent curdling.
- Return the combined mixture to the saucepan and cook over medium heat, stirring constantly, until thick enough to coat the back of a spoon.
- Remove from heat and stir in vanilla extract and heavy cream until well combined.
- Chill the mixture in the refrigerator for at least 4 hours or overnight for best results.
- Pour the chilled mixture into an ice cream maker and churn according to the manufacturer's instructions, usually about 20-25 minutes.
- Transfer the churned ice cream to an airtight container and freeze for an additional 2 hours or until firm before serving.
Recipe Video
Nutrition Facts
- Total number of serves: 6
- Calories: 300kcal
- Fat: 20g
- Saturated Fat: 12g
- Trans Fat: 0.5g
- Polyunsaturated Fat: 0.5g
- Monounsaturated Fat: 5g
- Cholesterol: 150mg
- Sodium: 40mg
- Potassium: 100mg
- Carbohydrates: 28g
- Fiber: 0g
- Sugar: 25g
- Protein: 5g
- Vitamin A: 800IU
- Vitamin C: 1mg
- Calcium: 150mg
- Iron: 0.5mg
- Vitamin D: 1mg
- Vitamin E: 0.5mg
- Vitamin K: 1mg
- Thiamin: 0.1mg
- Riboflavin: 0.2mg
- Niacin: 0.5mg
- Vitamin B6: 0.1mg
- Vitamin B12: 0.5mg
- Folate: 10mg
- Biotin: 1mg
- Pantothenic Acid: 0.5mg
- Phosphorus: 100mg
- Iodine: 0mg
- Magnesium: 8mg
- Zinc: 0.5mg
- Selenium: 8mg
- Copper: 0.1mg
- Manganese: 0mg
- Chromium: 0mg
- Molybdenum: 0mg
- Chloride: 100mg
Did you make this recipe?
Tag @https://www.instagram.com/ice_cream_haven/ on Instagram and hashtag it with #IceCreamIceCreamHavens
Like this recipe?
Follow @https://www.pinterest.com/Ice_Cream_Haven/ on Pinterest
Join our Facebook Group!
Follow https://www.facebook.com/icecreamhavens/ on Facebook
Why This Thai Tea Ice Cream Is Extra Creamy and Worth Making Today
A few careful steps—proper steeping, tempering, and chilling—turn bold brewed flavors into a silky, scoopable frozen custard.
The base blends heavy cream, milk, and sweetened condensed milk to deliver a rich mouthfeel. This mix boosts body and reduces free water, which improves overall creaminess and storage stability.
Properly steeped tea layers in roasted, earthy notes while the condensed milk rounds any edge. Taste the warm infusion so you can add thai tea depth without turning the base bitter.
Heat matters: cook the egg custard to about 170°F. That temperature sets the yolks without curdling and preserves a velvety texture. Tempering eggs first adds richness and helps the custard coat a spoon.
Quick path from steep to scoop
- Steep for full aroma, then strain.
- Temper yolks, cook to temperature for minutes, then cool.
- Chill 6–8 hours or overnight to cut ice crystals.
- Churn and freeze for a dense, gelato-like scoop.
Use an authentic thai tea mix (Cha Tra Mue or Panthai) for classic color and profile; black tea alone won’t match it.
What Is Thai Tea? Thai Tea Ice Cream Recipe Origins, Color, and Authentic Mixes
What started as a street-side black brew with warm spices now appears on menus from Bangkok to U.S. cafés.
Cha Yen began as a spiced black beverage served sweet and poured over ice. Its base blends bold leaves with aromatics like star anise, cardamom, and tamarind. The result is fragrant, slightly tannic, and made creamy by sweetened condensed milk.
In the United States, makers often added bright orange coloring and extra sugar to suit local tastes. That change made the drink visually iconic and sweeter than many traditional versions.
From street drink to U.S. favorite
Cha Yen moved from markets to cafés because of its showy color and comforting flavor. It’s now a common menu item and a frequent inspiration for frozen desserts and other recipes.
The role of Cha Tra Mue and other mixes
Brands like Cha Tra Mue (Number One Thai Tea) and Panthai sell ready blends that combine black leaves and spices. Using a quality thai tea mix ensures the signature orange hue and consistent aroma without sourcing each spice.
- Built-in spices add layered flavor without extra ingredient work.
- Only strong black tea will not give the same color or top notes.
- Taste the cup thai tea infusion while steeping to avoid bitterness.
Thai Tea Ice Cream Recipe Flavor Profile: Aromatic, Slightly Bitter, Perfectly Sweet
Roasted black leaves give the frozen custard a warm, toasty backbone that balances bright dairy notes. The base echoes the classic drink with earthy, slightly tannic edges that read grown-up rather than cloying.
The mixture of milk and cream softens tannins while sweetened condensed milk adds a rounded, familiar sweetness. Subtle spice notes—star anise, cardamom, and tamarind—bloom as the scoop warms on the tongue.
A small pinch of salt sharpens flavors and keeps the profile lively. A touch of vanilla or vanilla bean paste lifts floral highlights without masking the brewed aroma.
- Finish: lightly bitter, clean, and perfumed with lingering tea aromatics.
- Pairings: dark chocolate shards, toasted coconut, or sesame brittle for contrast.
- Tip: serve in chilled bowls so aromas keep unfolding and scoops stay optimal.
Dial your steep strength to control bitterness—aim for big aroma with gentle tannin so the custard’s cream stays plush, cohesive, and never thin. For a tested method, see this short guide on making the base thai tea ice cream.
Thai Tea Ice Cream Recipe
Gathering and measuring ingredients precisely makes the custard dependable and easy to scale.
Ingredients for a silky ice cream base
Keep measurements exact and lay out tools before you start.
- 1½ cups heavy cream
- 1½ cups whole milk
- 3 tablespoons thai tea mix (Cha Tra Mue or Panthai recommended)
- 6 egg yolks, ¼ cup sweetened condensed milk, ¼ cup sugar
- 1 teaspoon vanilla extract and ¼ teaspoon salt
- Optional: 1 oz dark chocolate + 1 teaspoon coconut or neutral oil for drizzle
Recommended equipment for best results
- Candy thermometer and an ice bath to cool quickly.
- Fine mesh sieve or cheesecloth-lined sieve to strain the mixture.
- Ice cream machine, freezer-safe container, sturdy bowl, whisk, and spatula.
“Measure ahead, temper carefully, and use a proper thermometer for consistent texture.”
Quick tip: Measure a cup heavy component and the milk in advance. This streamlines tempering and keeps the custard smooth for churning and final freezing.
Step-by-Step: Make the Ice Cream Base, Steep, Temper, Chill, and Churn
Start by warming the dairy until it just steams so the brewed mix releases bright color and aroma.
Combine the heavy cream and milk in a saucepan and apply gentle heat. When the mixture steams, add the cup thai tea blend and steep for 5–15 minutes, aiming for desired hue and scent.
Strain through a fine mesh (line with cheesecloth if you want extra silk). Whisk egg yolks with sugar and condensed milk, then temper with about 1/4 cup of the hot dairy.
Cook, finish, and chill
Return the mixture to the pot and cook over moderate heat, stirring until it reaches 170°F and coats the back of a spoon. Remove from heat, then stir in vanilla extract and a pinch of salt.
Cool in an ice bath, strain again if needed, and refrigerate for at least 6–8 hours or overnight so the cream base matures.
Churn and optional add-in
Churn per your machine—many units take 10–20 minutes; some models need 30–45 minutes—until the ice cream resembles soft-serve. For a crackle, drizzle melted dark chocolate mixed with oil into the spinning bowl about 5 minutes before the end.
“Temper slowly and chill well for the smoothest texture.”
Transfer to a shallow container, freeze until firm, then rest 10 minutes at room temperature before scooping.
- Warm dairy, steep minutes to control color.
- Temper yolks, heat to 170°F, strain through fine mesh.
- Chill for hours, churn to soft-serve, then freeze overnight.
Pro Tips & Troubleshooting for Maximum Creaminess
Small changes in steep time and chill windows yield big gains in texture and flavor. Use precise minutes for steeping, steady heat while cooking, and a long chill so the base freezes cleanly.
Steeping and temperature. Start with about five steep minutes to avoid bitter tannins. Bring the custard to roughly 170°F—do not boil—to set yolks without curdling the mixture.
Strain and chill. Always pass the mixture through a fine mesh; a second pass with cheesecloth removes grit and prevents a sandy mouthfeel. Chill the base 6–8 hours or overnight so it solidifies faster during ice cream churning.
Churning and storage. Stop when you reach soft-serve; overdoing cream churning can break the emulsion and yield greasy texture. Transfer to shallow containers, press plastic wrap on the surface, and freeze flat to reduce ice formation.
- If texture is icy: check sugar or condensed milk levels and your freezer temperature.
- If grainy: you likely overcooked eggs or under-strained—temper more slowly next time.
- If tea flavor is weak: add more leaves next batch rather than steeping longer to avoid extra tannin.
“Standardize steep minutes, chill hours, and your churn window to make ice cream consistently.”
Substitutions, Variations, and Serving & Storing
If you need a lactose-lean or pantry-friendly swap, try coconut milk and coconut cream to keep a rich mouthfeel and add warm, tropical notes.
Condensed milk can be replaced with evaporated milk or heavy cream mixed with sugar; taste as you go to match sweetness. For a dairy adjustment, half & half works well when you want a lighter body without increasing iciness.
To mimic an authentic brew without a packaged tea mix, blend strong black leaves with star anise, cardamom, and a pinch of tamarind powder. Add a drop of orange coloring if you want the classic hue.
Dairy swaps, coconut notes, and spice add-ins
- Use coconut milk + coconut cream for a coconut-forward base that pairs with the spices.
- Swap sweetened condensed milk for evaporated milk or heavy cream + sugar; adjust teaspoons of sugar to taste.
- Add vanilla or a teaspoon of vanilla extract during heating, or a pinch of cinnamon for extra warmth.
Serving ideas, containers, and freezer time frames
Serve in chilled bowls or cones with dark chocolate shards, sesame brittle, or toasted coconut flakes folded in after churning for texture.
Store in a shallow, airtight container up to 2–3 weeks. Press plastic wrap onto the surface to limit contact with air and reduce ice formation. Let the container sit about 10 minutes at room temperature before scooping for the cleanest ball.
“Portion with a warm, dry scoop and refresh it in warm water between servings for neat presentation.”
To speed back-to-back batches, keep your machine bowl frozen and rotate shallow containers. Small adjustments to heavy cream and whole milk ratios will reduce iciness while keeping a stable structure.
For a tested variation and extra tips on balancing sweetness and steep strength, see this short guide: thai tea ice cream tips.
Conclusion
Finish strong by locking in flavor with careful straining, a precise cook, and a long chill.
Thai Tea Ice Cream Recipe
Recap: Steep an authentic mix like Cha Tra Mue just enough, temper and heat the custard to about 170°F, then strain the base for a polished finish.
Sweetened condensed milk binds free water and adds signature sweetness, while heavy cream gives the plush body every premium scoop needs.
Follow the measured steps in this recipe, add a hint of vanilla or a whisper of salt, and consider a chocolate drizzle for texture without masking the brewed profile.
Chill thoroughly, store in a shallow container with plastic wrap, and let a cup sit a few minutes before serving for the best scoopable texture.
These techniques deliver fragrant, scoopable ice cream that stays smooth batch after batch.

