


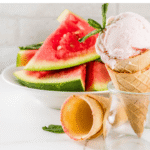
Watermelon Ice Cream
4
servings30
minutes40
minutes300
kcal1
hour10
minutesA refreshing homemade watermelon ice cream for summer.
Keep the screen of your device on
Ingredients
4 cups 4 watermelon chunks
1 cup 1 heavy cream
0.5 cup 0.5 granulated sugar
1 teaspoon 1 lemon juice
1 teaspoon 1 vanilla extract
0.25 teaspoon 0.25 salt
Directions
- Start by removing the seeds from the watermelon chunks to ensure a smooth texture in the ice cream.
- Place the watermelon chunks in a blender and puree until smooth and free of any lumps.
- In a medium bowl, combine the watermelon puree, heavy cream, sugar, lemon juice, vanilla extract, and salt. Mix well.
- Cover the bowl with plastic wrap and chill in the refrigerator for at least 2 hours until the mixture is cold.
- Once chilled, pour the mixture into an ice cream maker and churn according to the manufacturer's instructions, usually about 20-25 minutes.
- Transfer the ice cream to an airtight container and freeze for an additional 2 hours to firm up before serving.
- For best consistency, allow the ice cream to sit at room temperature for about 5 minutes before scooping.
Recipe Video
Nutrition Facts
- Total number of serves: 6
- Calories: 200kcal
- Cholesterol: -mg
- Sodium: -mg
- Potassium: -mg
- Sugar: -g
- Protein: -g
- Calcium: -mg
- Iron: -mg
- Thiamin: -mg
- Riboflavin: -mg
- Niacin: -mg
- Folate: -mg
- Biotin: -mg
- Phosphorus: -mg
- Iodine: -mg
- Magnesium: -mg
- Zinc: -mg
- Selenium: -mg
- Copper: -mg
- Manganese: -mg
- Chromium: -mg
- Molybdenum: -mg
- Chloride: -mg
Did you make this recipe?
Tag @https://www.instagram.com/ice_cream_haven/ on Instagram and hashtag it with #IceCreamIceCreamHavens
Like this recipe?
Follow @https://www.pinterest.com/Ice_Cream_Haven/ on Pinterest
Join our Facebook Group!
Follow https://www.facebook.com/icecreamhavens/ on Facebook
Introduction: Discover the Magic of Summer Desserts
Summer desserts lift spirits — and this watermelon ice cream recipe really shines. With its vibrant color, light sweetness, and creamy texture, it’s one of the best ways to beat the heat. Simple to make and full of fresh watermelon flavor, it’s a summer staple you’ll return to again and again.
Why This Dessert Stands Out
This treat stands out for its natural sweetness and silky (not icy) cream finish. Using just a few high-quality ingredients—watermelon, milk or cream, and a touch of sugar or sweetener—you get bright, refreshing results without fuss. Prep is quick (about 15–20 minutes); plan on freezing the mixture at least 4 hours for scoopable texture.
A Burst of Refreshing Flavors in Every Scoop
Each spoonful delivers a light, fruity burst balanced by a creamy base. The process is straightforward: blend the mixture until smooth, strain if you prefer a pulp-free finish, then chill and freeze. The result is a dessert that tastes like summertime in every scoop and invites recipe experimentation—try adding lime, strawberry, or a pinch of sea salt.
Captivates with its vibrant and refreshing qualities.
Quick to prepare—Prep: ~15–20 minutes | Freeze: at least 4 hours.
Encourages experimentation with seasonal ingredients and simple recipes.
Perfect for gatherings, kids, or a quiet afternoon treat.
The Story Behind Our Watermelon Ice Cream Recipe

Every great recipe starts with a simple idea. Ours began as an attempt to capture the bright, natural sweetness of watermelon in a silky ice cream that still felt light and refreshing. The goal was a dessert anyone could make at home with a few high-quality ingredients and straightforward steps.
Creative Inspiration for Homemade Treats
We perfected this recipe through small experiments—adjusting the fruit-to-cream ratio, testing different sweeteners, and trying both chilled and pre-frozen fruit. One concrete test that worked well: 2 cups fresh watermelon juice blended with 1 cup whole milk (or 1 cup full-fat coconut milk for dairy-free) produced a smooth, creamy base; the no-churn alternative using sweetened condensed milk and whipped cream yielded a thicker, quicker finish.
Time and technique mattered. Letting the mixture chill thoroughly before freezing and giving it the recommended freeze time prevented iciness and produced a silkier texture. We found that balancing the mixture’s sweetness and freezing time was key to preserving that fresh watermelon flavor.
Inspiration came from combining classic methods with modern shortcuts—so you can choose a custard-style approach or a no-churn cream recipe depending on your tools and schedule. Readers are encouraged to experiment with small tweaks (a squeeze of lime, a handful of strawberries, or a pinch of sea salt) to make the recipe their own.
The creative process involved testing various mixture techniques.
Key ingredients like milk or coconut milk help achieve a smooth texture.
Balancing flavor, sweetness, and freezing time ensures optimal results.
Traditional methods were blended with innovative ideas for an easy, modern twist.
Readers are encouraged to personalize their creations for a truly unique treat.
For more tips on crafting the perfect dessert, check out this ideal milk ice cream recipe. It’s a great resource for anyone looking to elevate their homemade creations.
Mastering the Perfect Watermelon Ice Cream Recipe

Achieving the ideal texture and flavor is both an art and a little food science. With balanced ingredients and the right steps, you’ll get smooth, creamy watermelon ice cream that really showcases fresh watermelon flavor. Below are concrete tips, measurements, and equipment choices to help you get consistent results.
Balancing Ingredients for Ideal Texture
Precision matters. A reliable starting ratio is: 2 cups fresh watermelon juice (about 3–4 cups diced fresh watermelon, blended and strained) + 1 cup whole milk or 1 cup full-fat coconut milk (for dairy-free) + 1/2 cup sugar (adjust to taste). Using juice instead of large chunks helps ensure a uniformly smooth mixture. Pre-chill the combined mixture in the fridge for 30 minutes before transferring to the freezer or ice cream maker for a creamier result.
Delicate fruits like strawberry pair well with watermelon—use up to 1 cup mashed strawberry per batch so it complements rather than overpowers the watermelon. Seasonal produce brightens flavor and color while keeping the recipe fresh and summery.
Pro Tips for a Creamy Finish
For best texture, make sure your freezer is cold and stable (typical home freezers run ~0°F/-18°C). Use 1 cup heavy cream instead of milk if you want a richer fat content—fat improves mouthfeel and reduces iciness. If you prefer a lighter treat, use milk or coconut milk. Pre-chilling your churn bowl or loaf pan speeds freezing and reduces ice crystal formation.
Experiment with fruit combinations and a small pinch of salt to amplify flavor. If using an ice cream maker, follow the manufacturer’s instructions for bowl freezing time and churn duration—generally 20–30 minutes of churning yields a soft-serve consistency before final firming in the freezer.
Ingredients and Essential Equipment

Great results start with fresh ingredients and the right tools. Here’s a practical list and when to use each item:
Select the Freshest Produce
Choose ripe watermelon—look for a uniform color and a creamy yellow “field spot” where it sat on the ground. For reference, 3–4 cups diced watermelon (about 1 small/medium melon’s worth) typically yields roughly 2 cups juice after blending and straining.
For a silky texture, blend fruit into a smooth puree and strain through a fine mesh to remove excess pulp. Pre-chilling the puree in the fridge for 30 minutes helps the mixture freeze more evenly.
Must-Have Kitchen Tools
Blender: Essential for creating a smooth puree (high-speed blenders give the best texture).
Ice Cream Maker: Ideal for a churned texture and fewer ice crystals—use when you want a softer, creamier finish.
Loaf Pan: Use for no-churn or if you don’t own an ice cream maker—freeze until firm, then beat or churn by hand for smoother texture.
Measuring Cups: Accurate ratios make a big difference—measure liquids and sugar precisely.
When to use what: choose an ice cream maker for the creamiest results (especially with higher cream/fat content). Use a loaf pan and periodic stirring (every 30–45 minutes) for a no-churn approach—this works well with the condensed-milk method.
These tools streamline the process and improve consistency. For an easy reference, see the recipe card and printable instructions below to follow exact measurements and step timings.
Remember, the key to success is balancing simplicity with professional-quality technique—use fresh ingredients, follow the ratios above, and pick the equipment that matches your preferred texture. Enjoy the process and savor every serving!
Prepping the Watermelon: Cutting, Deseeding, and Freezing
The secret to a creamy, refreshing watermelon ice cream starts with careful prep. Properly handling and freezing the fruit ensures a smooth texture and bright flavor—whether you use fresh watermelon or frozen watermelon you purchased earlier.
Step-by-Step to Perfect Cubes
1. Choose ripe fruit: look for a deep green rind with a creamy yellow “field spot,” and tap the melon—ripe watermelons sound hollow. If you prefer convenience, seedless watermelon works great.
2. Cut and deseed: remove the rind, slice into manageable pieces, and scoop out or cut away seeds (a small spoon or knife works well). For seedless varieties, you can skip this step.
3. Cube evenly: slice the flesh into even 1–1½ inch cubes so they freeze uniformly.
4. Pre-freeze on a tray: arrange cubes in a single layer on a baking sheet lined with parchment so they don’t clump. Freeze 2–3 hours, or until firm, then transfer to a labeled freezer-safe bag or airtight container for long-term storage (use within 8–12 weeks for best quality).
The Importance of Freezing for Creamy Texture
Freezing the fruit solid before blending helps you create a smoother mixture and reduces big ice crystals in the final product. Note: watermelon itself has negligible fat—fat for creaminess comes from milk, cream, or coconut milk you add. Properly frozen fruit lets the added fat integrate more evenly, giving a silkier finish.
Blending tips: chill your blender or food processor bowl in the freezer for 10–15 minutes before use—cold tools help maintain temperature and improve texture. Use a high-speed blender or food processor to break down frozen cubes; if needed, pulse and scrape to avoid overheating the blades.
Here are a few practical tips to elevate your preparation:
– Use high-quality produce and work quickly to minimize warming the fruit.
– Pre-chill your tools (blender/processor) to keep the mixture cold.
– If using frozen watermelon, thaw slightly (1–2 minutes) for easier blending but not so much that it becomes watery.
– For a pulp-free finish, strain blended juice through a fine mesh before adding milk or cream.
By following these steps—selecting ripe fruit, cubing and pre-freezing properly, and using chilled equipment—you’ll set yourself up to make a silky, flavorful watermelon ice cream every time. Enjoy the process and savor every bite!
Crafting the Creamy Ice Cream Base
The base you choose determines the texture and flavor of your watermelon ice cream. Below are two reliable approaches—custard and no‑churn—plus clear, copy‑ready formulas and step‑by‑step blending, straining, and churning instructions to help you get consistently smooth, scoopable results.
Custard Method vs. No-Churn Alternatives
1) Custard (rich, classic texture): Heat and temper eggs to create a velvety base that resists iciness. Example formula: 2 cups watermelon juice + 1 cup whole milk + 1 cup heavy cream + 3/4 cup sugar + 3 egg yolks. Gently heat milk and cream with half the sugar to 160°F (71°C), temper the yolks, cook until thickened, cool to refrigerator temperature, then mix with watermelon juice and chill before churning.
2) No‑Churn (quick, simple): Uses sweetened condensed milk and whipped cream for a fast, scoopable finish without an ice cream maker. Example formula: 2 cups watermelon juice + 1 can (14 oz) sweetened condensed milk + 1 1/2 cups heavy cream, whipped to soft peaks. Fold condensed milk into the strained watermelon juice, gently fold in whipped cream, pour into a container, and freeze.
Safety and tips for custard: always temper eggs and cook custard to about 160°F (71°C) to eliminate risk from raw egg. Cool custard completely (chill 2–4 hours) before freezing to reduce ice crystals and improve texture.
Measuring & Sweetness
Properly measuring sugar is crucial—start with the amounts above and taste the chilled mixture; watermelon sweetness varies by fruit. If your watermelon is very sweet, reduce sugar by 2–4 tablespoons. For dairy‑free/no‑dairy cream recipes, substitute full‑fat coconut milk 1:1 (use chilled coconut cream for best texture).
Blending, Straining, and Churning Your Mixture
1. Blend: Add pre‑frozen or well‑chilled watermelon cubes to a high‑speed blender. Blend until completely smooth. Using juice (strained puree) helps ensure uniform texture.
2. Strain: For the silkiest mouthfeel, pour the blended mixture through a fine mesh sieve into a clean bowl to remove pulp. This step enhances watermelon flavor and yields a smooth mixture that churns evenly.
3. Chill: Refrigerate the base 30 minutes to several hours (custard should be fully chilled) so it’s very cold before churning—this reduces churn time and ice crystals.
4. Churn: If using an ice cream maker, follow the manufacturer’s instructions—typically 20–30 minutes of churning produces a soft‑serve consistency; transfer to a sealed container and freeze at least 2–4 hours for scoopable firmness. If you don’t have a maker, pour into a shallow container and freeze, stirring vigorously every 30–45 minutes until set (or use the no‑churn method above).
Tips to prevent iciness and improve texture:
– Use cold tools: chill blender/processor bowls and churn bowls when possible.
– Add fat: increasing cream or using coconut milk improves mouthfeel and reduces ice crystals.
– Freeze quickly: a colder, stable freezer and shallower container speed firming and reduce large ice crystals.
Quick variations to try:
– Coconut Watermelon: swap milk/cream for 1 cup full‑fat coconut milk + 1/2 cup cream for a tropical twist.
– Chocolate swirl: fold 1/4–1/2 cup melted dark chocolate into half the base, then ripple into the rest before final freeze.
For more detailed no‑churn tips and printable ice cream recipes, see the recipe card and instructions below. Choose the method that fits your time and tools, and enjoy crafting the perfect watermelon ice cream!
Expert Tips and Tricks for Scooping and Storage

Mastering scooping and storage will keep your watermelon ice cream tasting fresh and scoopable. Whether serving immediately or saving for later, these practical tips help preserve texture and flavor so every bite is as good as the first.
Scoop-Difficulty Hacks
Struggling to scoop straight from the freezer? Pre-soak your scoop in hot water for a few seconds, then wipe dry—this warms the metal and lets it glide through the ice cream. Alternatively, let the pint sit at room temperature for 5–10 minutes before scooping to reach an ideal creamy (not melted) consistency.
For easier, more consistent scoops, chill your serving bowls and use a sturdy ice cream scoop; if the ice cream is very firm, press the scoop into hot water between servings.
Best Practices for Freezing and Serving
Store your watermelon ice cream in airtight containers to prevent freezer burn and off-flavors. For best quality, freeze in a shallow, airtight container so the mixture firms quickly and evenly. Place a sheet of parchment or plastic wrap directly on the surface before sealing to minimize ice crystals.
Label containers with the date and use within 2–3 months for peak flavor and texture. When using an ice cream maker or cream maker, follow the manufacturer’s instructions for bowl freezing and churn times to get the smoothest results.
Repurpose Leftovers
Don’t waste leftover pulp or juice—blend it into smoothies, freeze into popsicles, or whisk into vinaigrettes for a fruity twist. Seeds can be strained out and composted or discarded.
Quick Serving Checklist
– Pre-soak scoop in hot water for effortless serving.
– Let ice cream sit 5–10 minutes at room temperature for scoopable texture.
– Use airtight containers and surface parchment to prevent ice crystals.
– Label and use within 2–3 months for best quality.
Conclusion
Making watermelon ice cream is a simple, rewarding way to enjoy summer fruit. From selecting ripe watermelon to blending, straining, and freezing, each step affects texture and flavor. For a dairy-free option, substitute full-fat coconut milk or coconut cream 1:1 for milk/cream to keep the dessert rich and scoopable.
We encourage you to experiment with mix-ins and variations, share your favorite recipes, and print the recipe card below for easy reference. Small tweaks—like a squeeze of lime or a swirl of chocolate—make delightful cream recipes and ice cream recipes worth revisiting.
FAQ
What makes this dessert stand out?
It pairs the bright sweetness of fresh watermelon with a creamy base for a light, refreshing ice cream that’s perfect for warm days.
Can I use frozen fruit instead of fresh?
Yes—frozen fruit works well and often yields a thicker, creamier mixture when blended.
Do I need a special machine to make this?
No—an ice cream maker improves texture, but a high-speed blender or food processor with a no‑churn method will also produce great results.
How can I prevent it from becoming too icy?
Add fat (milk, cream, or coconut milk), chill the base thoroughly before freezing, and store in airtight containers with surface parchment to reduce iciness.
Can I customize the flavor?
Absolutely—try strawberry, lime, chocolate, or a pinch of salt for variations.
How long does it take to prepare?
Active prep is usually under 30 minutes; freezing takes at least a few hours (plan for 4+ hours or overnight for best scoopable results).
What’s the best way to store it?
Keep it in an airtight container in the freezer, label with date, and use within 2–3 months. Let sit 5–10 minutes at room temperature before scooping for easiest serving.


