


No Churn Ice Cream
4
servings30
minutes40
minutes300
kcalA creamy, quick, and easy vanilla ice cream requiring no ice cream maker.
Keep the screen of your device on
Ingredients
2 cups 2 heavy whipping cream
1 14-ounce can 1 sweetened condensed milk
1 tablespoon 1 vanilla extract
Directions
- In a large mixing bowl, whip the heavy whipping cream with a hand mixer until stiff peaks form, which takes about 5-7 minutes. Ensure the cream is cold before whipping for best results.
- Gently fold in the sweetened condensed milk into the whipped cream using a spatula. Make sure to mix it well but do not deflate the whipped cream.
- Add the vanilla extract and carefully fold it into the cream and milk mixture. Incorporate the vanilla thoroughly until the mixture is smooth and well combined.
- Transfer the mixture into a freezer-safe container and spread it out evenly. To prevent ice crystals, place a piece of wax paper or plastic wrap directly on the surface.
- Freeze the container for at least 6 hours or until the ice cream is firm and scoopable. Perfect results usually happen if left overnight.
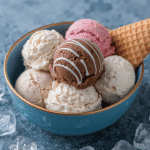
- Serve the ice cream in bowls with your favorite toppings like chocolate syrup or fresh berries for additional flavor and texture.
Recipe Video
Notes
- Recipes provides a creamy, delicious result that can be customized further by adding your favorite toppings or mix-ins. Enjoy creating and tasting your homemade no-churn ice cream!
Nutrition Facts
- Total number of serves: 6
- Calories: 250kcal
- Cholesterol: 60mg
- Sodium: 50mg
- Potassium: 130mg
- Sugar: 22g
- Protein: 3g
- Calcium: 8mg
- Iron: 0mg
Did you make this recipe?
Tag @https://www.instagram.com/ice_cream_haven/ on Instagram and hashtag it with #IceCreamIceCreamHavens
Like this recipe?
Follow @https://www.pinterest.com/Ice_Cream_Haven/ on Pinterest
Join our Facebook Group!
Follow https://www.facebook.com/icecreamhavens/ on Facebook
Introduction: Discover the Magic of Homemade Ice Cream
Making ice cream at home is as rewarding as it is delicious — the process combines simple ingredients and a little patience to yield a creamy, scoopable dessert you can tailor to your taste. Homemade ice cream invites nostalgia and creativity, and it’s a great way to learn how fat, sugar, and cold work together to create superior texture.
What Makes Churned Ice Cream Special?
Churned ice cream gets its silky, dense texture from a well-balanced base of cream and milk plus the air incorporated during the churning process. Using heavy cream increases fat content, which gives richness and helps prevent ice crystals, while whole milk keeps the mixture scoopable. A quality ice cream maker makes it easy to achieve this creamy consistency at home.
The Inspiration Behind the recipe for churned ice cream

This recipe was designed to be approachable: a short ingredient list, clear steps, and room to customize. Popular home machines — from countertop ice cream makers to stand mixer attachments like KitchenAid and reliable electric models such as Cuisinart — handle small batches beautifully. For most home cooks, a 1.5– to 2‑quart machine is ideal for making enough ice cream for a family without taking over the freezer.
“The best part? You can customize it with your favorite flavors!”
Whether you prefer a classic vanilla ice cream or want to experiment with seasonal fruit or mix-ins, the basic churned method adapts easily. If you’d like help choosing equipment, look for guides on how to pick an ice cream maker that match your expected batch size and budget.
Essential Ingredients and Tools for Homemade Recipe for Churned Ice Cream
Essential Ingredients and Tools for Homemade Recipe for Churned Ice Cream
Crafting a perfect batch starts with the right ingredients and the right maker. A balanced ice cream base—fat for richness, milk for scoopability, and sugar for texture—combined with a reliable cream maker gives you a creamy homemade result every time.
Key Ingredients: Cream, Milk, Vanilla & More

The foundation of any great ice cream is the base. For a classic vanilla ice cream, start with heavy cream and whole milk: the heavy cream provides fat that creates richness and a smooth mouthfeel, while whole milk keeps the mixture from becoming too dense.
Typical proportions to aim for (adjust as needed for yield): 1½ cups heavy cream + 1½ cups whole milk. Add about ⅔ cup sugar for sweetness and a pinch of salt to brighten flavor. Finish with 1–2 teaspoons vanilla extract or use seeds from a vanilla bean for a more aromatic result.
Notes on alternatives: if you use almond or coconut milk, expect a thinner texture because of lower fat—compensate with a bit more cream or a stabilizer if you want a similar scoop. If you plan to use egg yolks for a custard-style cream recipe, use pasteurized eggs and temper them into the warm milk mixture to avoid scrambling.
Selecting the Perfect Ice Cream Maker
Your maker is the mechanical heart of the process. Countertop electric ice cream makers and stand-mixer attachments both work well; look for a model with a sturdy paddled churn and recommended batch sizes that match your needs.
Popular home choices include Cuisinart electric units (reliable for 1.5–2 quart batches) and KitchenAid attachments for stand mixers. For beginners, a 1.5‑quart machine is ideal for small family portions; a 2‑quart maker is a better pick if you entertain often.
Practical tips: ensure the maker’s bowl is fully frozen if required by your model, and avoid overfilling—leave room for the ice cream mixture to expand as air is incorporated. If you don’t have an ice cream maker, there are no-churn methods that use whipped cream and condensed milk, though the texture and fat balance will differ from churned ice.
“The right tool and quality ingredients make a noticeable difference in the final texture and flavor.”
Quick ingredient checklist (for ~1.5–2 qt): heavy cream, whole milk, sugar, vanilla extract or vanilla bean, pinch of salt. Optional: egg yolks (for custard base), mix-ins (fruit, cookies, chocolate).
Preparation Prepping Your Recipe for Churned Ice Cream Base
Preparation Prepping Your Recipe for Churned Ice Cream Base
The foundation of a great ice cream is a well-prepared base. Follow these clear steps to mix, gently heat, and fully chill your ice cream base so your churned batch ends up smooth and scoopable.
1. Mix the cream, milk, sugar, and vanilla
Combine your measured heavy cream, whole milk, and sugar in a medium saucepan. Warm the mixture gently over medium-low heat — about 3–7 minutes depending on volume — stirring constantly until the sugar is fully dissolved and the mixture is steaming but not boiling. You should see small bubbles at the edge and light steam; do not let it reach a rolling boil.
Add vanilla extract (or the seeds from a split vanilla bean) toward the end of heating for the best aroma. If you’re using extracts like almond or coconut for a twist, add them sparingly so they don’t overpower the base.
2. Optional: make a custard (egg yolk) base
For a richer, silkier cream recipe, temper pasteurized egg yolks into the warm milk mixture. Whisk yolks in a bowl, slowly drizzle a small amount of the hot milk into the yolks while whisking constantly to raise their temperature, then pour the tempered yolks back into the saucepan and heat gently until the mixture thickens enough to coat the back of a spoon (do not boil). Follow safe handling guidelines for eggs.
3. Chill the ice cream base
Remove the pan from heat and let the base cool slightly. Transfer it to a bowl, press plastic wrap directly onto the surface to prevent a skin, and refrigerate. Chill for at least 2 hours, though overnight (6–12 hours) gives the best results: a cold base churns faster and produces fewer ice crystals.
Timing note: active prep for the base is brief (about 10–15 minutes), but you should plan for 2 hours to overnight chilling plus 20–40 minutes churning time and any additional freezing to firm up (3–4 hours if you want scoopable firmness).
No‑churn alternative

If you don’t have time or a maker, try a no‑churn method that uses whipped heavy cream folded into sweetened condensed milk and flavoring; it skips churning but will have a different texture and fat balance compared to churned ice cream.
“Chilling the base is the single most important step for smooth texture — patience pays off.”
Follow these steps carefully and your homemade ice cream base will be ready for churning into a perfect frozen treat.
Recipe for churned ice cream
Recipe for Churned Ice Cream
Unlock the steps to turn a cold ice cream base into a smooth, scoopable dessert. Whether you’re learning to make ice cream or refining your technique, the churning stage is where texture and air are controlled to create creamy perfection.
The Step-by-Step Churning Process
Checklist before you start:
– Make sure your maker’s bowl is fully frozen if required by your model (most electric bowls need 12–24 hours in the freezer).
– Chill your ice cream base thoroughly (at least 2 hours, preferably overnight).
– Have a freezer-safe container ready for firming.
How to churn (quick checklist):
1. Pour the cold ice cream mixture into the frozen bowl.
2. Start the machine and churn according to your model’s instructions. Expect roughly 20–40 minutes to reach a soft-serve consistency for a 1.5–2 quart batch—varies by machine, base temperature, and fat content.
3. Watch for the mixture to thicken and cling to the paddle; that’s your cue to stop. For firmer, scoopable texture, transfer to a freezer-safe container and freeze 3–4 hours (or until firm).
Practical cues and tips
– If the mixture seems icy, it may have been too warm going into the maker or the bowl wasn’t cold enough—always chill the base and follow the maker’s freezing instructions.
– Avoid overfilling the canister; the mixture expands as air is incorporated.
– Slower churning can produce a denser, richer texture; faster speeds incorporate more air for a lighter result.
Techniques for Achieving a Creamy Consistency
Key factors that influence texture: fat from heavy cream, sugar level, base temperature, and churning time. A higher fat content and properly chilled base help reduce ice crystals and improve mouthfeel. If you used egg yolks in a custard base, you’ll notice extra silkiness and stability.
If you’re new to churned ice, practice with plain vanilla first—once you’re comfortable, adding flavors and mix-ins becomes easier.
Enhancing Flavors with Mix-ins and Toppings
Enhancing Flavors with Mix-ins and Toppings

Adding fresh fruit, cookie pieces, or sauces after churning keeps textures distinct and prevents muddy streaks. Fold in mix-ins in the last 1–2 minutes of churning or layer them as you transfer the mixture to the container.
Two quick mix-in ideas (proportions for ~1.5 qt batch):
– Strawberry swirl: gently fold in 3/4 cup warm strawberry compote (cook 1 cup diced strawberries with 2 tbsp sugar until syrupy) as you spoon the churned ice cream into the container to create ribbons.
– Salted caramel ribbon: drizzle 1/2 to 3/4 cup thick caramel sauce (room temperature) in layers as you fill the container; use a knife to create pretty swirls but don’t overmix.
Other add-ins to try: chopped nuts, mini chocolate chips, crushed cookies, or mashed fruit—add chunky items near the end of churning so they stay texturally pleasing.
“The right churning technique and well-timed mix-ins turn a basic base into a memorable dessert.”
Recipe for Churned Ice Cream Storage, Serving, and Presentation Ideas
Recipe for Churned Ice Cream Storage, Serving, and Presentation Ideas
Making your own churned ice cream is rewarding — and storing and serving it correctly preserves that homemade texture and flavor. Use these practical tips to keep your frozen treat smooth, scoopable, and visually appealing.
Proper Freezing Techniques and Texture Restoration
Storage checklist:
– Transfer finished ice cream to an airtight, freezer-safe container.
– Press plastic wrap or parchment directly onto the surface before sealing to minimize air exposure and prevent ice crystals.
– Label the container with the flavor and date so you can track freshness.
Quality note: for peak flavor and texture, enjoy homemade ice cream within 2 weeks; properly stored it can remain safe to eat for up to two months, though texture may decline over time.
Restoring scoopable texture
If the ice cream is too hard from the freezer, let it sit at room temperature for 5–15 minutes (depending on how firm it is) before scooping. Short bursts in the microwave (5–8 seconds) can help soften very hard containers — use cautiously to avoid melting edges. A small splash of warm water on the scooper also helps release clean scoops.
Serving Suggestions for Perfect Summer Desserts
Presentation ideas:
– Serve scoops in classic cones, elegant bowls, or edible waffle cups for variety.
– Garnish with fresh fruit, a sprinkle of toasted nuts, flaky salt, or a drizzle of warm caramel sauce for contrast.
– Layer scoops with swirls of fruit purée or caramel between layers for a striped effect; add crushed cookies for crunch.
Visual tips: add sauces like caramel or fruit compote at room temperature and spoon them in ribbons as you fill the container to create attractive swirls without melting the ice cream.
“Small storage and serving steps make homemade ice cream taste and look perfect.”
Whether you’re plating single scoops for guests or filling waffle cups for a party, these small techniques — airtight storage, gentle thawing, and thoughtful garnishes — keep your churned ice cream tasting its best.
Conclusion
Creating your own Recipe for Churned Ice Cream at home is easier than it looks. With quality ingredients, a reliable maker, and a little patience, you can achieve a velvety, scoopable vanilla that’s perfect for summer or any time you want a special treat.
Quick Start — 3 things to prepare
– Ingredients: heavy cream, whole milk, sugar, vanilla extract (or vanilla bean), pinch of salt.
– Equipment: a 1.5–2 quart ice cream maker (or stand-mixer attachment) and an airtight freezer container.
– Time: ~15 minutes active prep, 2 hours to overnight chilling, ~20–40 minutes churning, then 3–4 hours in the freezer to firm.
Ready to start? Make the basic vanilla batch first, snap a photo of your creation, and share it in the comments or tag us on social media. For an easy printable ingredient checklist and a decadent chocolate variation, check the links in the recipe below.
FAQ
What makes churned ice cream unique?
Churned ice cream develops a smooth texture because churning incorporates air while the base freezes, and higher fat from heavy cream reduces ice crystals for a richer mouthfeel.
What are the essential ingredients?
At minimum: heavy cream, whole milk, sugar, and vanilla extract or vanilla bean. These create a simple ice cream base you can flavor and build on.
How do I choose the right ice cream maker?
Choose a machine with a solid motor and recommended batch size that suits your household; popular options include Cuisinart electric units and KitchenAid attachments for smaller home batches.
Why chill the base?
A cold base enters the maker at a low temperature so it freezes faster and forms fewer ice crystals, which improves texture.
Can I add mix-ins like cookies or fruit?
Yes — fold in chocolate chips, fresh berries, or crushed cookies in the last 1–2 minutes of churning, or layer sauces like caramel between scoops when transferring to the container.
How should I store homemade ice cream?
Use an airtight container, press plastic wrap onto the surface before sealing, and store in the coldest part of your freezer. Label with the date and flavor; for best texture enjoy within 2 weeks (though properly stored it can remain safe longer).
How can I fix grainy or icy ice cream?
Make sure the base is well chilled before churning and avoid overfilling the machine. For a quick fix, a short re-blend in a high-speed blender can help smooth texture, or add a tablespoon of alcohol (like liqueur) to lower the freezing point and reduce iciness.


