


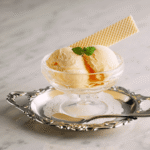
No Sugar Added Vegan Ice Cream
4
servings30
minutes40
minutes300
kcal1
hour10
minutesA simple vegan ice cream using everyday ingredients for a healthy treat.
Keep the screen of your device on
Ingredients
2 cups 2 full-fat coconut milk
0.5 cup 0.5 unsweetened almond milk
0.25 cup 0.25 maple syrup
1 tablespoon 1 vanilla extract
1 pinch 1 salt
Directions
- Pour the coconut milk, almond milk, maple syrup, vanilla extract, and a pinch of salt into a blender. Blend until smooth and fully combined to ensure a uniform base.
- Transfer the mixture into a bowl, cover it, and place it in the refrigerator for at least 2 hours to chill thoroughly and develop flavors.
- Once chilled, pour the mixture into an ice cream maker and churn according to manufacturer’s instructions, typically about 20-25 minutes, until it reaches a soft-serve consistency.
- Spoon the churned ice cream into a lidded container, and cover with parchment paper to prevent ice crystals. Freeze for at least 4 hours or until firm.
- Before serving, leave the ice cream out at room temperature for 5-10 minutes to soften slightly, making it easier to scoop.
- Store any leftovers in an airtight container in the freezer for up to one week to maintain freshness.
Recipe Video
Nutrition Facts
- Total number of serves: 4
- Calories: 150kcal
- Cholesterol: 0mg
- Sodium: 40mg
- Potassium: 50mg
- Sugar: 11g
- Protein: 2g
- Calcium: 20mg
- Iron: 1mg
- Thiamin: 0mg
- Riboflavin: 0mg
- Niacin: 0mg
- Folate: 0mg
- Biotin: 0mg
- Phosphorus: 0mg
- Iodine: 0mg
- Magnesium: 0mg
- Zinc: 0mg
- Selenium: 0mg
- Copper: 0mg
- Manganese: 0mg
- Chromium: 0mg
- Molybdenum: 0mg
- Chloride: 0mg
Did you make this recipe?
Tag @https://www.instagram.com/ice_cream_haven/ on Instagram and hashtag it with #IceCreamIceCreamHavens
Like this recipe?
Follow @https://www.pinterest.com/Ice_Cream_Haven/ on Pinterest
Join our Facebook Group!
Follow https://www.facebook.com/icecreamhavens/ on Facebook
Introduction: The Allure of Vegan Ice Cream
Discover the magic of plant-based desserts that are both indulgent and guilt-free. With the rise of veganism, traditional treats are being reimagined to fit modern dietary preferences. Whether you’re lactose intolerant or simply exploring healthier options, dairy-free alternatives offer a world of possibilities.
One of the key reasons to embrace these desserts is the use of natural sweeteners. Swapping refined sugar for options like monk fruit or erythritol not only reduces calorie counts but also enhances flavor depth. Ingredients like premium coconut milk and natural butter substitutes create a creamy, satisfying texture that rivals traditional recipes.
Why Choose No Sugar Added?
Opting for no sugar added recipes ensures a healthier treat without sacrificing taste. Natural sweeteners provide a balanced sweetness, while ingredients like peanut butter and chocolate chip add a fun twist. These variations keep the dessert indulgent yet nutritious, making it perfect for any occasion.
For those seeking inspiration, exploring dairy-free frozen treats can open up a world of creative possibilities. From creamy coconut bases to rich peanut-infused flavors, the options are endless. This approach not only caters to dietary needs but also celebrates the joy of dessert in a healthier way.
No sugar added vegan ice cream (recipe method)
Crafting a delicious, plant-based dessert is simpler than you think. With a few high-quality ingredients and straightforward steps, you can enjoy a creamy treat that’s both healthy and indulgent. Let’s dive into the essentials and the process to make it happen.
Essential Ingredients for a Healthier Dessert
Start with full-fat coconut milk and coconut cream for a rich, creamy base. These ingredients ensure a smooth texture without dairy. Add natural sweeteners like monk fruit or erythritol to keep it light yet flavorful.
For a chocolate twist, include unsweetened cocoa powder. A splash of your favorite plant-based milk helps achieve the perfect consistency. Each ingredient plays a crucial role in creating a balanced, satisfying dessert.
Step-by-Step Recipe Overview
Begin by blending the coconut milk, cream, and sweetener until smooth. Add cocoa powder or other flavorings and mix well. Pour the mixture into a freezer-safe container and let it chill for at least four hours.
After freezing, let the dessert thaw for a few minutes before scooping. This step ensures a creamy texture. For a richer experience, try adding swirls of peanut butter or chocolate chips before freezing.
Experiment with variations like adding fresh fruit or nuts. Adjust quantities to suit your taste. For more inspiration, check out this 3-ingredient ice cream recipe.
Exploring Flavor Variations and Ingredient Substitutions

Transform your dessert game with endless flavor possibilities and ingredient swaps. Whether you’re a fan of rich, nutty flavors or crave something sweet and indulgent, there’s no limit to how you can customize your treat. By experimenting with different ingredients, you can create a dessert that’s uniquely yours.
Incorporating Peanut Butter and Chocolate Options
For a decadent twist, try adding a cup of creamy peanut butter to your base. This not only enhances the flavor but also adds a smooth, velvety texture. If you’re a chocolate lover, mix in unsweetened cocoa powder or a handful of chocolate chips for a rich, indulgent experience.
Swirls of melted chocolate or dollops of peanut butter can also create a marbled effect, making your dessert visually appealing. These additions are perfect for those who enjoy a mix of textures and flavors in every bite.
Creative Mix-ins for an Innovative Twist
Take your creation to the next level by incorporating unique mix-ins. Chopped nuts, fresh fruit, or even a sprinkle of sea salt can add depth and complexity. For a tropical vibe, try shredded coconut or diced pineapple.
When adding mix-ins, ensure they’re evenly distributed to avoid clumping. This ensures every scoop is packed with flavor and texture. For more inspiration, check out this no-churn ice cream recipe that’s perfect for experimenting with creative additions.
Remember, the key to a smooth texture is proper freezing. Avoid overloading your freezer and let your dessert set gradually. This prevents ice crystals from forming, ensuring a creamy consistency every time.
Don’t be afraid to get creative and make the recipe your own. With a little experimentation, you can turn a simple dessert into a masterpiece that’s both delicious and nutritious.
No sugar added vegan ice cream Simple Techniques for a Creamy Consistency

Achieving the perfect creamy texture for your dessert doesn’t have to be complicated. With a few tried-and-true methods, you can create a velvety, smooth treat that rivals store-bought options. The key lies in mastering the freezing and thawing process, ensuring every bite is as indulgent as the last.
Freezing Methods and Thawing Tips
Freezing is the most critical step in achieving the right consistency. For best results, let your dessert set in the freezer for at least four hours, or ideally overnight. This time allows the mixture to solidify evenly, preventing unwanted ice crystals.
When it’s ready to serve, let it thaw at room temperature for 15-20 minutes. This step ensures a soft, scoopable texture. If you’re in a hurry, placing the container in the fridge for an hour can also work wonders.
To avoid a chunky or icy result, ensure your mixture is well-blended before freezing. Using a high-quality blender or food processor can make all the difference. For an even smoother finish, consider adding a splash of plant-based milk during blending.
If your dessert turns out too hard, don’t worry. Simply let it sit at room temperature for a few extra minutes. For a richer experience, try swirling in melted chocolate ice or nut butter before freezing. These small tweaks can elevate your homemade creation to the next level.
Experimenting with different freezing techniques can also yield impressive results. For example, using shallow containers helps the mixture freeze more evenly. If you’re looking for professional-grade tools, check out this affiliate link for equipment recommendations.
Remember, patience is key. Allowing enough time for freezing and thawing ensures a dessert that’s both creamy and satisfying. With these simple techniques, you’ll master the art of creating the perfect texture every time.
No sugar added vegan ice cream Using Equipment and Tools for Best Results

The right tools can elevate your homemade dessert to a gourmet experience. Whether you’re blending, freezing, or serving, having the proper equipment ensures a smooth and consistent treat every time. From high-powered blenders to specialized trays, each tool plays a vital role in creating the perfect texture.
Choosing the Right Blender and Ice Cube Trays
A high-powered blender is essential for achieving a creamy mixture. Look for models with strong motors and sharp blades to handle thick ingredients like coconut cream. Brands like Vitamix or Ninja are popular choices for their reliability and performance.
For freezing, silicone ice cube trays are a game-changer. They’re flexible, making it easy to pop out frozen portions without breaking. These trays also help create uniform serving sizes, ensuring consistency in every scoop.
Troubleshooting Common Challenges
Even with the best tools, challenges can arise. If your mixture isn’t blending smoothly, add a splash of plant-based milk to thin it out. Overheating can also be an issue, so pulse your blender instead of running it continuously.
For freezing, avoid overloading your store-bought trays or containers. This ensures even freezing and prevents ice crystals. If your dessert freezes too hard, let it thaw for a few minutes before serving.
For more tips, check out this link to a helpful post on troubleshooting frozen desserts. With the right tools and techniques, you’ll master the art of creating a creamy, indulgent treat at home.
Tips and Tricks for Perfect Homemade No sugar added vegan ice cream

With a few expert tips, you can create a flawless dairy-free treat. Whether you’re a beginner or a seasoned pro, these strategies will help you streamline the process and achieve the best results. From preparation to serving, every step matters.
Time Management: From Prep to Freezer
Efficient time management is key to making a smooth and creamy dessert. Start by soaking raw cashews for at least 5 minutes, or up to 3 hours, to ensure a silky texture. Blend the mixture for 3-4 minutes until it’s perfectly smooth.
Chill the mixture for 30 minutes before churning. This step ensures optimal texture and prevents graininess. Use an ice cream maker for 20-25 minutes until it resembles soft serve. Freeze for 4-5 hours for a firm consistency.
To avoid over-freezing, let the dessert thaw at room temperature for 15-20 minutes before serving. This ensures a scoopable texture every time.
Expert Storage and Serving Advice
Proper storage is essential to maintain flavor and texture. Use airtight containers to prevent freezer burn and ice crystals. For best results, store your dessert in shallow containers to ensure even freezing.
When serving, garnish with fresh vanilla or fruit for a vibrant presentation. Add mix-ins like almond pieces or chocolate chips for extra flavor and texture. These small touches can elevate your dessert to a gourmet experience.
For a creative twist, try layering your dessert with swirls of melted chocolate or nut butter. This not only enhances the flavor but also makes it visually appealing.
- Soak cashews for a smooth base and blend thoroughly.
- Chill the mixture before churning for optimal texture.
- Store in airtight containers to maintain freshness.
- Garnish with fresh fruit or vanilla for a vibrant presentation.
- Experiment with mix-ins for added flavor and texture.
No sugar added vegan ice cream Health Benefits and Nutritional Insights

Understanding the health benefits of plant-based desserts can transform how you enjoy sweet treats. These options are not only indulgent but also packed with nutritional advantages. By choosing desserts made with natural sweeteners and wholesome ingredients, you can support a healthier lifestyle without sacrificing flavor.
Keto, Low Carb, and Dietary Considerations
One of the standout benefits of these desserts is their compatibility with various diets. For those following a keto or low-carb lifestyle, substituting refined sugars with natural sweeteners like monk fruit or erythritol can make a significant difference. These alternatives help maintain stable blood sugar levels while providing a satisfying sweetness.
Ingredients like coconut milk and syrup offer a rich, creamy texture without the need for dairy. These components are also high in healthy fats, which are essential for maintaining energy levels on a low-carb diet. By using these ingredients, you can create a dessert that aligns with your dietary goals.
Maintaining the right room temperature during thawing is crucial for preserving both flavor and nutrient profiles. Allowing your dessert to sit at room temperature for a few minutes before serving ensures a smooth, creamy texture that enhances the overall experience.
- Lower glycemic index benefits from natural sweeteners.
- High healthy fat content from coconut milk and syrup.
- Supports keto and low-carb dietary needs.
- Preserves flavor integrity through proper thawing techniques.
For those looking to explore more indulgent options, consider trying a creamy vanilla base with caramel, chocolate, and. This recipe combines rich flavors with nutritional benefits, making it a perfect addition to your dessert repertoire.
By incorporating these tips and insights, you can enjoy a dessert that’s both delicious and aligned with your health goals. Whether you’re managing dietary restrictions or simply seeking a healthier treat, these plant-based options offer a satisfying solution.
Conclusion
Making a free, no sugar added vegan ice cream at home is both simple and rewarding. By choosing natural ingredients like coconut fat and natural sweeteners, you can create a treat that’s both healthy and indulgent. This approach allows you to enjoy a creamy texture without compromising on flavor.
Mastering the right techniques and using the proper tools ensures a smooth, scoopable consistency every time. Experiment with mix-ins like vanilla extract or nut butter to add depth and richness. These small tweaks can transform your dessert into a personalized masterpiece.
With just a few tablespoons of high-quality ingredients, you can craft a dessert that fits various dietary needs. Whether you’re following a keto or low-carb lifestyle, this treat is adaptable and satisfying. The process is straightforward, making it perfect for beginners and experts alike.
Celebrate your creativity by sharing your creations with others. Explore more delightful dessert ideas to keep your kitchen adventures exciting. Every scoop is a reminder that healthy eating can be both delicious and fun.
FAQ
Why should I choose no sugar added options for my dessert?
What are the essential ingredients for making this dessert?
Can I add peanut butter or chocolate to this recipe?
How do I achieve a creamy consistency?
What equipment works best for making this dessert?
How long does it take to prepare and freeze?
Can I store leftovers, and how?
Is this dessert suitable for keto or low-carb diets?


