


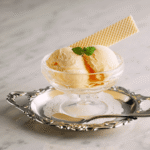
Homemade Soy Ice Cream
4
servings30
minutes40
minutes300
kcal1
hour10
minutesCreamy vegan ice cream with everyday ingredients.
Keep the screen of your device on
Ingredients
2 cups 2 soy milk
0.75 cup 0.75 sugar
1.5 teaspoons 1.5 vanilla extract
1 pinch 1 salt
2 tablespoons 2 cornstarch
Directions
- In a saucepan, combine 1.5 cups of soy milk and sugar, and heat on medium, stirring until sugar dissolves.
- Dissolve cornstarch in the remaining 0.5 cups of soy milk before adding to the saucepan.
- Continue heating and stirring until the mixture thickens slightly and coats the spoon.
- Remove from heat, add vanilla extract and salt, stir well, then let cool completely.
- Transfer mixture to a container, cover, and chill in refrigerator for at least 4 hours.
- Once chilled, pour the mixture into an ice cream maker and churn for 20-25 minutes.
- Transfer the ice cream to a freezer-safe container and freeze until firm, about 2 hours.
- Serve scoops of creamy soy ice cream in bowls or cones as desired.
Recipe Video
Nutrition Facts
- Total number of serves: 4
- Calories: 160kcal
- Cholesterol: 0mg
- Sodium: 30mg
- Potassium: 200mg
- Sugar: 18g
- Protein: 3g
- Calcium: 100mg
- Iron: 1mg
- Thiamin: 0.1mg
- Riboflavin: 0.05mg
- Niacin: 1mg
- Folate: 6mg
- Biotin: 0mg
- Phosphorus: 80mg
- Iodine: 0mg
- Magnesium: 20mg
- Zinc: 0.5mg
- Selenium: 2mg
- Copper: 0.1mg
- Manganese: 0.1mg
- Chromium: 0mg
- Molybdenum: 0mg
- Chloride: 50mg
Did you make this recipe?
Tag @https://www.instagram.com/ice_cream_haven/ on Instagram and hashtag it with #IceCreamIceCreamHavens
Like this recipe?
Follow @https://www.pinterest.com/Ice_Cream_Haven/ on Pinterest
Join our Facebook Group!
Follow https://www.facebook.com/icecreamhavens/ on Facebook
Why This Soy Ice Cream Shines Right Now
The best soy-based scoops I tasted in Kyoto highlighted clarity of flavor over bells and whistles.
That clarity is the goal here: use a thicker soy milk from an Asian grocery or a homemade batch so the milk carries body and natural sweetness. Thicker, higher-solids soy gives a cream-like mouthfeel without heaviness, letting vanilla support rather than mask the bean.
We keep sugar low on purpose. A restrained sweetness level mirrors Kyoto’s style and keeps the soy flavor clean and modern. This approach is a simple quality policy: choose fresher, less processed ingredients and the result improves at churn and freeze.
Made for U.S. Home Kitchens
- Inspired by Kyoto, but designed for a standard maker and common kitchen tools.
- Prep and churn fit into practical minutes, so the plan works on a weeknight.
- Focus on soy and milk choices to control both flavor and finished texture.
Easy Soy Ice Cream Recipe: Ingredients, Tools, and Yield

Start by laying out precise measures and the small set of kitchen gear you’ll need. This helps the process move quickly and keeps the final texture consistent.
Ingredients
Base: 2 cups soy milk and 1/2 cup sugar. These proportions give body and balanced sweetness.
Texture boosters: 1/4 cup cashews, 2 tablespoons corn starch, and a pinch of salt. Add 1 vanilla bean plus 1 1/2 teaspoons vanilla extract for layered aroma.
Equipment
Use an ice cream maker (a Cuisinart-style maker works well), a saucepan to warm and thicken the base, and a blender or soaked cashews for a silky mixture.
Chill the base in a covered bowl or glass jar before you churn. Finish in a freezer-safe container with a tight lid to avoid ice crystals.
Yield and notes
“Measure carefully: small changes to cups or teaspoons affect texture and sweetness.”
- Yields about 1 quart of finished frozen dessert.
- Soak cashews overnight if you don’t have a high-speed blender.
- See the full method and tips for timing and troubleshooting.
Easy Soy Ice Cream Recipe Step-by-Step: From Mixture to Churned Ice Cream

Follow these clear steps to move the base from blender to bowl and into your maker with confidence.
Blend the base
Combine milk, sugar, cashews, corn starch, and a pinch of salt in a high-speed blender. Blend until the mixture is silky and shows no grit. This smooth mix impacts how the ice and cream set later.
Cook to thicken
Pour the blended mixture into a pan. Split a vanilla bean, scrape seeds into the pan, add the pod, and cook over medium heat for several minutes, stirring to avoid scorching. Remove the pod, stir in vanilla extract and optional vodka, then take off heat.
Chill before the maker
Transfer the warm base to a covered bowl or jar and refrigerate until fully cool—about three hours. Proper chill time helps the maker produce better overrun and a refined consistency when you churn.
Churn and freeze
Churn ice cream in your ice cream maker until it reaches soft-serve consistency. Aim not to overwork the mix; visual cues matter more than time on the clock. Move the churned cream to a lidded container and freeze for several hours to firm up before serving.
Easy Soy Ice Cream Recipe Pro Tips, Variations, and Serving Ideas

Focus on ingredient quality and timing to get scoopable, flavorful results every batch. Choose a thicker soy milk from an Asian grocery or make your own for more body and a truer flavor when frozen.
Texture matters: Grind or soak cashews for cream-like richness, and stir in a small amount of corn starch to hold water and reduce iciness. A single tablespoon of vodka keeps the mix soft after several hours in the freezer without tasting boozy.
- Layer vanilla bean with vanilla extract for depth.
- Add a chocolate ripple by drizzling melted chocolate during the last minute of churn ice cream.
- Top bowls with a bright berry sauce or pair scoops with warm apple crisp.
Storage and serving: Pack churned ice cream into a shallow container and seal tightly to limit air. Let the container sit at room temperature for a few minutes before scooping so the consistency softens for clean rounds.
“Keep notes on maker time and chill hours so your next batch is even better.”
Conclusion
This final note ties Kyoto-inspired flavor choices to practical at-home techniques for consistent results.
Choose a thicker soy milk from an Asian market or make your own to give the base real body. Use a vanilla bean plus extract, a small cup of cashews, and a touch of cornstarch to hold texture and reduce ice formation.
Churn in any standard cream maker, then set the churned mix in a freezer-safe container for a few hours. A tablespoon of vodka helps keep scoops soft and scoopable.
With careful ingredients, measured sugar, and brief minutes of prep, you get reliable ice cream that highlights vanilla and soy flavor. Treat sourcing as your quality policy and tweak minutes and hours until the texture matches your taste.
FAQ
What kind of soy milk works best for a creamy dairy-free dessert?
Do I need an ice cream maker to churn this frozen treat?
How do I prevent icy crystals and achieve smooth texture?
Can I flavor the mixture beyond vanilla and chocolate?
How much sugar should I use, and are there alternatives?
What yield can I expect from this formula?
How long should I chill the base before putting it in the maker?
What are safe storage and serving tips?
Can I make a chocolate version with this base?
Are there nut-free ways to improve creaminess?
How do I adapt the recipe for a no-churn method?
Can I make this ahead for events and how far in advance?
What equipment besides a maker should I have on hand?


