


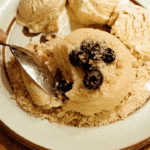
Homemade Chocolate Ice Cream Bars
4
servings30
minutes40
minutes300
kcal1
hour10
minutesRich chocolate ice cream bars with crunchy toppings, perfect for a summer treat.
Keep the screen of your device on
Ingredients
2 cups 2 heavy cream
1 cup 1 sweetened condensed milk
0.5 cup 0.5 unsweetened cocoa powder
1 teaspoon 1 vanilla extract
8 pieces 8 ice cream sticks
1 cup 1 chocolate chips
0.25 cup 0.25 crushed nuts
Directions
- In a mixing bowl, whisk together the heavy cream, sweetened condensed milk, cocoa powder, and vanilla extract until smooth and fully combined.
- Pour the mixture into popsicle molds, ensuring to leave a little space at the top to allow for expansion when freezing.
- Insert the ice cream sticks into each mold, making sure they are centered and adequately submerged in the chocolate mixture.
- Place the filled molds into the freezer and allow them to freeze for a minimum of two hours or overnight until solid.
- Once frozen, melt the chocolate chips in a microwave-safe bowl, heating in 20-second intervals and stirring in between each until smooth.
- Carefully remove each ice cream bar from its mold, and quickly dip each bar into the melted chocolate to coat evenly.
- Sprinkle or dip each bar into crushed nuts immediately after dipping in chocolate, before the chocolate hardens.
- Allow the bars to rest on a baking tray lined with parchment paper until the chocolate has set completely, then serve.
Recipe Video
Nutrition Facts
- Total number of serves: 8
- Calories: 250kcal
- Cholesterol: 50mg
- Sodium: 40mg
- Potassium: 120mg
- Sugar: 16g
- Protein: 3g
- Calcium: 100mg
- Iron: 1mg
Did you make this recipe?
Tag @https://www.instagram.com/ice_cream_haven/ on Instagram and hashtag it with #IceCreamIceCreamHavens
Like this recipe?
Follow @https://www.pinterest.com/Ice_Cream_Haven/ on Pinterest
Join our Facebook Group!
Follow https://www.facebook.com/icecreamhavens/ on Facebook
Why You’ll Love This Homemade Ice Cream Bar Recipe
No‑churn convenience makes these treats easy to pull together without special gear. The base whips into a soft, smooth texture that resists large ice crystals, so each bite is silky and satisfying.
Customize the center with swirls of Nutella, passion fruit, raspberry, coffee, salted caramel, blueberry, peanut butter, or Biscoff. These layers add surprise and let you recreate favorite flavors at home.
Portion flexibility is a major perk: mini molds (about 45 mL) freeze fast and are easy to unmold, while larger molds feed a crowd. Make a batch ahead and keep extras in the freezer for instant desserts.
- Fast results: no churn, no machine.
- Texture contrast: a crisp chocolate shell complements the soft interior.
- Family fun: set a bowl of toppings and let everyone decorate.
- Budget smart: cheaper than many store options and fully customizable.
Pro tip: stash some uncoated sticks in the freezer and dip in batches so coating stays glossy. For more ideas and step‑by‑step inspiration, see this healthy homemade option at plant‑based frozen bars.
Quick Snapshot: Time, Yield, Skill Level
Spend about ten minutes prepping the base, then let the freezer finish the job. Expect a hands-off chill period measured in hours rather than minutes.
Prep and Freezer Time
Typical active prep is ~10 minutes to whisk the cream and milk base. Mini molds (about 45 mL) set faster — roughly 1.5–2 hours.
Larger molds or cakesicle shapes need more patience. Plan on 4–6 hours for fully firm centers before dipping in chocolate.
Servings and Mold Size
Yield example: a small batch makes four 90 ml bars. Scale the base to fill more molds or use a 7×11-inch parchment-lined pan to freeze a slab, then cut into shapes and add sticks.
- Skill level: beginner-friendly; no machine required.
- Measure: keep a cup or measuring cups handy for neat pouring.
- Tip: soften store-bought slightly so it levels, but don’t melt it.
Ice Cream Bar Recipe
Mixing air into a rich cream and milk blend creates a light, stable base perfect for handheld treats. This no‑churn method lets home cooks make ice cream bars fast with minimal gear.
Base formula (example): 120 g heavy/whipping cream, 60 g sweetened condensed milk, 60 g evaporated milk, 1/4 tsp pure vanilla paste. Whisk the cream until soft peaks form, fold in the condensed and evaporated milk, then add the vanilla paste.
Why it works: condensed and evaporated milk reduce free water, which cuts ice crystal formation and keeps the texture smooth. Vanilla paste is preferred over extract to avoid adding extra water while keeping bold flavor.
Core flow: whisk the base, fill silicone molds or a parchment‑lined pan, freeze until solid, then dip in melted chocolate and decorate. Whisking adds air for a lighter bite and masks any minor crystaliness.
Quick swaps and scaling: use coconut milk (full fat) for part of the evaporated milk, or double the formula to fill larger molds. Essential tools: measuring jug, whisk or stick blender, silicone molds, and a parchment‑lined sheet pan. Read the dipping steps ahead so coating goes smoothly.
Ice Cream Bar Recipe Ingredients You’ll Need for the Cream Base

Choose full‑fat dairy and concentrated milks for the best texture and flavor. This short list keeps water low and fat high so the frozen center stays smooth and scoopable.
Heavy cream, sweetened condensed milk, evaporated milk
Measured example: 120 g heavy/whipping cream, 60 g sweetened condensed milk, 60 g evaporated milk, and 1/4 tsp vanilla paste.
Heavy cream provides the fat that gives body and a scoopable feel. Condensed milk removes much of its water and adds sweetness while preventing large ice crystals. Evaporated milk boosts milk solids for a custardy note without extra sugar.
Vanilla: paste vs extract for best consistency
Vanilla paste is preferred because it adds bold flavor with minimal added moisture. If you must use vanilla extract, use it sparingly to avoid thinning the base.
Pinch of salt to balance sweetness
Finish with a fine pinch of sea salt to brighten dairy and vanilla notes. Keep ratios balanced so the base freezes firm yet yields easily when bitten.
- Keep ingredients cold and measure with a cup or digital scale for accuracy.
- Lightly whip the cream before folding in milks to trap air for a softer bite.
- Work quickly to limit warming; cold tools help the base set cleanly in the freezer.
Chocolate Coating and Magic Shell Options
A glossy chocolate shell transforms a frozen treat into a hand-held indulgence. Choose dark, milk, or white to control sweetness and snap.
Dark chocolate gives a robust, less-sweet finish. Milk or white chocolate yields a creamier, sweeter coating that kids often prefer.
Melting and thinning: oil or coconut oil
Gently melt chocolate over a simmering water bath using a double boiler to reduce scorch risk. For speed, microwave in 30-second bursts, stirring between each.
To thin melted chocolate for a crisp shell, add about 1/4 cup neutral oil or coconut oil per 2 cups chocolate. Use refined coconut oil for a neutral taste or virgin for a subtle coconut note.
Practical dipping tips
- Transfer the warm chocolate to a tall, narrow glass to fully submerge and dip ice treats cleanly.
- Work with frozen-solid bars so the shell sets within seconds and stays glossy.
- If the coating thickens, add small extra oil amounts until it flows like warm syrup.
- Keep the bowl or glass warm but not hot; overheated chocolate can thicken or bloom.
“Use a gentle boiler for control; microwave for speed—stir well either way to avoid streaks.”
Ice Cream Bar Recipe Tools and Kitchen Gear for Success

The right tools speed prep and help your finished treats look professional. A few reliable items reduce mistakes and keep batches consistent.
Silicone molds and wooden sticks
Use flexible silicone molds for easy unmolding and neat edges on cream bars. Place molds on a tray that fits the freezer so they stay level and don’t spill.
Wooden sticks should be straight and centered. That supports an even dip and a comfortable hold while eating.
Measuring jug, bowls, and digital scales
A glass measuring jug gives precise pours and cuts cleanup time. Keep organized cups and bowls nearby to hold toppings and ingredients.
Digital kitchen scales are crucial for repeatable results—weight beats volume when texture matters.
Stick blender or countertop blender
An immersion (stick) blender quickly whips small batches and blends add-ins without overheating the base. For larger volumes, use a countertop blender and pulse to avoid warming the mix.
Parchment-lined sheet pan and workstation tips
Line a sheet pan with parchment paper to keep freshly unmolded bars from sticking. Pre-chill the tray so bars don’t sweat before you coat them in chocolate.
- Keep a flat, stable freezer space so molds set level.
- Arrange cups and a clean bowl for a tidy dipping station.
- Use a measuring cup for small pours and a scale for ingredients like milk and condensed milk.
Step-by-Step: Make the Ice Cream Base
Begin with everything cold; that small step sets the stage for a smooth, airy ice cream base.
Whisking for air and creamy texture: Chill the bowl and beat the heavy cream to soft peaks. Stop once peaks hold but still bend; this traps air and prevents a dense finish.
Mixing order: Fold in sweetened condensed milk, then evaporated milk. Scrape the bowl so no streaks remain. Add vanilla paste last and mix just enough to combine.
Getting the right consistency before freezing: Aim for a thick, pourable cream base that flows into molds without deflating. Keep the mixture cold; if it warms, chill briefly before filling.
- Start with cold tools and ingredients to save time and boost structure.
- Avoid over‑whipping past soft peaks to prevent separation or a buttery texture.
- Move promptly from mixing to filling so trapped air reduces iciness during freeze.
Tip: If adding swirls like caramel or fruit, layer them after partially filling molds so ripples stay defined. Then freeze until firm and proceed to dip in chocolate.
Fill, Insert Sticks, and Freeze the Bars
Prep the portions so they freeze evenly and hold their shape. Pour the chilled cream and milk base into molds or a parchment-lined pan. For molds, fill just below the rim to allow slight expansion without overflow.
Using molds vs a parchment-lined pan
For molded portions, insert a stick straight and centered. Many silicone sets include guides—double-check alignment before you move the tray to the freezer.
For the no-mold method, line a 7×11-inch pan with parchment paper. Pour the base, freeze solid, then cut rectangles and press sticks in before a final chill.
Freezer time and firmness check
Freeze time: allow about 3–4 hours for full-size pieces; mini molds can set sooner. Place trays on a flat shelf and avoid opening the door often so the temperature stays steady.
- Keep a parchment-lined tray ready to hold unmolded bars before you dip them in chocolate.
- Work in small batches: remove only a few bars at a time to limit surface melting and ice formation.
- Test firmness by pressing the center; the pieces should feel rock-solid before coating.
“Wipe drips from mold edges and freeze on a level surface for cleaner shapes and easier unmolding.”
If bars soften while you work, return them to the freezer for 10–15 minutes. If layering fillings, freeze a thin base layer first, add swirls, then top with more base so stripes stay defined. This step helps you make ice treats that look as good as they taste.
Dip, Coat, and Set: The Dark Chocolate Coating
Finish your frozen treats with a glossy dark chocolate coating that sets fast and gives a satisfying snap. Melt the chocolate using a double boiler or microwave and thin it with about 1/4 cup neutral oil per 2 cups of chocolate for a fluid shell.
Pouring chocolate into a tall glass for easy dipping
Transfer the warm, fluid chocolate to a tall glass so you can fully submerge each bar in one smooth motion. Dip ice pieces quickly and tap gently to shed excess coating for a thin, even finish.
Decorating with nuts, cookies, or sprinkles
Work fast: the shell sets in about 10–15 seconds on frozen centers. Add nuts, cookie crumbs, or sprinkles immediately so they adhere.
- Keep decorations in shallow bowls within arm’s reach.
- Place dipped bars on a paper-lined tray and return to the freezer for 10–15 minutes.
- If the coating thickens, warm briefly or add a splash of oil to restore flow.
“One clean dip usually gives the best texture and appearance.”
Ice Cream Bar Recipe Flavor Variations and Add-Ins

A few smart add-ins lift the base into many distinct flavor directions. These mix-ins let you tailor homemade ice to family tastes without extra fuss.
Fruit coulis: simmer berries with a little sugar, blend, strain, and chill. Spoon a thin layer into molds, freeze briefly, then add the base so ribbons stay vivid.
Caramel, Nut Butters, and More
Make a classic salted caramel by cooking sugar to amber, stirring in butter and a splash of milk or cream, then cooling before swirling.
- Create indulgent centers with Nutella, Biscoff, or peanut butter—freeze a thin layer for neat separation.
- Add mint extract to the base and finish with a dark chocolate coating for a bright contrast.
- Dissolve instant coffee in warmed evaporated milk for a true coffee note.
Spice and Crunch
Try 1/4 tsp cinnamon, cardamom, or nutmeg for warmth. Fold in crushed cookies, pistachios, or toasted almonds for texture.
“Swirls and layers let simple ingredients feel gourmet—balance sweetness and test a small spoonful first.”
Tips for Texture, Consistency, and Easy Make
Small technique changes make a big difference in final texture and mouthfeel. Follow a few focused tips to keep the center smooth, avoid large crystals, and finish with a glossy coating.
Reducing Water Content to Prevent Large Crystals
Prioritize low-water ingredients such as sweetened condensed and evaporated milk in the ice cream base. These cut free water and reduce big ice formation.
Keep the cream base cold and mix quickly to lock the emulsion before freezing.
Why Whipping Air Into the Base Matters
Whisk the cream to soft peaks to fold in air. That trapped air softens each bite and improves scoopability in cream bars.
Light whipping also helps the mixture resist gritty texture after a long freeze.
Working Fast While Dipping to Set the Shell
Thin melted chocolate to a fluid state and dip only a few pieces at once. Keep remaining bars in the freezer so they stay rock-solid.
If frozen treats frost over, let them rest 1–2 minutes before dipping to limit bubbling. After coating, return to the freezer, then allow bars to rest 5–10 minutes at room temp before serving for ideal consistency.
- Organize a dipping station with toppings staged.
- Freeze bars fully before coating to prevent slipping.
- Note freezer times and chocolate fluidity to refine your process.
For more inspiration on silky results and flavor ideas when you make ice cream, check the creamiest icy options.
Storage, Freezer Tips, and Serving
Proper storage keeps homemade treats tasting fresh and prevents frost or sticking. Wrap each piece once fully set so shells stay crisp and centers remain smooth.
Wrap with Parchment Paper to Prevent Sticking
Once frozen, wrap each portion in parchment paper or plastic. This reduces aroma transfer and avoids freezer burn. For neat, stackable packages, place a sheet of parchment between layers.
Best Freezer Time and Quick Soften Before Serving
Store in airtight containers or freezer bags and label with the date. Quality is best within 2–3 months, but keep items in the coldest part of the freezer to limit temperature swings.
- Wrap individually in parchment paper to prevent sticking and odors.
- Layer wrapped pieces between parchment in a sealed container.
- Label bags with the date; they stay best for about 2–3 months.
- Let items sit 5–10 minutes at room temperature before serving so flavor and texture bloom.
- For parties, pre-dip and store; bring out small batches so they stay cold longer.
For variations and a related tip on texture, see a helpful guide on dark corn syrup in frozen treats.
Troubleshooting and Pro Tips from the Test Kitchen
Small adjustments in technique can fix most glazing and texture problems without redoing a whole batch. These tips focus on temperature, timing, and ingredient ratios so your finish stays glossy and the interior stays smooth.
Chocolate Too Thick or Cracking
If your chocolate is thick or the shell cracks, thin it with a little neutral oil and warm gently. Stir while warming and use a double boiler for precise control.
A too‑thick shell often breaks because it chills too hard on overly cold pieces. Dip fast and avoid frost‑laden surfaces.
Icy Bars or Grainy Texture
Grainy centers usually mean too much free water. Stick to sweetened condensed and evaporated milk, and whip the cream to soft peaks for lift.
Let frozen pieces sit 5–10 minutes before serving so the interior softens and loses a frozen, grainy feel. Track freeze hours and room temperature to improve repeatability.
- If melted chocolate seizes or thickens, stir in oil and warm gently over a boiler.
- Use minimal vanilla extract or prefer paste to limit added water.
- A dull shell usually means temp issues—rewarm slightly and stir to restore fluidity.
- Work quickly and keep extras in the freezer so coatings set cleanly for an easy make.
“Small temp and timing tweaks in the kitchen make the difference between a good dip and a perfect finish.”
Conclusion
When you combine a low-water, cream-forward base with quick freezing and a thin chocolate shell, results become reliably professional.
Ice Cream Bar Recipe, this simple approach yields smooth ice cream that rivals store brands. Store finished pieces wrapped individually in parchment-lined containers for up to a couple months. Let them sit 5–10 minutes before serving so texture and flavor bloom.
Flavor options range from bright fruit coulis and salted caramel to mint, coffee, or cookie crumbles. Use a tall glass for dipping to get even coverage and work in small batches so the shell sets glossy and thin.
In short, this bars recipe gives you an easy, scalable method to make stunning cream bars at home. Share the link to your favorite base and coating combos, and enjoy a crowd-pleasing frozen treat with minimal time and fuss.
FAQ
How long does it take to make these homemade bars from start to finish?
What ingredients create a stable, creamy base without an ice maker?
Can I use vanilla extract instead of vanilla paste?
Which chocolate is best for the shell: dark, milk, or white?
What’s the safest way to melt chocolate for dipping?
How can I thin melted chocolate without altering flavor?
What mold or method should I use if I don’t have popsicle molds?
How do I prevent icy or grainy texture in the finished bars?
Why did my chocolate coating crack after freezing?
Can I add mix-ins like nuts, cookie crumbs, or swirls to the base?
How should I store finished bars to keep them fresh and prevent freezer burn?
What’s a quick decorating tip for a professional look?
Are there easy fruit or flavor variations that don’t water down the base?
Do I need any special tools to get even fills and smooth surfaces?


