


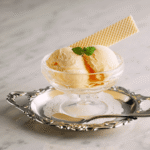
Passion Fruit Ice Cream
4
servings30
minutes40
minutes300
kcal1
hour10
minutesA refreshing and creamy passion fruit ice cream.
Keep the screen of your device on
Ingredients
1 cup 1 passion fruit pulp
1 cup 1 heavy cream
1 cup 1 whole milk
0.75 cup 0.75 granulated sugar
1 teaspoon 1 vanilla extract
0.25 teaspoon 0.25 salt
Directions
- In a mixing bowl, whisk together the passion fruit pulp, heavy cream, whole milk, granulated sugar, vanilla extract, and salt until the sugar is completely dissolved.
- Cover the mixture and chill in the refrigerator for at least 2 hours or overnight for best results.
- Pour the chilled mixture into an ice cream maker and churn according to manufacturer's instructions, usually around 20 to 30 minutes.
- Transfer the churned ice cream to an airtight container and freeze for at least 4 hours or until firm before serving.
- Serve the ice cream scooped into bowls or cones, and garnish with fresh fruit or additional passion fruit pulp if desired.
Recipe Video
Nutrition Facts
- Total number of serves: 8
- Calories: 180kcal
- Cholesterol: 35mg
- Sodium: 60mg
- Potassium: 110mg
- Sugar: 18g
- Protein: 2g
- Calcium: 60mg
- Iron: 0.2mg
- Thiamin: 0.0mg
- Riboflavin: 0.1mg
- Niacin: 0.1mg
- Folate: 0.0mg
- Biotin: 0.5mg
- Phosphorus: 60mg
- Iodine: 0.1mg
- Magnesium: 8mg
- Zinc: 0.3mg
- Selenium: 1.5mg
- Copper: 0.0mg
- Manganese: 0.0mg
- Chromium: 0.0mg
- Molybdenum: 0.0mg
- Chloride: 55mg
Did you make this recipe?
Tag @https://www.instagram.com/ice_cream_haven/ on Instagram and hashtag it with #IceCreamIceCreamHavens
Like this recipe?
Follow @https://www.pinterest.com/Ice_Cream_Haven/ on Pinterest
Join our Facebook Group!
Follow https://www.facebook.com/icecreamhavens/ on Facebook
Why You’ll Love This Creamy, Tangy Fruit Ice Cream
A vivid floral aroma meets a whipped base to create a standout frozen treat with easy technique. Sweetened condensed milk adds sugar and lowers the freezing point, which keeps the texture scoopable and cuts down on ice crystals.
Whipping heavy cream traps air and mimics churning, giving a light, lush mouthfeel that rivals churned ice cream. The higher fat content carries the bright tropical notes so each spoonful tastes intense and balanced.
“Sweetened condensed milk and whipped cream together make a reliable base that stays smooth straight from the freezer.”
- True sweet-tart balance; floral aroma stands out without tasting cloying.
- Short hands-on time and simple steps; no eggs or special tools.
- Repeatable results: fewer ice crystals, consistent creaminess for every batch.
| Feature | Benefit | Result |
|---|---|---|
| Sweetened condensed milk | Reduces free water | Scoopable texture |
| Whipped heavy cream | Adds air and richness | Light, churned-like finish |
| Fresh passion fruit pulp | Distinct aroma and tartness | Bright, refreshing dessert |
Ingredients & Smart Substitutions for the Perfect Passion Fruit Ice Cream Recipe Base

Start by choosing concentrated, low-water pulp to lock in bright flavor and avoid icy texture.
Select seedless passion fruit pulp or a passion fruit concentrate for the base. These options cut free water and lower the risk of crystallization in the frozen mixture.
Use very cold heavy whipping cream to maximize volume when you whip. Do not swap in lower-fat milk; the higher fat content gives a smoother, scoopable finish.
Sweetened condensed milk is essential. It provides sweetness and a lower freezing point that keeps the ice cream soft. There is no effective substitute for its concentrated sugars and limited water.
- Spooled measurements: about 3/4 cup seedless pulp for the base and 1/2 cup seeded pulp for a swirl.
- For a seeded ribbon, simmer seeded pulp with granulated sugar in a saucepan for 8–10 minutes until thick. Cool completely before folding in.
- Have a large bowl, whisk or mixer, and rubber spatula ready for quick assembly.
| Ingredient | Why it matters | Use |
|---|---|---|
| Seedless pulp / concentrate | Minimizes water to reduce ice crystals | Base (≈3/4 cup) |
| Very cold heavy cream | Adds fat and whip volume for structure | Whip until soft peaks |
| Sweetened condensed milk | Lowers freezing point, sweetens without extra water | Essential; no substitute |
| Seeded pulp (for swirl) | Gives crunch and a golden ribbon | Simmer 8–10 minutes with sugar, cool |
Passion Fruit Ice Cream Recipe Tools & Equipment You’ll Need

Setting up your workspace with the right equipment saves time and yields better texture.
Start with a reliable mixer. A stand mixer with a whisk attachment speeds whipping, but a hand mixer works fine in small kitchens.
Keep an extra bowl chilled so you can whip cream separately and fold without losing volume. Use a flexible rubber spatula to gently combine the whipped cream and passion fruit base.
Choose the right container. Pick a freezer-safe container—an ice cream container, loaf pan, or cake tin—large enough for a neat swirl and minimal headspace.
- Press plastic wrap directly onto the surface to limit air and ice crystals.
- Use a metal scoop; dip in hot water for clean portions.
- If churning, freeze an ice cream maker or ice cream machine bowl 24 hours ahead.
“A level spot in the freezer and a tight lid make for an even set and fewer freezer odors.”
| Tool | Why it matters | Tip |
|---|---|---|
| Stand mixer | Fast, consistent whipping | Use whisk attachment |
| Freezer-safe container | Even freeze, neat swirl | Match size to batch |
| Metal scoop | Clean servings | Warm between scoops |
Passion Fruit Ice Cream Recipe (No-Churn, Easy Method)

Start by making the seeded jelly ribbon so it cools while you build the no-churn base.
In a small saucepan, combine seeded pulp and granulated sugar. Simmer over medium-high heat 8–10 minutes until thick and glossy, then cool to room temperature.
In a large bowl, beat seedless pulp with sweetened condensed milk for about 8–10 minutes to aerate the mixture.
Whip very cold heavy cream to stiff peaks in a separate bowl. Fold the whipped cream into the milk-pulp base in 3–4 additions, lifting to keep air in the mixture.
Pour into a chilled, freezer-safe container. Add about half the cooled jelly in an “S” pattern, then use the back of a spoon to draw figure-eights for a seeded ribbon.
“Press plastic wrap directly onto the surface to limit air and ice crystals.”
- Cover and freeze at least 8 hours (10–12 hours yields optimal scoopability).
- Soften a few minutes before serving and dip a metal scoop in hot water for clean portions.
- Reserve the remaining jelly for topping individual servings or for when you make ice cream with an ice cream maker another day.
No-Churn vs. Ice Cream Maker Methods
Choosing between a no-churn batch and an ice cream maker version comes down to time and tools. The no-churn path uses whipped heavy cream and sweetened condensed milk, folded with pulp and frozen for 6–12 hours. It requires a mixer and a freezer-safe container, and it delivers a dense, rich texture.
The churned approach starts with a quick reduction in a saucepan—about 8–10 minutes—then joins heavy cream, whole milk, vanilla, and salt. Chill the dairy base 30 minutes to a day, then churn 20–30 minutes in a fully frozen ice cream machine or ice cream maker bowl.
- Timing: no-churn needs 6–12 hours in the freezer; churned sets faster after churning (2+ hours).
- Texture: no-churn is rich and dense; churned tastes lighter and silkier due to continuous aeration.
- Flavor: use a concentrated pulp or reduction to limit added juice and reduce ice crystals.
| Method | Key gear | Best for |
|---|---|---|
| No-churn | Mixer, container | Easy, hands-off batches |
| Churned | Ice cream maker, frozen bowl | Classic churned body |
| Both | Saucepan for reductions | Use concentrate or frozen pulp, avoid sweetened mixes |
“Match the method to your schedule and tools: no-churn for speed, maker method for classic texture.”
Pro Tips for Texture, Flavor Balance, and Icy Crystal Prevention
Smart chilling and gentle handling are the shortcuts to reliably creamy results. Chill the heavy cream, condensed milk, whisk attachments, and the freezer-safe bowl or container for at least 30 minutes before you start.
Whip to medium-to-stiff peaks. Slightly under-whipping is safer than over-whipping, which can break the fat and make the mixture grainy. Fold in stages with a wide spatula, lifting from the bottom to keep air in the blend.
Prioritize low water content. Use strained pulp or concentrate and avoid juice-heavy swaps to cut down on big ice crystals. Cool any seeded reductions or sugar ribbons fully before adding them; hot swirls melt the base and invite iciness.
Keep seeds in the swirl rather than the base to preserve a silky mouthfeel while adding texture. Press plastic wrap directly onto the surface, seal with a tight lid, and plan your time: a 30-minute chill for prep and overnight freeze for no-churn gives the best results.
“Allow the container a few minutes at room temperature before scooping; it releases cleanly and keeps the structure intact.”
| Tip | Why it helps | Quick action |
|---|---|---|
| Chill ingredients & bowl | Speeds set and improves whip volume | 30 minutes in fridge |
| Fold in stages | Preserves air for light texture | Use wide spatula, 3–4 folds |
| Limit water content | Reduces ice crystals over time | Use concentrated pulp or puree |
| Seal tightly | Minimizes freezer burn and iciness | Press wrap to surface, close lid |
Serving, Storage, and Make-Ahead
Plan your serving and storage steps ahead so the texture stays perfect for guests.
Freeze at least 8 hours for no-churn batches; 10–12 hours gives the best scoopable body. Churned batches should move from the ice cream maker straight to the freezer and chill at least 2 extra hours to firm.
Set the pan on the counter for 5–10 minutes before scooping. Dip a hot metal scoop in warm water so it glides through the mixture without tearing the surface.
Use a freezer-safe, lidded container sized to your batch. Minimize headspace and press plastic wrap directly onto the surface to limit air exposure and slow iciness.
“Store for peak quality up to two weeks; texture firms after 24+ hours, so allow extra minutes at room temperature before serving.”
- Rotate the pan during long freezes if your freezer has hot spots to help an even set.
- Pre-scoop into a chilled bowl and refreeze briefly for fast plating when serving many guests.
- For make-ahead batches, swirl sauce, cover tightly, and freeze; keep reserved jelly refrigerated to drizzle fresh when serving.
| Action | Why | Timing |
|---|---|---|
| Counter rest | Softens firm set | 5–10 minutes |
| Seal with wrap | Limits air and iciness | Immediately after filling |
| Store duration | Peak quality | Up to two weeks |
Conclusion
Passion Fruit Ice Cream Recipe
Finish with the method that fits your kitchen: no‑churn for ease, or churned for a classic texture. Use low‑water pulp and full‑fat milk or condensed milk to keep the mixture smooth and scoopable.
Key moves: whip, fold, swirl, and freeze for no‑churn; reduce, chill, churn, and set for the maker method. Freeze at least 8–12 hours for no‑churn or 2+ hours after churning for a firm set.
Store in a lidded container with plastic wrap on the surface. Use about half the jelly for a seeded ribbon and save the rest for topping. Pin this guide, gather chilled tools, and make ice cream—your tangy, tropical scoop is ready to impress.
FAQ
How long does this creamy, tangy frozen dessert take to make?
Can I use bottled juice or concentrate instead of fresh pulp?
What are smart ingredient swaps if I don’t have heavy cream?
Do I need an ice cream maker to get a smooth texture?
How do I prevent icy crystals in the finished dessert?
Can I make the base ahead and freeze it before churning?
How should I store leftovers and how long do they keep?
Are there tips for balancing tartness and sweetness?
Can I include the seeds for texture or should I strain them out?
What containers work best for freezing and serving?


