


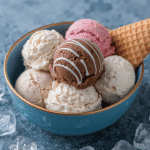
Taro Ice Cream Recipe
6
servings20
minutes10
minutes250
kcalCreamy taro ice cream made with simple ingredients.
Keep the screen of your device on
Ingredients
1 cup 1 taro root, peeled and diced
1 cup 1 whole milk
1/2 cup 1/2 sugar
1 cup 1 heavy cream
1 teaspoon 1 vanilla extract
Directions
- Start by steaming the peeled and diced taro root for about 10 minutes or until it is soft.
- Transfer the steamed taro to a blender and add the whole milk. Blend until you achieve a smooth and consistent mixture.
- In a medium saucepan, combine the taro mixture and sugar, stirring over medium heat until the sugar is completely dissolved.
- Remove the saucepan from heat and stir in the heavy cream and vanilla extract, mixing well to combine all ingredients.
- Chill the mixture in the refrigerator for at least 2 hours or until it is completely cool to the touch.
- Pour the chilled mixture into an ice cream maker, churning according to the manufacturer's instructions usually for about 20-25 minutes.
- Once churned, transfer the ice cream to a lidded container and freeze for at least 2 hours or until firm.
- Serve the taro ice cream as is or with fresh fruit, chocolate chips, or any of your favorite toppings.
Recipe Video
Nutrition Facts
- Total number of serves: 6
- Calories: 250kcal
- Cholesterol: 25mg
- Sodium: 40mg
- Potassium: 120mg
- Sugar: 25g
- Protein: 4g
- Calcium: 80mg
- Iron: 0mg
- Thiamin: 0mg
- Riboflavin: 0mg
- Niacin: 0mg
- Folate: 0mg
- Biotin: 0mg
- Phosphorus: 0mg
- Iodine: 0mg
- Magnesium: 0mg
- Zinc: 0mg
- Selenium: 0mg
- Copper: 0mg
- Manganese: 0mg
- Chromium: 0mg
- Molybdenum: 0mg
- Chloride: 0mg
Did you make this recipe?
Tag @https://www.instagram.com/ice_cream_haven/ on Instagram and hashtag it with #IceCreamIceCreamHavens
Like this recipe?
Follow @https://www.pinterest.com/Ice_Cream_Haven/ on Pinterest
Join our Facebook Group!
Follow https://www.facebook.com/icecreamhavens/ on Facebook
Introduction: Discover the Unique Charm of Taro Ice Cream
Step into the world of exotic flavors with this delightful treat. The taro ice cream offers a creamy texture and a naturally sweet taste that’s hard to resist. Its unique profile stems from the fresh taro root or taro powder, which adds depth and authenticity to every bite.
Taro has a rich history in Asian and African cuisines. In regions like Korea, it’s used in both desserts and savory dishes. This versatile root brings a touch of tradition to your kitchen, connecting you with authentic culinary practices.
The refreshing mixture in this recipe is flexible, allowing you to adapt it to the ingredients you have at home. Whether you’re using fresh taro root or taro powder, the process is straightforward and rewarding. It’s a great way to experiment with flavors and techniques.
Making this dessert at home is easier than you might think. Despite its exotic origins, the recipe is accessible for everyday cooks. In just a few hours, you can create a treat that’s perfect for a special day or a casual indulgence.
For those who love exploring unique flavors, this dessert pairs beautifully with other treats like taro milk tea. Together, they create a harmonious blend of taste and tradition.
Whether you’re new to taro or a longtime fan, this dessert is sure to impress. Its creamy texture, natural sweetness, and visual appeal make it a standout addition to any dessert table.
Taro Ice Cream Recipe Essential Ingredients, Tools, and Preparation Tips

Crafting a unique dessert starts with the right ingredients and tools. Whether you’re using fresh taro root or taro powder, each choice impacts the flavor and texture of your creation. Fresh taro offers a vibrant color and earthy taste, while taro powder provides convenience and consistency.
Selecting Fresh Taro Root and Taro Powder Options
When choosing fresh taro, look for roots that are firm and heavy, similar to selecting potatoes. Fresh taro requires peeling and boiling until tender, which enhances its natural sweetness. On the other hand, taro powder is a great alternative for those short on time, offering a similar flavor profile with less preparation.
Key ingredients like milk and cream play a crucial role in achieving the dessert’s creamy texture. Full-fat milk or coconut milk adds richness, while heavy cream ensures a smooth, velvety consistency. Combining these with taro creates a balanced, indulgent treat.
Must-Have Kitchen Tools and Equipment
To bring your dessert to life, you’ll need the right tools. A high-powered blender or food processor is essential for creating a smooth taro base. For the best results, an ice cream maker like the Ninja Creami ensures even churning and a perfect texture. If you don’t have a machine, manual methods like hand mixing can also work with patience.
Controlling heat is another critical factor. When caramelizing or simmering taro, low to medium heat prevents burning while enhancing its natural flavors. Proper preparation ensures a dessert that’s both delicious and visually appealing.
- Fresh taro root offers vibrant color and earthy flavor.
- Taro powder provides convenience and consistency.
- Milk and cream are essential for creaminess.
- An ice cream maker ensures smooth, even texture.
- Control heat to avoid burning and enhance sweetness.
Detailed Process for Taro Ice Cream Recipe Perfection

Mastering the art of a creamy dessert starts with the right techniques. This section will guide you through the essential steps to create a smooth and indulgent treat. From cooking the base to achieving the perfect texture, every detail matters.
Cooking the Base and Achieving Creamy Texture
Begin by frying the taro with butter to develop a caramelized flavor. This step enhances the natural sweetness and adds depth to the dessert. Next, simmer the taro with cream, coconut milk, and sugar. The cream mixture will naturally thicken due to the taro’s high starch content.
Seasoning with a pinch of salt is crucial. It balances the sweetness and enhances the overall flavor profile. Stir continuously to prevent burning and ensure even cooking. This process creates a rich and velvety base for your dessert.
Chilling, Blending, and Churning Techniques
Once the base is cooked, blend it until smooth. Use a high-powered blender to avoid lumps and achieve a silky consistency. If the mixture is too thick, add a splash of milk to ease the blending process. Strain the mixture to remove any remaining fibers for a flawless texture.
Transfer the blended mixture into an airtight container and chill it for at least 4 hours. Chilling ensures the flavors meld together and the mixture sets perfectly. After chilling, churn it in an ice cream maker for a creamy and scoopable texture.
For those without a machine, you can still achieve great results. Freeze the mixture and stir it every 30 minutes to break up ice crystals. This method requires patience but delivers a homemade dessert worth the effort.
Experiment with variations like adding toppings or pairing it with other desserts. For more inspiration, check out this turtle ice cream recipe. It’s a delightful way to explore new flavors and techniques.
Customizing Your Dessert: Variations and Creative Tweaks

Transform your kitchen into a creative space with endless dessert possibilities. Whether you’re using an ice cream maker or mixing by hand, there are countless ways to make your treat uniquely yours. Experimenting with flavors, toppings, and presentation can turn a simple dessert into a masterpiece.
Ice Cream Maker Versus No Machine Methods
Using an ice cream maker ensures a smooth and creamy texture with minimal effort. Machines like the Ninja Creami churn the mixture evenly, creating a consistent result. However, if you don’t have a machine, don’t worry. You can still achieve a delicious dessert by freezing the mixture and stirring it every 30 minutes. This method requires patience but delivers a homemade treat worth the effort.
Flavor Enhancements, Toppings, and Presentation Ideas
Add depth to your dessert by incorporating fresh taro root or unique toppings like chopped almonds, cashews, or chewy boba. These additions not only enhance the taste but also add a delightful texture. For a sweet finish, drizzle with syrups like oat condensed milk or date syrup.
Presentation matters too. Serve your dessert in elegant bowls and garnish with a medium amount of toppings to highlight its inviting color and flavor. For more inspiration, check out this easy no-churn recipe, which offers a simple yet versatile approach to dessert-making.
Encourage your inner cook to experiment and put a personal twist on your creation. Whether it’s a new topping or a unique flavor combination, each batch can be an expression of your culinary artistry.
Troubleshooting and Best Practices for Consistent Results

Perfecting your dessert-making skills requires attention to detail and practical solutions. Even with the best instruction, challenges can arise. This section will guide you through common issues and provide effective fixes to ensure your treat turns out perfectly every time.
Common Issues and Effective Solutions
One frequent problem is the dessert freezing too hard. If this happens, let it sit at room temperature for a few minutes. This softens it just enough to scoop easily with a spoon. For a smoother texture, consider adding a splash of milk before freezing.
Another issue can occur during the creaming process. If the mixture isn’t blending well, ensure all ingredients are at room temperature. Follow the instruction closely to avoid lumps. A high-powered blender can help achieve a silky consistency.
Maintaining the vibrant purple hue can also be tricky. If using taro powder, ensure it’s evenly mixed. For a deeper color, add a few drops of natural food coloring. This enhances the visual appeal of your treat.
Here are some additional tips to ensure success:
- Chill the mixture thoroughly before freezing to prevent ice crystals.
- Stir the mixture every 30 minutes if not using an ice cream maker.
- Use a spoon to test the texture before serving.
For more detailed guidance, explore this taro ice cream recipe. It offers step-by-step instructions to help you master the process. Additionally, visit Ice Cream Haven for more inspiration and tips on creating delicious frozen desserts.
By addressing these challenges and following best practices, you’ll create a dessert that’s both visually stunning and irresistibly creamy. Experiment with confidence and enjoy the process!
Conclusion
Taro Ice Cream Recipe, Embracing the art of dessert-making can transform your kitchen into a hub of creativity and flavor. This process highlights the importance of patience, especially during the chilling phase, which takes at least an hour to achieve the perfect texture. Using a blender ensures a smooth and cohesive liquid base, making every bite a delight.
Don’t hesitate to experiment with food coloring or additional ingredients like egg to personalize your creation. These tweaks can elevate both the look and taste of your dessert, making it uniquely yours. The journey from ingredient selection to final presentation is as rewarding as the result itself.
Every minute invested in this process translates into a superb, authentic experience, akin to enjoying a bubble tea-inspired treat. For more inspiration, explore this dairy-free dessert recipe to expand your culinary horizons. Let your creativity shine and enjoy the process of crafting something truly special.
FAQ
Can I make this dessert without a machine?
How do I choose the best taro root?
Can I use taro powder instead of fresh root?
How can I enhance the flavor of my homemade treat?
What’s the best way to store it?
Can I add toppings to my creation?
Why is my mixture grainy?


