


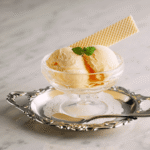
Key Lime Ice Cream
6
servings20
minutes20
minutes220
kcalCreamy and tangy ice cream with a refreshing key lime flavor.
Keep the screen of your device on
Ingredients
1.5 cups 1.5 heavy cream
0.5 cups 0.5 whole milk
0.75 cups 0.75 granulated sugar
1/2 teaspoon 1/2 vanilla extract
1 tablespoon 1 key lime zest
0.5 cups 0.5 key lime juice
Directions
- In a medium-sized mixing bowl, combine heavy cream, whole milk, and granulated sugar. Stir until the sugar is fully dissolved.
- Add vanilla extract and key lime zest to the mixture, stirring thoroughly until evenly distributed throughout.
- Slowly pour in the key lime juice, continuing to stir, ensuring the mixture remains smooth and consistent.
- Cover the bowl with plastic wrap and place it in the refrigerator to chill for at least 2 hours.
- Set up your ice cream maker as per the manufacturer's instructions and pour the chilled mixture into it.
- Churn the mixture in the ice cream maker for about 20 minutes or until it reaches a soft-serve ice cream consistency.
- Transfer the churned ice cream into an airtight container and freeze for an additional 3-4 hours to allow it to firm up.
- Serve the Key Lime Ice Cream in bowls or cones, garnished with additional lime zest for an extra touch of flavor.
Recipe Video
Nutrition Facts
- Total number of serves: 6
- Calories: 220kcal
- Cholesterol: 40mg
- Sodium: 20mg
- Potassium: 90mg
- Sugar: 25g
- Protein: 2g
- Calcium: 6mg
- Iron: 0mg
- Thiamin: 0mg
- Riboflavin: 3mg
- Niacin: 0mg
- Folate: 1mg
- Biotin: 0mg
- Phosphorus: 3mg
- Iodine: 0mg
- Magnesium: 1mg
- Zinc: 0mg
- Selenium: 1mg
- Copper: 0mg
- Manganese: 0mg
- Chromium: 0mg
- Molybdenum: 0mg
- Chloride: 0mg
Did you make this recipe?
Tag @https://www.instagram.com/ice_cream_haven/ on Instagram and hashtag it with #IceCreamIceCreamHavens
Like this recipe?
Follow @https://www.pinterest.com/Ice_Cream_Haven/ on Pinterest
Join our Facebook Group!
Follow https://www.facebook.com/icecreamhavens/ on Facebook
Overview and Inspirational Beginnings
Discover the refreshing twist that transforms traditional desserts into something extraordinary. This treat combines the tangy zest of citrus with a creamy texture, creating a flavor that’s both bold and satisfying. It’s a story of innovation, passion, and a love for homemade delights.
The Story Behind This Refreshing Treat
Inspired by the success of a no-churn cheesecake, this recipe evolved into something even more exciting. The creator wanted to capture the bright, zesty flavor of citrus in a creamy dessert. Fresh lime juice became the star, balancing sweetness with a tangy kick.
The process is simple. Mix condensed milk, heavy cream, and a splash of citrus. Add a crunchy graham cracker crust for texture. In just a few minutes, you’ll have a dessert that’s as impressive as it is delicious.
Why Homemade Ice Cream Beats Store-Bought
Homemade treats always have an edge. You control the ingredients, ensuring freshness and quality. No artificial flavors or preservatives—just pure, natural goodness. This recipe uses fresh lime juice and condensed milk for a rich, creamy base.
Store-bought options can’t match the balance of flavors. The tangy citrus cuts through the sweetness, creating a perfect harmony. Plus, the no-churn method saves time and effort. No custard base, no constant stirring—just mix, freeze, and enjoy.
For an extra touch, try using evaporated milk to enhance the creaminess. It’s a small change that makes a big difference.
Essential Ingredients and Must-Have Equipment

Unlock the secrets to a refreshing treat that’s perfect for any occasion. The magic lies in the ingredients and tools you use. Freshness and quality are key to achieving that iconic flavor and texture.
Fresh Citrus Elements
Bold citrus flavors come from fresh lime zest and juice. These elements provide the tangy kick that balances the sweetness. Always zest before juicing to capture maximum flavor.
Sweetened Condensed Milk and Heavy Cream
Sweetened condensed milk adds richness and sweetness, while heavy cream creates a smooth, creamy texture. Together, they form the base of this no-churn dessert. The fat content in heavy cream ensures a luxurious mouthfeel.
For the crust, graham cracker crumbs, butter, and brown sugar combine for a crunchy contrast. This layer adds depth and texture to every bite.
Nutritional Insights
Each serving packs a flavorful punch while offering nutritional benefits. With 259 calories per serving, this treat is a balanced indulgence. The nutrition profile includes essential vitamins like A and C, making it a guilt-free dessert option.
Essential Equipment
- An electric mixer ensures smooth blending of ingredients.
- A sturdy bowl is necessary for mixing and preparation.
- An ice cream maker (optional) can enhance the texture if you prefer a churned version.
For more tips on no-churn desserts, check out this easy no-churn ice cream guide. With the right ingredients and tools, you’re ready to create a dessert that’s both impressive and delicious.
How to Create a Perfect key lime ice cream recipe

Transform your dessert game with a homemade treat that’s both creamy and tangy. This no-churn dessert combines the zesty flavor of citrus with a smooth, rich texture. It’s a delightful twist on the classic key lime pie, perfect for any occasion.
Step-by-Step Culinary Process
Start by preparing the graham cracker crust. Combine crushed graham crackers, melted butter, and a touch of sugar. Press this mixture into the bottom of a container to create a firm base. Bake for 10 minutes to set the crust.
Next, mix the ice cream ingredients. In a large bowl, beat sweetened condensed milk, heavy cream, and cream cheese until smooth. Add fresh lime zest and juice for that signature tangy flavor. The mixture should be creamy and well-combined.
Layer the crust and ice cream mixture in the container. Start with a layer of crust, followed by the creamy mixture. Repeat until all ingredients are used. This layering technique ensures every bite is packed with flavor and texture.
Detailed Assembly and Freezing Tips
Freezing is crucial for the perfect texture. Place the layered dessert in the freezer for at least 8 hours or overnight. This allows the flavors to meld and the mixture to set properly. Patience is key to achieving a creamy, indulgent treat.
Before serving, let the dessert sit at room temperature for 5-10 minutes. This makes it easier to scoop and enhances the flavors. For a richer experience, try adding a dollop of whipped cream or a sprinkle of lime zest.
For more tips on creating the perfect no-churn dessert, check out this ideal milk ice cream recipe. It’s a great way to explore new flavors and techniques.
No-Churn vs. Traditional Churned Methods

Ever wondered how to make a creamy dessert without the hassle of traditional methods? Whether you prefer the simplicity of a no-churn approach or the rich texture from an ice cream maker, both techniques have their unique benefits. Let’s explore which method might suit your lifestyle best.
Advantages of a No-Churn Approach
The no-churn method is perfect for those who want a quick and easy dessert. It eliminates the need for constant stirring or tempering a custard base. Simply mix sweetened condensed milk, heavy cream, and fresh citrus, then freeze. This method saves time and effort, making it ideal for busy home cooks.
Using an Ice Cream Maker for That Extra Creaminess
If you’re after a smoother, more luxurious texture, a traditional churned method with an ice cream maker is the way to go. The machine churns the mixture, incorporating air for a lighter, creamier result. While it requires more equipment, the payoff is a dessert that feels truly indulgent.
Creative Variations and Serving Suggestions
Both methods allow for endless creativity. Add chunks of graham cracker for a crunchy twist or swirl in extra citrus zest for a tangy kick. Serve your creation with a sprinkle of crumbs or a wedge of fresh fruit to enhance the lime pie vibe. For more inspiration, check out this guide on no-churn desserts or explore simple ice cream recipes.
In summary, the no-churn method is quick and hassle-free, while using an ice cream maker offers a creamier texture. Both approaches have their appeal, so choose the one that fits your kitchen setup and lifestyle. Whichever you pick, you’re in for a delicious treat!
Conclusion
Creating your own homemade treat is both rewarding and delicious. Whether you choose the no-churn method or use an ice cream maker, this dessert offers a perfect balance of tangy and sweet flavors. The graham cracker crust adds a delightful crunch, making every bite unforgettable.
This recipe is versatile and allows for endless creativity. Experiment with garnishes like fresh lemon zest or whipped cream to enhance the experience. The use of heavy cream ensures a rich, creamy texture that’s hard to resist.
Making this dessert at home not only saves money but also lets you control the quality of ingredients. It’s a fun and easy way to bring a touch of homemade joy to any occasion. For more tips on using an ice cream maker, check out this helpful guide.
Ready to impress? Try this recipe today and share your unique twists. Enjoy the value of homemade cooking and the smiles it brings!
FAQ
Can I use regular limes instead of key limes?
Do I need an ice cream maker for this recipe?
How long does it take to freeze the mixture?
Can I add graham cracker crumbs for a pie-like twist?
Is sweetened condensed milk necessary?
How can I make this treat dairy-free?
Can I store leftovers for later?
What’s the best way to serve this dessert?


